Customizing Status and Break Codes
You can create status and break codes that agents use to indicate when they are taking breaks or when they only manage certain types of interactions. You can also regulate how many or what percentage of agents can be on a break at the same time.
Tip: Use break codes such as 10 minute break, lunch, training, etc. The use of break codes can be monitored in the Real-time Statistics window.
Table of Contents
- To Access Break Codes
- To Create a New Break Code
- To Delete a Break Code
- To Enable or Disable the Custom Call Tab on the Pause/Resume Screen
- To Enable or Disable the Agent Browser Tab on the Pause/Resume Screen
- To Create a New Custom Status
Note: Read the tutorial about break codes here.
To Access Break Codes
- From the VCC Live menu, select Contact Center > Break Codes.
To Create a New Break Code
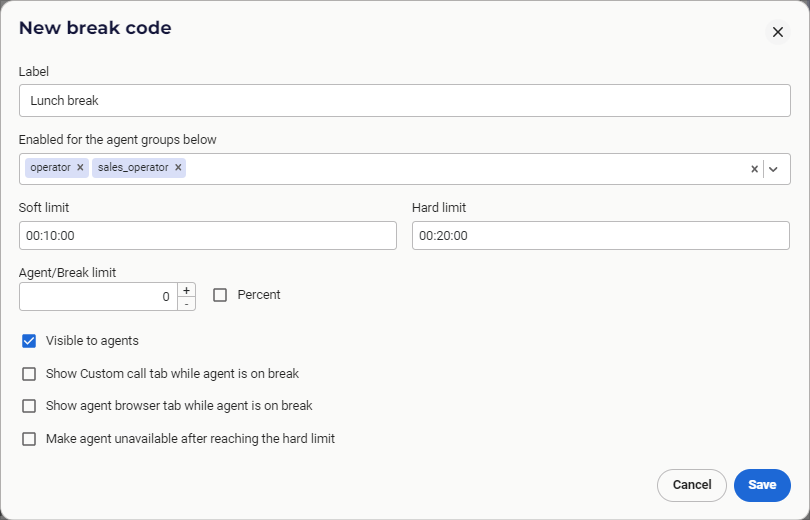
- From the VCC Live menu, select Contact Center > Break Codes, then press New break code.
- Enter a name in the Name text field.
- Select one or more agent groups for which you wish to create the break code.
- Mark the Visible to agents checkbox to make the break code visible.
- Set the soft and hard limits.
- Set the agent and break limit.
- Press Create.
Note: Break codes can be assigned to User Right Groups.

To Delete a Break Code
- From the VCC Live menu, select Contact Center > Break Codes.
- While keeping your cursor over a break code, press
.
- Press Yes.
To Enable or Disable the Custom Call Tab on the Pause/Resume Screen
- From the VCC Live menu, select Contact Center > Break Codes.
- Select a break code.
- Mark or unmark the Show Custom call tab while agent is on break checkbox.
Note: The agent must be granted access to the Custom call user right. See Managing User Right Groups.
To Enable or Disable the Agent Browser Tab on the Pause/Resume Screen
- From the VCC Live menu, select Contact Center > Break Codes.
- Select a break code.
- Mark or unmark the Show agent browser tab while agent is on break checkbox.
Note: At least one URL must be added to the agent browser. See Adding Web Pages for Agents.
To Create a New Custom Status
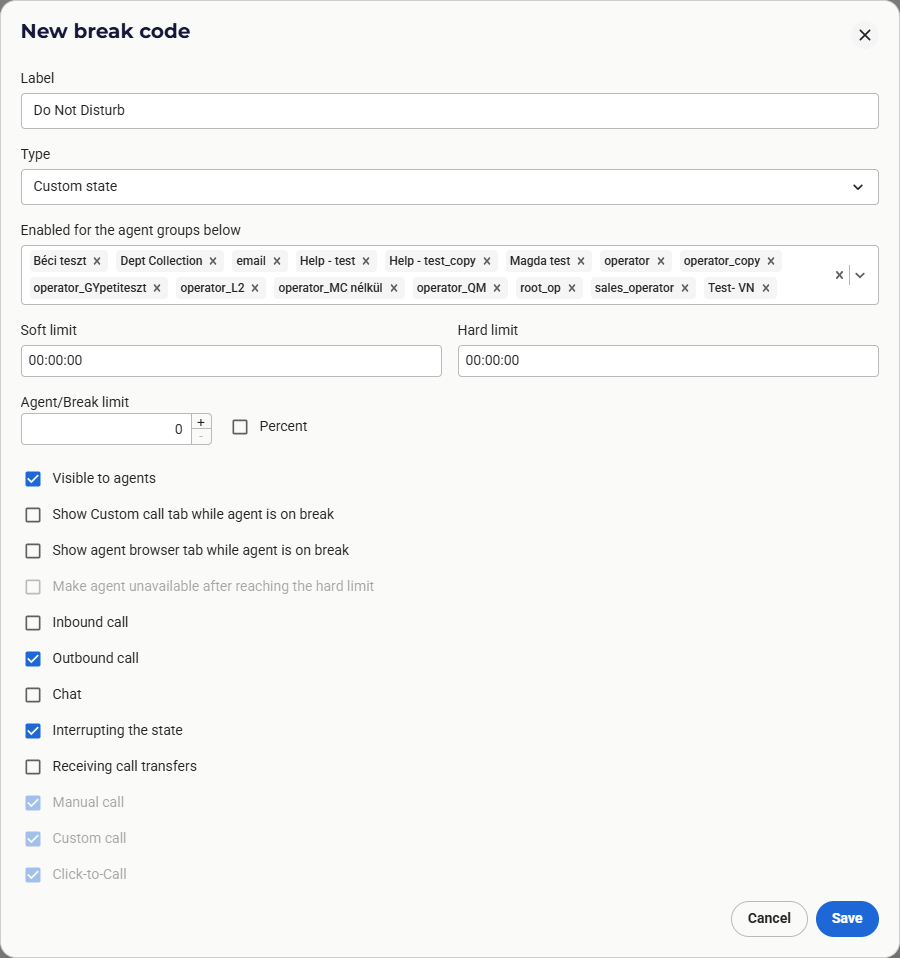
- From the VCC Live menu, select Contact Center > Break Codes, then press New break code.
- Enter a name in the Name text field.
- In the Type field select Custom state.
- Select one or more agent groups for which you wish to create the break code.
- Mark the Visible to agents checkbox to make the break code visible.
- Set the soft and hard limits.
- Set the agent and break limit.
- Select what type of interactions can agents manage in this status: Inbound call, Outbound call, Chat, Call transfers
- Select whether interrupting this state should result in the agent returning to this state or not
- Press Create.

Related articles
There's always more to learn. Discover similar features by visiting related articles:


Comments
Can’t find what you need? Use the comment section below to connect with others, get answers from our experts, or share your ideas with us.
There are no comments yet.