


You can send and receive email messages. There are options to send both personalized mass emails and disposition-triggered emails.
Note: This article describes only the basic settings of the Email feature. For more in-depth guides, check out our Email tutorials.
Table of Contents
- View the Email Log
- Modify Generic Email Settings
- Set up an Inbound Email Account
- Modify Disposition-Triggered Email Settings
- Set up an SMTP Email Account
- Upload Email Attachments
- Mass Email
- Set up a Mass Email Function Account
- Modify Mass Email Settings
- Email Templates
- Create an Email Template
- Test an Email Template
- Activate or Inactivate an Email Template
- Delete an Email Template
- Auto-reply
- Set up Automatic response
- Include CC in reply
- Record and Ticket Handling
- Allow or Prevent Agents from Adding New Contacts
- Automatic Record Creation
- Automatic Record Creation and Ticket Assignment
- Automatic Ticket Creation
- Display ticket ID in subject
- Queues
- Set up an Email Queue
- Automatic Language Detection for Emails
- Enable Email Language Detection
View the Email Log
- Read about viewing email logs in the Email Log section.
Modify Generic Email Settings
- Select a project from the project list, then select Channels > E-mail.
- Confirm the desired settings.
- Press Save.
Set up an Inbound Email Account
- From the VCC Live menu, select Contact Center > Global Settings.
- Select the Email accounts tab.
- Press New account. Enter a name for the account.
- From the Protocol drop-down list, select Email forwarding
- In the Project drop-down list, you can choose which project your inbound emails should be routed to.
With this setup, you will see an auto-generated email address. To receive inbound emails in VCC, use this email address in your platform to forward emails to.
Modify Disposition-Triggered Email Settings
- Select a project from the project list, then select Channels > E-mail.
- Press
 to see your email templates list, then select a template.
 - Select the Disposition-triggered email sending tab, then set the desired settings. The system adds the selected dispositions to each record based on the response.
- In the Dispositions pane, mark the checkbox beside one or more dispositions. When agents use these dispositions, the email is sent automatically.
- Press Save.
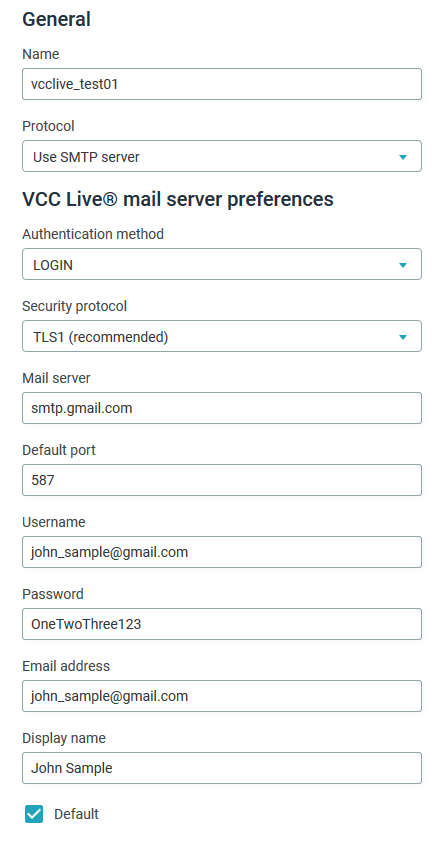
Set up an SMTP Email Account
Instead of using VCC Live’s mailing server, you can choose another SMTP server to handle your email-sending duties. In this example, we will show how to sync your account with your email client.
- From the VCC Live menu, select Contact Center > Global Settings.
- Select the Email accounts tab.
- Click on the “…” icon, and then select the New account option.
- From the Protocol drop-down list, select Use SMTP server
- Enter the details in the following fields:
- Authentication method: LOGIN
- Security protocol: STARTTLS
- Mail server: Your mail server address, for example: smtp.office365.com or smtp.gmail.com
- Default port: 465 or 587 (which one is authorized)
- Username: Your email address
- Password: your email password or, in Google’s case, the 16-character password generated for VCC Live by Google’s App passwords
- Email address: Your email address
- Display name: the name that appears to your customers when they receive an email from your agents
- Default: By marking this checkbox, you set this account as your default sender account.
- Press Save
Note: Similarly to other types of email accounts, you can create multiple SMTP accounts for sending email messages.
Note: You can also set up OAuth 2.0 authentication for emails, read about it here.
Upload Email Attachments
When creating an email template, you can also define which attachments you want to add to your messages. Once you upload your files to your Attachments tab, you can access and apply them for setting up email templates.
For in-depth instructions about this feature as well as to learn how to set up dynamic email attachments, see our Email Attachments tutorial.
- Select a project, then select Channels > E-mail.
- Select an email template.
- Select the Attachments tab.
- Press Upload attachment, navigate to the file you want to use, press Open, then press Finish.
- Tick the ballot box with a checkmark in the Active column. The selected attachment(s) will be automatically added to the active email template.
Tip: Besides attaching, you can also embed images in your email templates.
To do so, follow the instructions above until Step 4, then click on the icon found in the Copy URL column. The image URL is then copied to your clipboard, which you can insert in your email template with the Insert > Image… options.
When uploading your files, there are a few system limitations to keep in mind:
- It is not possible to upload files of the following formats: com, bat, exe, dll, vbs, scr, pif, lnk, sh, js, msi
- Your chosen file’s name should be different than already existing filenames in the Attachment section.
- The maximum file size limit for uploads is 5 MB.
Mass Email
Set up a Mass Email Function Account
- From the VCC Live menu, select Contact Center > Global Settings.
- Select the Email accounts tab.
- Press New account.
- Enter a name for the setting.
- Select Mass email from the Protocol drop-down list.
- Enter your email address and domain, then press Save.
- The Domain settings pane appears, displaying 3 DNS records (2 TXT record type, 1 CNAME record type). The following field values must be set on your domain: name, record_type, and value.

- Once you have finished, please let your contact person at VCC Live know. Your credentials must be validated on our end.

Modify Mass Email Settings
For in-depth instructions about this feature, see our Mass Emails tutorial.
- Select a project from the project list, then select Channels > E-mail.
- Press to see your email templates list, then select a template.
- Select the Mass email tab.
- Set the desired settings. The system adds the selected dispositions to each record based on the response.
- Press Save.
Email Templates
Create an Email Template
- Select a project from the project list, then select Channels > E-mail.
- Press New email template.
- Enter the name of the template in the Template name text field.
- Enter a subject.
- Enter an email address or select a database field in the Recipient drop-down list to set the recipient.
- Enter one or more email addresses in the CC and BCC text fields if required.
- Enter or select an email address from the Sender drop-down list. This address is displayed as the sender to the recipient.
- If it is not marked, mark the Active checkbox.
- Select the Message tab, then enter and format the desired message, or enrich it with an image and video.
- Select the Attachments tab to insert an attachment.
- Press Save.
Test an Email Template
- Select a project from the project list, then select Channels > E-mail.
- Press to see your email templates list, then select a template.
- On the General tab, enter an email address in the text box beside the Save and send test email button, then press the button.
Activate or Inactivate an Email Template
- Select a project from the project list, then select Channels > E-mail.
- Press to see your email templates list, then select a template.
- Mark or unmark the Active checkbox.
- Press Save.
Delete an Email Template
- Select a project from the project list, then select Channels > E-mail.
- Press to see your email templates list.
- Hover your mouse over the template you want to delete, then press .
Auto-reply
Set up Automatic response
- Select a project from the project list, then select Channels > E-mail.
- Select the Automatic response menu.
- Select the email template that you would like to send as a reply when an email is received. If the email template includes variables from the customer record, then it will be only replaced properly if Automatic record creation is set to System.
Include CC in reply
- Select a project from the project list, then select Channels > E-mail.
- Select the Include CC in auto reply.
- When selected, the autoreply will include the CC from the original incoming email. When not selected, the reply will only be sent to the sender.
Record and Ticket Handling
Allow or Prevent Agents from Adding New Contacts
- Select a project from the project list, then select Channels > E-mail.
- Select the Enable agents to create new records menu.
- Select Manually to allow agents to manually create new records or Disabled to prevent the addition.
Automatic Record Creation
- Select a project from the project list, then select Channels > E-mail.
- Select the Enable agents to create new records menu.
- Select Automatically. If a new email arrives and there is a single match for the sender’s email address in the database, then the email is automatically assigned to that record. If there is no match, then a new record is created. If there are multiple matches, then the agent can select from them.
Automatic Record Creation and Ticket Assignment
- Select a project from the project list, then select Channels > E-mail.
- Select the Enable agents to create new records menu.
- Select System. If a new email arrives and there is a single match for the sender’s email address in the database, the email is automatically assigned to that record, and a new ticket is created. If there is no match, then a new record is created with a new ticket. If there are multiple matches, then the system assigns the email to the latest record, and a new ticket is created for it.
Note: With this setup, emails are automatically converted to tickets and are not assigned to an agent. In this scenario, it is recommended that Shared ticket handling is turned on.
Automatic Ticket Creation
- Select a project from the project list, then select Channels > E-mail.
- Select the Automatic ticket creation checkbox. When selected, agents don’t need to populate ticket data manually. Still, a new ticket will be created for each new email for a customer record (if it’s not a reply to a previous ticket), where the ticket’s title will be populated with the email’s subject.
Display ticket ID in subject
With this optional functionality, it is possible to change whether the VCC Ticket Number is involved in an email’s subject when the agent and the customer reply to each other. When it is included, the email is added to the ticket using this part of the subject. When it is turned off, the Ticket Number is not involved in the email’s subject when the agent replies, but the customer’s reply will still be allocated to the right ticket. The functionality is turned on by default.
Queues
You can assign agents to queues, and also customize how the system distributes emails to agents, including which agent should be prioritized.
Set up an Email Queue
- Select a project, then navigate to Email > Queues tab.
- Press Create New
- Enter a name, then select a language
- Set up the SLA time and add Timestrips to your queue.
- Press Save
Once you have created your Email queue, you need to assign agents to this queue. This can be done by following the steps below:
- Select a project from the project list, select Agents, then select the Queues & Skills tab.
- Select a level in the Email queue column. The name of the column is the name of the Email queue.
- Press Save.
Automatic Language Detection for Emails
The Automatic Language Detection function can automatically detect the language of incoming email messages and direct that email to the selected queue.
Enable Email Language Detection
- Select a project from the project list, then select Channels > E-mail.
- Mark or unmark the Email language detection checkbox.
- In your Queues select a Queue and select the desired language in the Language section so that emails detected in that language are directed to the selected queue immediately.
The Language column will display the detected language of the emails on the following interfaces:
- Agent Workspace’ Email interface
- Admin Workspace’ Email Log — You can also filter emails by language.
Note: If the detection fails, the Language field will be blank.
Related articles
There's always more to learn. Discover similar features by visiting related articles:
Comments
Can’t find what you need? Use the comment section below to connect with others, get answers from our experts, or share your ideas with us.
There are no comments yet.