Agent Workspace in HubSpot
This is VCC Live’s documentation on the VCC Live plugin that can be integrated into HubSpot.
This document covers all features and functionality that come with VCC Live for HubSpot, enabling a more fluent user experience and effective workflow while using HubSpot with VCC Live.
Table of Contents
- 1. EULA
- 2. Sign In
- 3. Project Selection Screen
- 4. The Layout of VCC Live for HubSpot
- 4.1 Phone
- 4.1.1 Transferring a Call
- 4.1.2 Agent Statuses / Breaks
- 4.2 History
- 4.3 Settings
- 5. Navigation
1. EULA
Before your first use of VCC Live for HubSpot, you need to read and accept the End User License Agreement. If you have done so, press Accept & Continue.
If you have any questions regarding VCC Live’s EULA, please contact our Customer Care Team.
2. Sign In
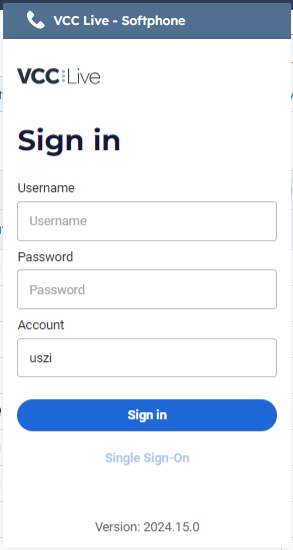
On the login screen, you need to submit your username, password, and account name for authentication to access your data.

3. Project Selection Screen
The project login screen allows you to select one primary project and one or more secondary projects. When you select secondary projects, you will receive calls from those projects as well.
TIP: Once you have selected a primary project, you can quickly select or deselect all the other projects on your list as secondary projects with this dedicated button:
4. The Layout of VCC Live for HubSpot
When you log in to VCC Live for HubSpot, there are four tabs you can use to navigate your way in the app. These are:
- Dialer
- Phone
- History
- Settings
Let’s take a look at what each of these screens can do.
Note: The Dialer tab only displays whether you are in predictive or manual dialing mode.
4.1 Phone
The Phone screen is the main work area of VCC Live for HubSpot. Here you can manage calls that are initiated by the power/predictive dialer, or accept incoming calls. When accepting an incoming call, the project and queue name appear with the call, making it clear to the agent where the incoming call belongs to.
While handling a call, the actions listed below are available:
- Mute or unmute yourself
- Put the call on hold
- Transfer the call
- Set a disposition (In case of a callback disposition, you can set the time and date of the callback.)
- Take notes
Note: It is possible to initiate calls using phone numbers from the HubSpot interface (Click-to-Call) or by entering phone numbers manually. In such cases, these calls are considered as custom calls and do not require to have a disposition when the call ends.
To use VCC Live for HubSpot, ‘New records handling’ in the selected projects need to be set as ‘Automatic’ or ‘Automatic – Looking up Records’.
When the call ends, you still have the option to set the disposition and take notes in the Afterwork status – this works the same way as in the standalone VCC Live application.
The Phone screen has 3 tabs: the Keypad, Extensions, and Agents tab.
On the Keypad tab, you can manually enter a phone number, using either your PC’s keyboard or the virtual keypad on the screen.
On the Extensions tab, you select one of the extensions from the list and transfer the ongoing call to that extension.
On the Agents tab you can select one of the available agents from the list and transfer the ongoing call to that agent.
4.1.1 Transferring a Call
While you are on a call, you can transfer a call by clicking on the Call transfer icon:
The Transfer call to… window then appears, which works similarly to the Phone tab.
Here you can:
- Transfer the call to a number you dial in
- Transfer the call to an extension number
- Transfer the call to another agent
- Transfer the call to a queue
- Transfer the call to a phone number in the phone book
In all of the above cases, you can use the search function too.
When transferring the call to another agent, you can decide to either use the attended transfer or the blind transfer option:
Attended transfer means that before transferring the call, you can talk to the other agent and discuss whether they can accept the transfer.
Blind transfer means that the call is transferred to the other agent instantly, without discussing it beforehand.
Once the transfer takes place, you can set a disposition to the call in the Afterwork part.
Note: Agents are able to transfer a call to any queue that belongs to a project that they are logged in as either primary or secondary. Transferring to a queue is possible without an agent being currently available to receive a call in it.
4.1.2 Agent Statuses / Breaks
Agent statuses / break codes represent non-work-related periods of time, such as lunch breaks or coffee breaks. Using these statuses allows agents to leave their workstations, but still have their time tracked and measured, so supervisors can plan projects accordingly.
To choose a break code from the agent interface, follow these steps:
- Click the arrow button on the top of the plugin
- Select a break code from the drop-down menu
- Once your break is over, resume work by clicking on the arrow button again, and select Available.
4.2 History
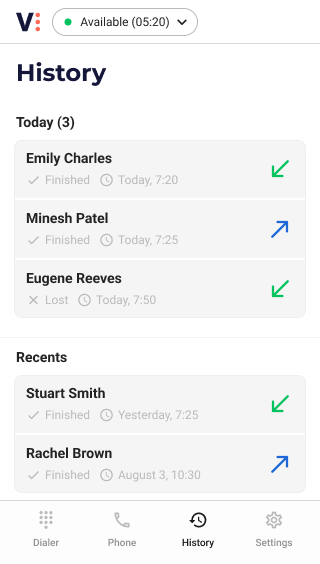
The History screen lists all inbound and outbound calls you had in the past. The list includes additional information regarding the call event, such as: set disposition, callback time and date.
The direction of the call is indicated by the small arrow next to the log entry:
- The blue arrow indicates an outbound call
- The green arrow pointing in the opposite direction, indicates an inbound call

The History screen also groups your call log based on the time it took place. For example, you can see the calls you made earlier that day in a separate group from the other calls that were handled earlier than that day.
The History screen loads the last 50 history logs on the screen. If you need to see more, then by pressing the “Load more” button you can see more call logs. The History refreshes itself every few seconds, so it makes sure your History section is always up-to-date.
Note: Call History only appears for the Agents when they have the right to view the CDR Log functionality.
4.3 Settings
In the Settings screen, you can adjust your Audio settings or visit the General and About sections.
- The system detects the available microphones and speakers installed on your computer. In the Audio settings section you can select the microphone and speakers you want to use. You can select a secondary speaker as well, that will be used to play a ringing sound when you receive an inbound or dialer call
- In the General settings, you can change the language of the solution or select to minimize the Plugin when the call starts.
- The About section includes the End-User License Agreement and general information about VCC Live.
Note: To see your microphone listed in the above drop-down, you have to allow your browser to use it when you first open the VCC Live in your browser.
5. Navigation
VCC Live for HubSpot is designed to meet the most popular navigational patterns and user behaviors.
Here is a list of handy features we implemented in VCC Live for HubSpot to provide you with a smooth, seamless workflow with VCC Live.
-
Click-to-call: When clicking on a phone number in HubSpot, VCC Live automatically recognizes the phone number format and starts dialing the number.
-
Customer profile: When a new call is established, whether it be an incoming or outbound one, then the customer’s profile loads automatically (Note: Only if the customer’s number is registered in the HubSpot database)
-
Exit project: To exit the project you are currently logged into, click on the small arrow in the Agent status selection pane, and select Exit project from the drop-down list. This action takes you to the project selection screen.
-
Log out: To log out from the project entirely, select the Log out action on the project selection screen.


Comments
Can’t find what you need? Use the comment section below to connect with others, get answers from our experts, or share your ideas with us.
There are no comments yet.