Handling Emails and Tickets
VCC Live helps agents handle queries in a centralized ticketing system by converting customer emails into support tickets.
Table of Contents
- Notification Badges
- Emails and Tickets
- To Access Emails and Tickets
- To Create a New Ticket
- Handling Tickets
- To Reply to an Email
- To Transfer an Email to another Queue
- Additional Omnichannel features
- Color Coding
- Filtering Tickets
Notification Badges
You can see the number of new emails and open tickets by glancing at the email icon on the taskbar.
Emails and Tickets
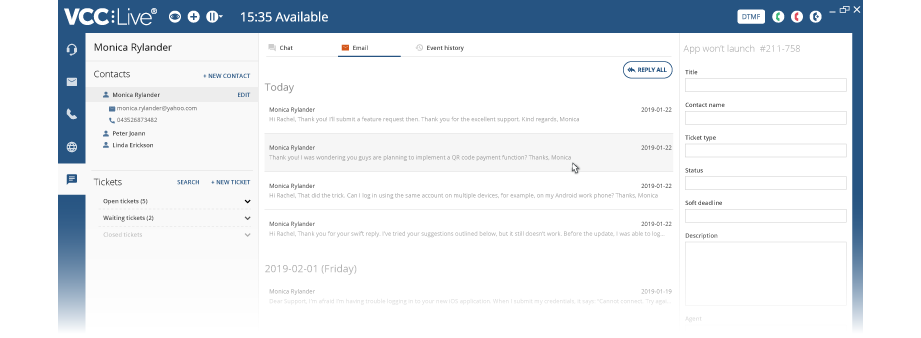
The emails and tickets interface lists all new inbound emails, ongoing tickets, and tickets awaiting your response. You can assign a new email to a new or already existing client and open a ticket for the query, or create a new ticket from scratch.
| name | description |
|---|---|
| Inbound emails | New emails. |
| Open tickets | Ongoing tickets awaiting a reply from the agent. |
| Waiting tickets | Ongoing tickets awaiting a reply from the customer. |
To Access Emails and Tickets
- Press
on the taskbar to open the email and ticket lists.
- Press
to view the spam folder, or press
to refresh emails and tickets.
To Create a New Ticket
- Press
to create a new ticket, or select a new email.
- If you want to assign the email to an existing client, use the Search for records pane to search for a record, and then select the customer. If you want to assign the email to a new client, use the Create new record pane, and fill in the required information, then press Create.
Handling Tickets
When you open a ticket, you can view all the information related to the client, for example, contact details, other tickets assigned to the client, chat and email threads, and the event history.
To Reply to an Email
- Once the email and ticket interface is open, select an email.
- Enter the subject, compose your message, then press Send.
To Transfer an Email to another Queue
Many times, agents handle incoming emails received to a general email address. These emails need to be transferred to a specific group of agents who can handle a certain type of issue. If the related package is activated, agents can transfer emails to queues. After forwarding, the email will appear only to those agents who have been added to the selected queue. Please remember that only agents who are granted this right can perform this action.
Here is how it works:
- If there is an incoming email, a ‘Transfer‘ button appears next to it.
- Selecting this button the agent can choose a queue from a list, where the emails should be transferred.
Additional Omnichannel features
Custom fields: Custom fields can be used in emails and email templates. These are Alias, Signature, Free text #1, Free text #2.
Please note, that except for ‘Alias’, there is a limit of 1000 characters for these fields.
Record identification: In case of inbound or outbound phone calls (records), when opening a new ticket, the record is identified right away, and appears for the ticket. This is handy for agents as they don’t have to look up phone numbers manually.
Ticket number as variable: Ticket Number can be used as a variable in email templates. This makes it easier to communicate with your customers.
Saving ticket data: Filling a script can be saved for a ticket, that appears also in the customer’s history. All field values that are entered in a script are saved in the event history.
Indexed fields in the database: Indexed fields can now appear in the database, too. Based on your specific settings set up by VCC Live, you can find your indexed fields in the database (found at project> Database> Fields). These fields also appear in the Ticket list interface (e.g., name, phone1, phone2, etc.). They appear as new columns, and they are included in your exports from this interface. To enable this feature, please contact our Customer Care Team or your KAM contact person.
Optional provision of phone fields: Filling the phone field is not mandatory in case of emails and chats.
Color Coding
Entities in the email and ticket list also appear with color codes, indicating their importance and thus providing alert information based on their respective SLA values. The color codes appear in front of the tickets and emails.
An orange color code indicates if the entity’s deadline or SLA is due in 1 hour.
Filtering Tickets
Agents can filter their ticket list by:
- Agent
- Project
- Ticket Type
- Status
- Queue
This applies to both Open Tickets and Waiting Tickets individually for the most flexibility.
Filters can be used in any configuration. For example, you can filter for assigned agents, specific projects, and specific ticket types simultaneously, applying all of the conditions (AND the logical operation is applied).
When a filter is applied, it will be highlighted with a red filter icon. Once an agent applies a filter and opens a ticket, the filter will remain active when they return to the previous view. The filters will only be cleared when the agent completely exits the system.


Comments
Can’t find what you need? Use the comment section below to connect with others, get answers from our experts, or share your ideas with us.
There are no comments yet.