Managing Fields
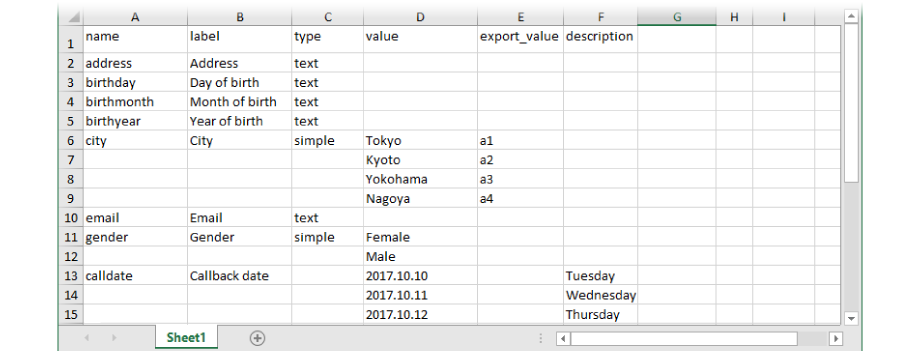
Fields contain the database column names and are created automatically when you import a database file. You can also import them manually. The system automatically adds unique ID numbers to each field.
Table of Contents
- Field Categories
- Field Types
- To Import Fields
- To Manually Create a New Field
- To Modify Field Type (Text, Simple, Multiple)
- To Add a Single Value to a Field
- To Add Multiple Values to a Field
- Other Settings
Field Categories
| Field category | Description |
|---|---|
| System field | A default, system-generated field. |
| Project field | A manually-created or imported field. |
| Index field | Any index field inserted as the first column in a database update file. It tells the system which records you want to update. |
Field Types
| Field type | Description |
|---|---|
| Text | This type of field can contain alphanumeric characters, for example, the record’s name or address. |
| Simple | This type of field can contain multiple items (alphanumeric characters), but the agent can only select a single item. |
| Multiple | This type of field can contain multiple items (alphanumeric or numeric characters), and the agent can select more than one item. |
To Import Fields
- Select a project from the project list, then select Database > Fields.
- Select Actions > Import fields and values.
- An import wizard window pops up. Navigate to the CSV or TXT file you want to import and select it. Press Open.
- Press Next, then press Finish.
Note: A field import file must contain name, type, and value column names.
To Manually Create a New Field
- Select a project from the project list, then select Database > Fields.
- Select Create new field.
- Enter the Unique identifier.
- Enter the Label. This is the field name that the agent will see.
- Select a field type in the Type drop-down list.
- Press Create field.
To Modify Field Type (Text, Simple, Multiple)
- Select a project from the project list, then select Database > Fields.
- Select an existing field, then select a field type in the Type drop-down list.
- Press Create field.
Note: When using a multiple-value type field in a script, it needs to contain a control that allows for the selection of multiple values. Read about controls you can add in the Types of Controls section.
To Add a Single Value to a Field
- Select a project from the project list, then select Database > Fields.
- Select an existing field, then select One value tab in the right column.
- Enter a name for the value in the Name text field.
- Enter an Export value. When you export the fields database, this will substitute the field values.
- Enter a Description, Agent commission and Call center commission.
- Press Add values.
To Add Multiple Values to a Field
- Select a project from the project list, then select Database > Fields.
- Select an existing field, then select the Multiple values tab in the right column.
- Enter a value name and export value, separated by a vertical bar character. Enter the next value in the next line.
- Press Add values.
Tip: Using export values can be beneficial when you use complete words as a field value, but export the fields into a database that, for example, cannot handle characters with accents.
Other Settings
| Setting | Description |
|---|---|
| Indexed | Marks the field as indexed. Enable only if you wish to use the database field for skills-based routing, quota tools, database updates, or make it searchable in the records list. Up to 25 fields can be marked as indexed. |
| Include in CDR log as | If enabled, the field and the field’s values will be included in the CDR log. Up to 10 fields can be included in the CDR log. |
| Personal data | If enabled, the field’s values will be anonymized when the anonymization is due. You can set up the timing of anonymization at the Project’s General settings page. The timing will consider the days that passed since the record was imported to the database. |
| Statistics field | If enabled, the marked field’s numeric content will appear in User-based statistics. Results will appear in agent, time, and project dimensions. The field’s value can also be used in Custom KPI editor for crafting new KPIs. If other projects include a statistic field with the same name and label, then the results will appear in the same KPI column. If you mark a field as a Statistics field, data will be only displayed in the User-based statistics starting from the time when you have switched it on. |
Note: Read more about how you can manage KPIs in User-based statistics here. You can also check out how to create Custom KPIs here.


Comments
Can’t find what you need? Use the comment section below to connect with others, get answers from our experts, or share your ideas with us.
There are no comments yet.