


Getting Started with Chat
Estimated reading time: 17 minutes | Target users: Supervisors, Agents
VCC Live Chat allows you to extend your various means of communication with an instant messaging function. You can integrate VCC Live Chat both to your website and to the Facebook page of your business. When a visitor sends you a message, agents can instantly respond from within the VCC Live application.
In this lesson, you will learn:
- How to set up VCC Live Chat for your website and Facebook page
- How to customize the appearance of the VCC Live Chat widget
- What are some of the most important settings for your Agents
- What are Chat queues and how to adjust them
- How agents can use the chat
1. Setting up VCC Live Chat for Your Website
To configure the integration of VCC Live Chat to your website, this tutorial will help you to set up everything from basic settings to more customized solutions, covering the essential features of VCC Live Chat to provide a seamless customer experience and an efficient means of communication for your business.
For more details on how to integrate VCC Live Chat with Facebook Messenger, see 5. Facebook Integration
1.1 Embed VCC Live Chat to your website
To implement VCC Live Chat, you need to embed a section of code from the VCC Live desktop application to the source code of your website.
- Select a project from the project list, then select Channels > Chat.
- Select the Web chat tab.
- Copy the content from the Code to insert on your website field to your website.
Note: You may need to contact your webmaster to add the code to your website
1.2 Send Chat Transcript via Email
Once the agent closes the conversation, the system automatically forwards the conversation contents to the email address of your choice. This feature functions as a conversation history for your Chat conversations.
- Select a project from the project list, then select Channels > Chat.
- Select the General settings tab.
- Enter an email address in the Send chat transcript via email to.
- Press Save.
1.3 Customize Auto-Messages and Replies
You can create customized messages that would appear to your customers when they interact with the chat function on your website.
1.3.1 Customize Chat Greeting
Compose a personal message for your website visitors when they open the chat window. This would help your visitors to establish a more engaging user experience.
- Select a project from the project list, then select Channels > Chat.
- Select the General settings tab.
- Enter your chat greeting in the Chat greeting text field. When your website visitor opens the chat, the greeting is displayed.
- Press Save.
1.3.2 Auto reply (no available agents)
If your website visitor sends a message when there are no agents available, this message will appear as a reply, indicating that starting a chat conversation is not possible at the moment.
- In the same General settings, enter your message in the Auto reply (no available agents) text field.
- Press Save.
1.3.3 Auto message (agent left the chat)
If the agent leaves the conversation or the connection is interrupted, this message will appear in the Chat window.
- In the same General settings, enter your message in the Auto message (agent left the chat) text field.
- Press Save.
1.3.4 Enable or Disable Automatic Pop-Ups After a Time Delay
You can adjust a timeframe to define how many seconds after a visitor opens your website should the chat window appear.
- In the Web chat, mark or unmark the Pop up chat window in (sec) checkbox.
- Enter a value in the text field. Minimum value: 1 second, maximum value: 3600 seconds, default value: 15 seconds.
- Press Save.
1.3.5 Reopen Closed Chat Widget in (min)
You can adjust a timeframe to define how many minutes after the visitor closes the chat widget should the chat window reappear.
- In the same Web chat, mark or unmark the Reopen closed chat widget in (min) checkbox.
- Enter a value in the text field. Minimum value: 1 minute, maximum value: 1440 minutes, default value: 10 minutes.
- Press Save.
Note: If the pop-up chat window in (sec) is disabled, the chat widget only appears when the website visitor selects the button. If the function is enabled, the chat widget will only appear if there are available agents.
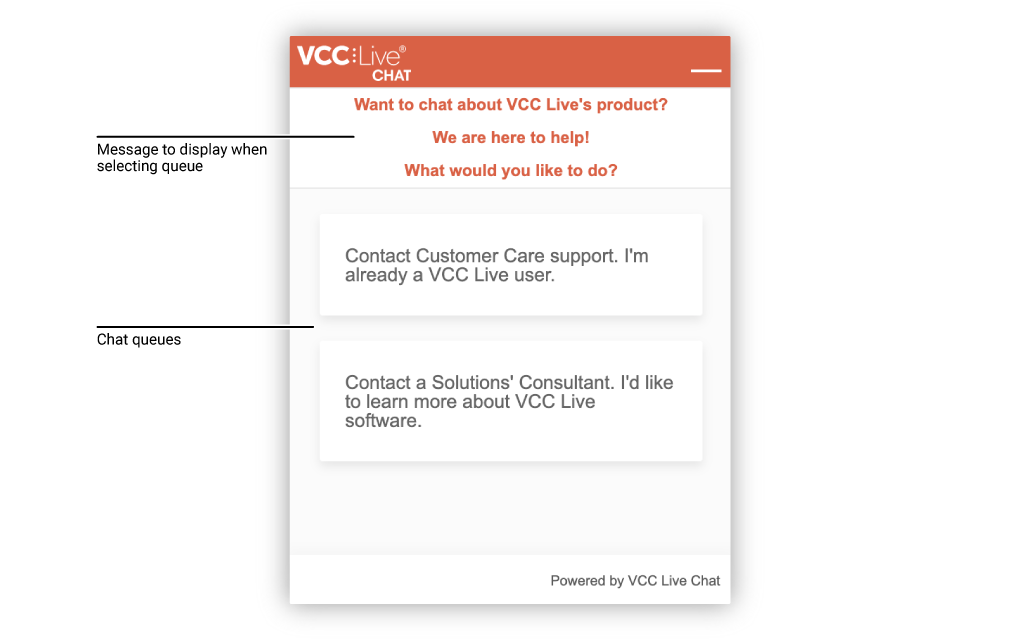
Note: You can specify a message to display in the chat when the website visitor chooses a queue. To enter the message, select the General settings, then enter your message in the Message to display when selecting queue text field.
2. Customizing Chat Widget Appearance
You can personalize the look of your VCC Live Chat widget with custom colors, a unique widget logo, and Chat button label, making it possible to reflect your company’s branding and image. Furthermore, you can adjust the pop-up behavior of the Chat widget.
2.1 Customize Chat Widget Head Font Color
- Select a project from the project list, then select Channels > Chat.
- Select the Web chat tab.
- Select the Header text color bar to invoke the color picker control.
- Select a color, or enter a HEX color code.
- Press OK, then press Save.
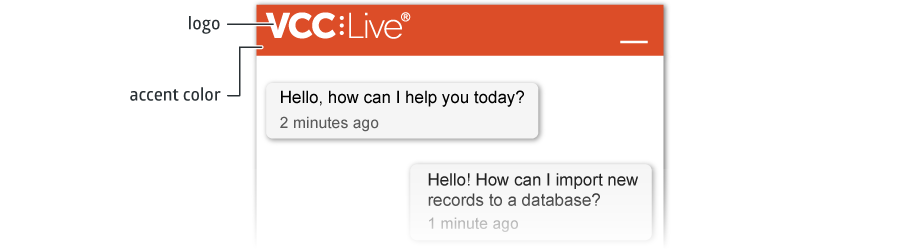
2.2 Customize Chat Widget Accent Color
- In the Web chat tab mentioned above, select the Accent color bar to invoke the color picker control.
- Select a color, or enter a HEX color code.
- Press OK, then press Save.
Note: The color picker control interface may vary depending on what operating system you are using.
2.3 Change Chat Widget Logo
To set up a Chat widget logo, it is recommended to use a PNG or SVG image with a transparent background. The optimal image resolution is 350 x 40 px. Any larger image will be automatically resized to 40 px height. The aspect ratio is preserved.
- In the same Web chat tab, insert a URL link to the logo you want to use in the Image URL.
- Press Save.
2.4 Change Chat Button Label
- In the same Web chat tab, enter a text in the Chat button label text field.
- Press Save.
3. Setting Up Agents
To optimize the workflow of your Agents and to gain insights about their performance, you can adjust various parameters to leverage their skills and productivity.
3.1 Limit How Many Chat Conversations an Agent is Allowed to Handle
- Select a project from the project list, then select Channels > Chat.
- Select the Web chat tab.
- In the Conversations per agent text field, enter the desired value. After entering a value, agents will be able to handle only several calls that do not exceed the number you have given.
- Press Save.
3.2 Set Expected Agent Response Time
The Expected Agent Response Time is a value that defines how fast an agent should reply to the most recent chat message. A chat-specific disposition is auto-allocated based on this given value.
Note: If this function is enabled when a chat conversation between an agent and client ends, the system will allocate a chat-specific disposition to the conversation. See Chat-Specific Dispositions.
Note: You can view the chat conversation history in the chat log. See Chat Log.
- Select a project from the project list, then select Channels > Chat.
- Select the General settings tab.
- Mark the checkbox beside Expected agent response time (sec)
- Enter the desired value. The value defines how fast an agent should reply to the most recent chat message. A chat-specific disposition is auto-allocated based on this given value.
- Press Save.
3.3 Closing Chat without Customer Assignment
If your agents cannot always identify which customer they had a chat session with, you can enable the possibility for agents to close a chat without assigning it to a record.
- Select a project from the project list, select Channels > Chat, then select the General settings tab.
- Select Close chat without being assigned to a customer
3.4 Closing Chat without Ticket Assignment
By default, agents need to assign all chat conversations to a ticket. If you don’t require this in your business processes, then you can disable it.
- Select a project from the project list, select Channels > Chat, then select the General settings tab.
- Select Close chat without being assigned to a ticket
3.5 Distribute chats to agents in call states
By default, the system only assigns a new chat to such agents in a queue who are in the Available state or in a custom state, where chat is enabled. If you want to permit agents to receive chats in call-related states (e.g., Call, Hold, Prework, Afterwork), then you can enable it. This could be useful if agents chat with the same customer as they are currently talking to on the phone.
- Select a project from the project list, select Channels > Chat, then select the General settings tab.
- Select Distribute new chat to agents in call-related user states
4. Chat Queues and Chat Transfer
Using Chat queues, you can configure how new chat messages are assigned to specific groups of agents. This allows you to more efficiently allocate your agents to chat messages based on their expertise, while also ensuring your clients get the answer they need.
For example, you can create chat queues for specific topics (e.g., “Technical support” and “Question about my order”) with each queue assigned to specific agent departments (e.g., Technical Support and Sales Support). Before your website visitors start a chat conversation on your website, they can choose the most relevant topic from a list — and their messages will be routed to one of the queues you specified earlier.
4.1 Create and Use Chat Queues
- Select a project from the project list, select Channels > Chat.
- Select the Queues tab.
- Enter a Name and Label for the new queue, for example “Technical Support”, then press Save. Your new chat queue is ready to use!
- To use chat queues, you need to assign the queues to agents on the Agents > Queues & Skills interface. See Assigning Agents to a Queue.
Note: You can specify a message to display in the chat when the website visitor chooses a queue. To enter the message, select the General settings tab, then enter your message in the Message to display when selecting queue text field.
4.2 Transfer Chat Conversations to Other Agents or Queues
Your website visitor may be routed to the wrong queue, for example, because the website visitor selected the wrong topic in the chat widget. In this case, your agent can transfer the website visitor to another chat queue or a specific agent.
You can either enable or disable this function for your agents by taking the following steps:
- Select a project from the project list, select Channels > Chat.
- Select the General settings tab.
- Mark or unmark the Transfer chat conversation checkbox. If marked, your agents assigned to this project will be able to transfer website visitors to other agents or queues.
5. Facebook integration
You can integrate VCC Live Chat with Facebook Messenger. This enables your Facebook page visitors and agents to communicate in real-time via a social platform they already know and love. When a visitor sends you a message via your Facebook page, agents can instantly respond from within the VCC Live application. Agents can see the visitor’s profile information as well as information about the page the visitor reached out from.
5.1 Integrate VCC Live Chat with your Facebook Page.
- Select a project from the project list, then select Channels > Chat.
- Select the Integration tab.
- Press Login with Facebook
- Enter your Facebook login credentials,
- Press Log in to sign in to Facebook.
- You will receive a prompt regarding information sharing and privacy settings. Select Okay.
- Facebook pages you manage will appear in the Facebook Messenger pane.
- Press Login with Facebook for the relevant Facebook page you wish to connect to your project.
Note: Only one Facebook business page can be connected to a project.
6. VCC Live Chat from the Agent Workspace
The Agent workspace for VCC Live Chat is available once the Agent receives an incoming message. As mentioned above, VCC Live Chat allows Facebook page and website visitors to communicate with Agents in real-time.
6.1 Manage Chat Messages
6.1.1 Access Chat messages
- When a website visitor contacts an Agent via chat, the chat interface automatically pops up in VCC Live.
- If a chat has been opened already before and you wish to enter it again, press the (
 ) on the taskbar to activate the chat worksheet.
6.1.2 Assign Conversation to a record
- Open the conversation.
- Select or Create a new record.
- Assign the conversation to the record.
6.1.3 View conversation History with a visitor
- Open the conversation.
- Expand the Previous chat conversations drop-down pane.
6.2 Chat Overviews
VCC Live Chat interface has two slightly different interfaces, based on the source of the incoming chat messages. These are the Website chat and Facebook chat windows. You can find a detailed overview of both windows on the Website chat overview and Facebook chat overview pages.
6.3 Transfer Chat Conversations to Other Queues or Agents
- Open the conversation
- Press Transfer
- Select a queue or user from the list, where you wish to transfer your chat conversation.
Note Transferring Chat Conversations to other queues or agents is available only if the project’s supervisor enabled this option.
For more information, see 4.2 Transfer Chat Conversations to Other Agents or Queues
7. Chat Templates
You can create chat templates —short preset messages— that can be inserted by the agents in the message box using shortcut expressions. When the agent starts typing in the shortcut, the system will automatically suggest the corresponding template that can be inserted by clicking on the suggestion.
To Create a Chat Template
- Select a project from the project list, select Channels > Chat, then select the Chat templates tab.
- Press Create new to create a new template.
Congratulations!
You’ve just learned how to set up VCC Live Chat!
Comments
Can’t find what you need? Use the comment section below to connect with others, get answers from our experts, or share your ideas with us.
There are no comments yet.