


Outbound and Inbound Emails
Estimated reading time: 20 minutes | Target users: Supervisors
In this tutorial, you will learn how to handle both outbound and inbound emails in VCC Live.
There are multiple ways to handle emails in VCC Live. You can use language queues, you can assign tickets to your inbound emails, or you can track the status of your emails in various logs and statistics. All of these are covered in this tutorial, along with useful tips and links on how to set them up.
If you have subscribed to our Multichannel subscription plan, VCC Live can handle inbound emails as well. By utilizing all the email management features in VCC Live, you can create complex and practical operation processes for your company’s departments (Customer Care, Marketing, Sales etc.), allowing them to make their daily routines more efficient.
In this lesson, you will learn:
- How to handle both Outbound and Inbound emails together
- How VCC Live’s ticketing system works, and what the difference between email and ticket is
- What the available email-related settings are
- What language-based queues are and how to use them
- What email and ticket-handling reports are available
1. Handling Outbound and Inbound emails together
If you want to manage your outbound and inbound emails together, you need to have either a VCC Live Multichannel or Premium subscription plan. Once you have acquired your subscription plan, you need to set up your email account, which can be done by following the steps below.
To Set up an Inbound Email Account
- From the VCC Live menu, select Contact Center > Global Settings.
- Select the Email accounts tab.
- Press New account. Enter a name for the account.
- From the Protocol drop-down list, select Email forwarding
- In the Project drop-down list, you can choose which project your inbound emails should be routed to.
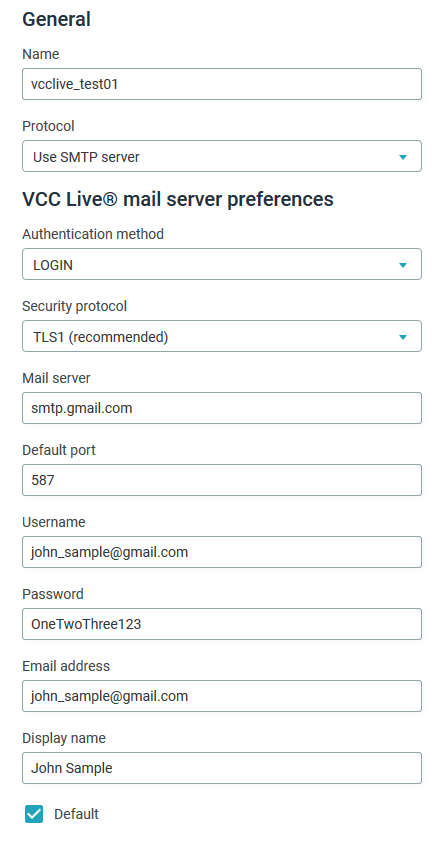
To Set up an SMTP Email Account
- From the VCC Live menu, select Contact Center > Global Settings.
- Select the Email accounts tab.
- Click on the “…” icon, and then select the New account option.
- Enter a name for your account in the Name field, and select the Use SMTP server below in the Protocol field.
- When the VCC Live® mail server preferences section appears, please select the following:
- Authentication method: LOGIN
- Security protocol: TLS1
- Mail server: Your mail server address, for example: smtp.office365.com or smtp.gmail.com
- Default port: 587
- Username: Your email address
- Password: Your email password
- Email address: Once again, your email address.
- Display name: Name of the sender account. This is used only for outbound messages.
- Default: By marking this checkbox you set this account as your default sender account.
- Press Save
Note: Similarly to other types of email accounts, you can create multiple SMTP accounts for sending email messages.
Note: You can also set up OAuth 2.0 authentication for emails, read about it here.
To Set up a Mass Email Function Account
- From the VCC Live menu, select Contact Center > Global Settings.
- Select the Email accounts tab.
- Press New account.
- Enter a name for the setting.
- Select Mass email from the Protocol drop-down list.
- Enter your email address and domain, then press Save.
- The Domain settings pane appears, displaying 3 DNS records (2 TXT record type, 1 CNAME record type). The following field values must be set on your domain: name, record_type, and value.

- Once you have finished, please let your contact person at VCC Live know. Your credentials must be validated at our end.

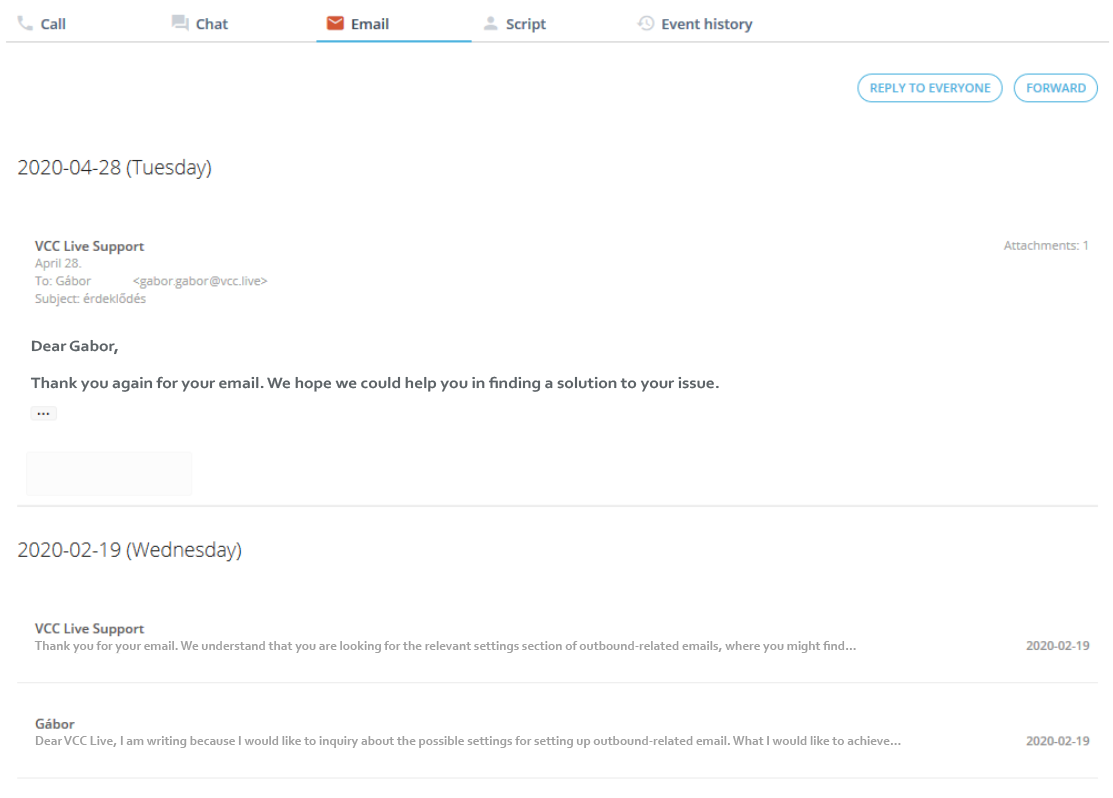
When handling both inbound and outbound emails, the agent interface can arrange all messages belonging to one email thread in a single column, allowing you to expand or collapse the messages as well.
2. VCC Ticketing System
VCC Live’s ticketing system works in a clear and effective way. Whenever a new email is received, it remains as an email until an agent opens it and assigns it to an existing ticket or creates a new ticket based on the received email. This means that when agents respond to an email, they also assign a ticket to it, and the entire conversation (inbound and outbound messages) that takes place regarding an issue is handled within one ticket.
Tickets appear on the Supervisor interface as well, which can be reached via Project > Database > Ticket List. You can also list all Emails that have been assigned to tickets by navigating to Projects > Logs and Statistics > Email log, and marking Also related to tickets when searching for emails.
When a new ticket is created, it receives an automatically generated unique ID. The ID follows an xxx-YYYYMMDD-zzzzzz pattern, where xxx stands for the project’s unique ID, YYYYMMDD stands for the ticket creation date (indicating its year, month and day), and zzzzzz shows a system-generated number.
3. Email settings
Once you have created and added your email account to your project, you should also take a look at some additional settings, to help you specify exactly how emails should be handled by your agents in your project. To access these settings, navigate to Project > Channels > E-mail, where on the General settings tab you can find the Email handling section.
Email handling
- New email list element number: This value defines the number of new emails displayed at once to your agents. The entered value must be between 1 and 250.
- Lock emails to agents: Enabling this feature will lock all the emails in the agents’ list, meaning these emails will not appear to other agents.
- Change pref user: Enabling this function will allow you to transfer a case from one person to another. The function is available to both agents and supervisors.
- Automatic response: Using a dropdown list, you can choose one of the templates you have set up previously. The selected template will act as an automatic reply to all incoming emails to your project.
- Enable agents to create new records: Enabling this feature allows your agents to create a new customer on the contract assignment panel.
- Search: Turning on this function, by marking its checkbox, allows your agents to use the Search function within tickets.
- Shared ticket handling: Enabling this function allows any of your agents to view and handle any of your tickets, rather than just the ones assigned to them.
- Display address: Enabling this function displays the email address assigned to your project when sending an email. It is especially useful when agents are using multiple email accounts.
- Display template CC recipients: This function allows your agents to see the CC recipients added to the Email template when composing a reply message on the Write response interface.
- Display template BCC recipients: This function allows your agents to see the BCC recipients added to the Email template when composing a reply message on the Write response interface.
- Email language detection: Enabling this feature allows you to detect the language of an incoming email.
- Email queue: This function distributes email messages to email queues based on their language. In order to activate it the Email language detection feature mentioned above must be enabled. Email queues can be created on the Queues tab, next to the General settings tab. To assign agents to email queues, navigate to the Queues and Skills interface (Project settings > Agents). If the language of an incoming email does not match any of the predefined email queues, then the email is routed to the Default email queue.
- Automatic deletion of e-mails, chats and related tickets: This function enables the automatic deletion of emails and chats after the given number of days based on the receipt and closure of the interaction. If no remaining emails or chats are left for a given ticket, then the ticket is also deleted. If there is no ticket left for the related record, then the attributes marked as personal data of the record are anonymized.
- Automatic deletion after (days): This defines the number of days after which automatic deletion will take effect. The minimum value for the time period is 30 days.
Email sender accounts
Here you can find checkboxes that allow you to determine which sender accounts to display on the agents’ interface. This allows your agents to choose between sender accounts when sending messages. Here you can also set up a default account.
Email templates
In this section you can set which templates should be made available to your agents in the project. A list of templates appears here, and you can put a checkmark next to the ones you want to be visible to your agents.
Note : Once you have set up all your preferred settings, do not forget to press Saveon this page!
Tickets settings
In the Ticket settings section you can create new ticket types that can be used by your agents in order to categorize tickets.
- From a supervisor perspective, a new ticket type can be added by entering a Label and an Export value in the Custom values interface (Project > Tickets > Custom values). It is useful for categorizing, filtering and reporting purposes. Supervisors can search and export tickets based on their labels in the Ticket List section (Project > Database > Ticket List).
- From an agent perspective, a ticket type can be selected when the agent creates a ticket or assigns an email to a ticket.
Example Ticket types could include customer complaints, financial questions, technical questions, etc.
4. Language-based Email Queues
Language-based email queues are very useful if you have inbound email messages that are written in different languages. If you need different groups of agents to handle certain languages, you can set up email queues for these groups, so messages written in a certain language are queued to a specific group of agents. Sorting and assigning emails to queues is based on our system’s language-detection mechanism.
Create a New Email Queue
- Select Project > Channels > E-mail
- On the Queues tab, enter a name and select a language in the New email queue section, and press Save.
- Your new queue will appear in the list in the middle. There is a default queue as well, which cannot be deleted but can be renamed. The default queue is used by the system if it cannot detect the language of the incoming message, or if the detected language does not match any of the predefined language queues.
- For the function to work properly, both the Email language detection and Email queue checkboxes must be marked on the General settings tab in Project > Channels > E-mail.
Note : When cloning projects, email queues are automatically copied.
Assign Agents to Email Queues
- Select Project > Agents.
- Navigate to the Queues & Skills tab, and select the Email queue in the Queue type dropdown list.
- In the table agents are represented by rows, and queues by columns. The table works as a matrix, you can assign which agent should be assigned to which email queue. If you set any skill level here, it also means an agent’s assignment to that queue.
Note : Skills assigned to agents do not affect the email Queues settings.
When searching and exporting emails, supervisors can use the email queue attribute on the Project settings > Channels > Database > Email log interface. Please note however that this works only when the system succeeds in detecting a language. If no language can be detected, the Language field will remain blank and the Queue column will display the Default queue.
From the Agent perspective
Once an email queue is set up, agents can also see the Queue column on their interface. It helps them to sort and categorize incoming messages on the following screens:
- The emails interface
- The search results screen
5. Email-related reports and statistics
You can look for email message data on a number of screens. In the list below you can find details of the most important inbound and outbound email sections for your statistics.
-
Email log: provides an overview of all emails received and sent using all possible methods. By marking the Also related to tickets checkbox, it can also display emails that are already being handled as tickets. The data can be filtered based on various parameters, including email direction, sender, recipient, subject, language and many more. Some of the most important KPIs in this section are:
- Date – the date and time when the email was received
- Locked by Agent – indicates whether an agent is currently working on the email
- Locked At – the date and time when the current agent opened the email to work on it
- Ticket Number – the ticket number the email is related to, if there is one
- Sent By – the name of the agent who sent the outgoing email
- Language – detected incoming email language
-
API – Get Email Log: This includes information as in the Email log
-
Ticket List: provides general email information, with a special focus on the ticketing features. Some of the most important data here includes:
- Ticket Number and Ticket ID – for identification purposes
- Ticket Type – options can be chosen by an agent from a list of allowed options, previously set up by a supervisor in the Tickets menu
- Title – normally equivalent to the email’s title, but agents can edit it when creating a ticket to respond to an incoming email
- Agent – name of the agent currently assigned to the ticket; in other words the person responsible for it
- First open time – the date and time when the ticket was originally opened/created
- First and last sent time – the date and time when the first and last message in the thread was sent out by an agent
- First and last received time – the date and time when the first and last message was received in the thread
- Sent and received email count – the number of emails sent and received within the thread
- SLA value – the time between when the first email in the thread was received and when the first one was sent
-
User-Based Statistics
| Agent emails | |
|---|---|
| Agent email (Sent) | Number of emails sent from the omnichannel agent interface. |
| Agent email (Response) | Number of emails sent as a response from the omnichannel agent interface. A reply email ID is assigned to these messages. |
| Agent Email (Bounced) | Number of agent emails that received a bounce notification from the recipient’s mailbox. |
| Agent Email (Link Clicks) | Number of agent emails containing links, that received a click by the recipients. |
| Agent Email (Marked as Spam) | Number of agent emails that have been marked as spam by the recipient. |
| Agent Email (Delivered) | Number of agent emails that have been successfully delivered to the recipient. |
| Agent Email (Dropped) | Number of agent emails that have not been delivered to the recipient. |
| Agent Email (Opened) | Number of agent emails that have been opened by the recipient. |
| Agent Email (Unsubscribed) | Number of agent emails where the recipient clicked on the ‘Unsubscribe’ button. |
| Disposition emails | |
|---|---|
| Disposition Email (Sent) | Number of sent emails based on a disposition set for a record or based on a trigger in the agent script’s email checkbox. |
| Disposition Email (Bounced) | Number of disposition emails that received a bounce notification from the recipient’s mailbox. |
| Disposition Email (Link Clicks) | Number of disposition emails containing links, that received a click by the recipients. |
| Disposition Email (Marked as Spam) | Number of disposition emails that have been marked as spam by the recipient. |
| Disposition Email (Delivered) | Number of disposition emails that have been successfully delivered to the recipient. |
| Disposition Email (Dropped) | Number of disposition emails that have not been delivered to the recipient. |
| Disposition Email (Opened) | Number of disposition emails that have been opened by the recipient. |
| Disposition Email (Unsubscribed) | Number of disposition emails where the recipient clicked on the ‘Unsubscribe’ button. |
| Mass emails | |
|---|---|
| Mass Email (Sent) | Number of sent emails using the mass email sending function. |
| Mass Email (Bounced) | Number of mass emails that received a bounce notification from the recipient’s mailbox. |
| Mass Email (Link Clicks) | Number of mass emails containing links, that received a click by the recipients. |
| Mass Email (Marked as Spam) | Number of mass emails that have been marked as spam by the recipient. |
| Mass Email (Delivered) | Number of mass emails that have been successfully delivered to the recipient. |
| Mass Email (Dropped) | Number of mass emails that have not been delivered to the recipient. |
| Mass Email (Opened) | Number of mass emails that have been opened by the recipient. |
| Mass Email (Unsubscribed) | Number of mass emails where the recipient clicked on the ‘Unsubscribe’ button. |
- Real-Time Monitoring:
- Users section – State -shows user state and can also display Email state, whenever an agent is working with an email
- Outbound section – Email status -shows the total number of users in Email status at any given time
- Call statistics:
- Emails – The number of sent email messages
- Global call statistics:
- Emails – The number of sent email messages
- Email Status – The total time an agent spent in Email Status
Related articles
There's always more to learn. Discover similar features by visiting related articles:
Comments
Can’t find what you need? Use the comment section below to connect with others, get answers from our experts, or share your ideas with us.
There are no comments yet.