


Dynamic Email Contents
Estimated reading time: 25 minutes | Target users: Supervisors
Dynamic Email Contents are variables you can insert in an Email template when composing a message, for example during a Mass email campaign. They are useful in helping you create more personalized and customized emails that are unique for each of your recipients. A large number of variables are available, and can relate to specific parameters of your project, agent or the addressee, in a highly-customizable format.
In this lesson, you will learn about:
- The structures and types of dynamic email contents
- The types of system default dynamic fields
- How to add dynamic fields to your emails
- How to monitor your outbound emails
- Some examples of using dynamic email contents
1. Structure and Types of Dynamic Email Contents
Before we start to discover the various types and uses of dynamic email contents, let’s explore how they are structured, what main categories there are and what their main features are.
1.1 The Two Main Types of Email Contents
There are different types of dynamic email content with several sections and parameters.
The two main types are:
- System Default Dynamic Email Contents (System Default E.C.) and
- Project-Specific Dynamic Email Contents (Project-Specific E.C.).
System Default E.C. are available in every project, whereas Project-Specific E.C. are specific to each project.
Project-Specific E.C. are closely related to the Fields section of your project’s Database: the Fields you set up here can be used as dynamic email contents when composing your email message.
1.2 The Three Types of Fields
There are 3 types of fields in VCC Live that can be used in your database:
- General fields, which are suitable for containing any text, number, or other character-based information. When used as a dynamic email content field, it is inserted as it is displayed in the database.
- Single parameter fields, suitable for depicting one possible parameter at a time. When used as a dynamic email content field, it is inserted as it is displayed in the database.
- Multiple parameter fields, suitable for depicting multiple parameters at the same time.. When a field has more than one value assigned, consecutive values are separated by a “|” character and listed in the same order as in your Fields menu, based on their value id.
For disposition-triggered emails, or emails that are sent from the agent interface, additional information inserted by an agent in a relevant script field can also be used in the email body. In order to avoid sending an empty value, we recommend setting up these important fields as mandatory in the relevant script or datasheet page.
1.3 Field Elements
Whether you choose a General, Single-parameter or Multiple-parameter field, you can use its field elements when composing a message. This means that, when using a field, you can access its subparts, and either edit them in the Fields pane or allocate them when composing your email. Here are the 4 types of field elements you can use.
-
Label: This is the text you can see (or edit) in the Label field in Project > Database > Fields > Field settings > Label. This is usually a display name of the database variable, for example Customer Address for a variable address.
- Its format is shown as {variablename.label}
-
Value
- It shows the actual value of that variable field for a particular record.
- In the case of General fields, it shows a value that can be imported by either a database import or via API. Additionally, it can be also provided by an agent via the agent script. Example: {name.value} in the email body would show the name of the recipient (ie. the full name assigned to a record).
- In the case of Single and Multiple parameter fields, it shows a value that can be imported by either a database import or via API. Additionally, it can be also provided by an agent via the agent script. Available variable values are shown in the Values field – Name column in Project > Database > Fields > Field settings > Values.
- You can edit the value by selecting the row and editing it in the section which appears below. Don’t forget to press ‘Change value’ to save your settings.
- Its format is shown as {variablename.value}
-
Export Value: This parameter is found only in Single and Multiple parameter fields. If used as a dynamic email content, it displays the export of a field value provided either via the database import or the API. The value of the related export value can be also chosen by an agent via the agent script. Relevant export values are shown in the Values table – Export value column found in Project > Database > Fields > Field settings > Values.
- You can edit the value by selecting the row and editing it in the section that appears below. Don’t forget to press ‘Change value’ to save your settings.
- Its format is shown as {variablename.export_value}
-
Value’s description: This parameter is found only in Single and Multiple parameter fields. If used as a dynamic email content, it displays the description of a field value provided either via the database import or the API. The value of the related description value can be also chosen by an agent via the agent script. Relevant values’ descriptions are shown in the Values table – Description column found in Project > Database > Fields > Field settings > Values.
- You can edit the value by selecting the row and editing it in the section that appears below. Don’t forget to press ‘Change value’ to save your settings.
- Its format is shown as “{variablename.description}”
1.4 Example
Let’s take a single parameter field called product (a product that your client is interested in) which has no values yet for your records in the database. If you want to use this in an email as dynamic content, then add the field to your database as per the following:
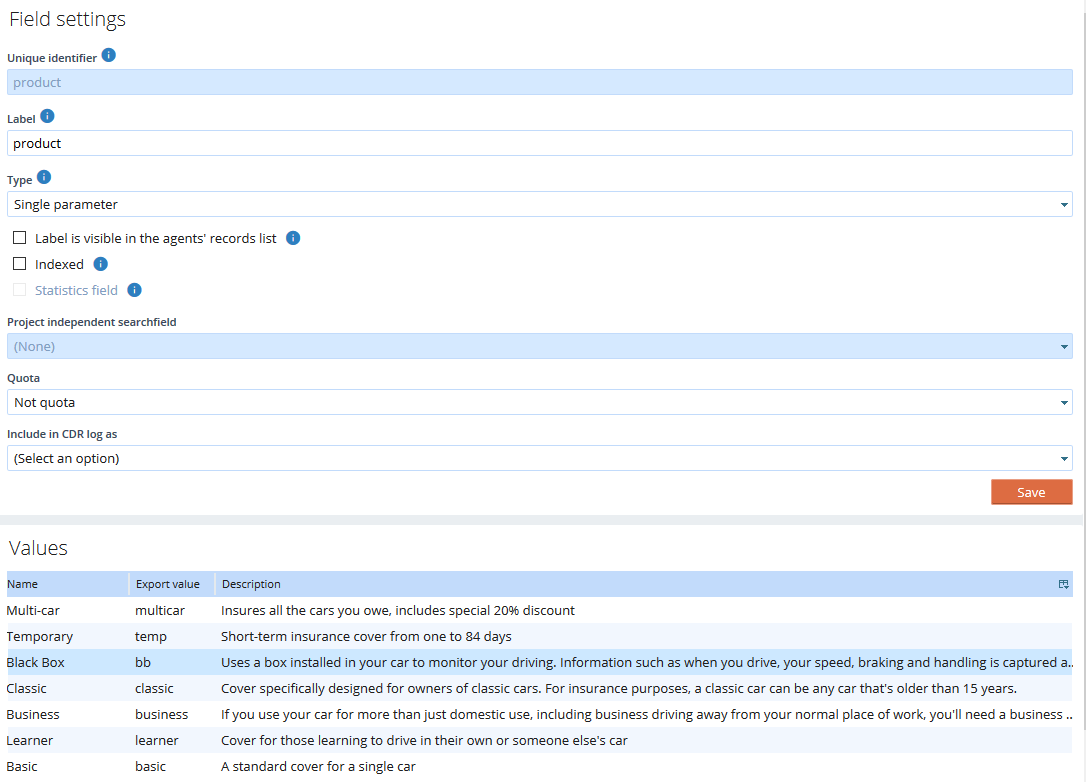
Once you have added the field to your database, include it in the agent script as:
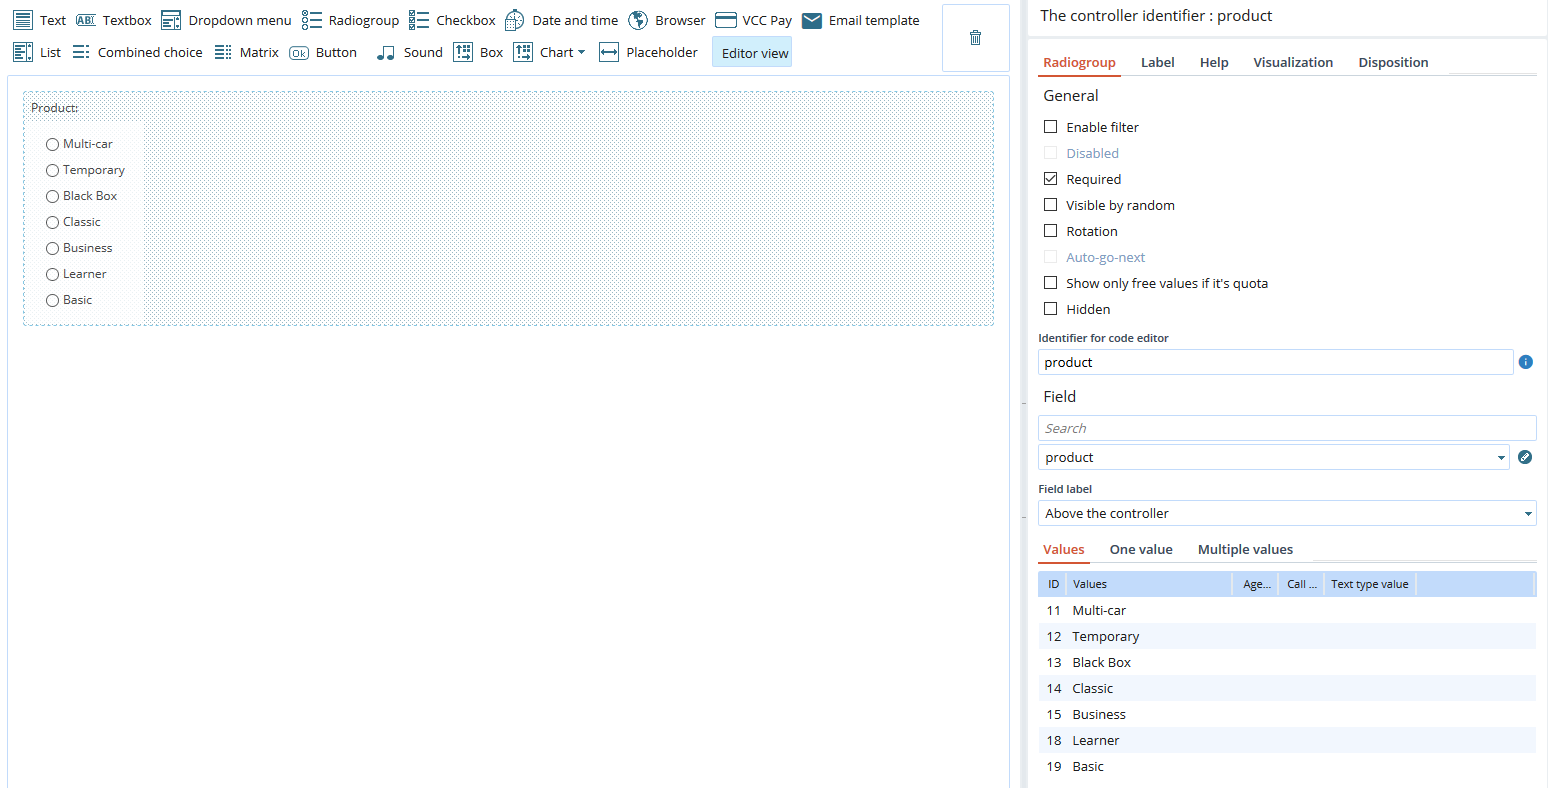
This means that your agents will be obliged to choose one of the values available, while in the email template you can use either label, value, export value or description, depending on your requirements. The corresponding information is saved in the Fields menu, therefore when your agent chooses eg. Black-box value, which is displayed in the email template as {product.description}, then in the personalized email your client will receive, a description corresponding to Black-Box value, such as: “A flexible box installed in your car to monitor your driving. Information regarding your driving habits, speed, brake and acceleration handling is captured and shared with an insurance company to configure their policy prices.”
2. System Default Dynamic Email Fields
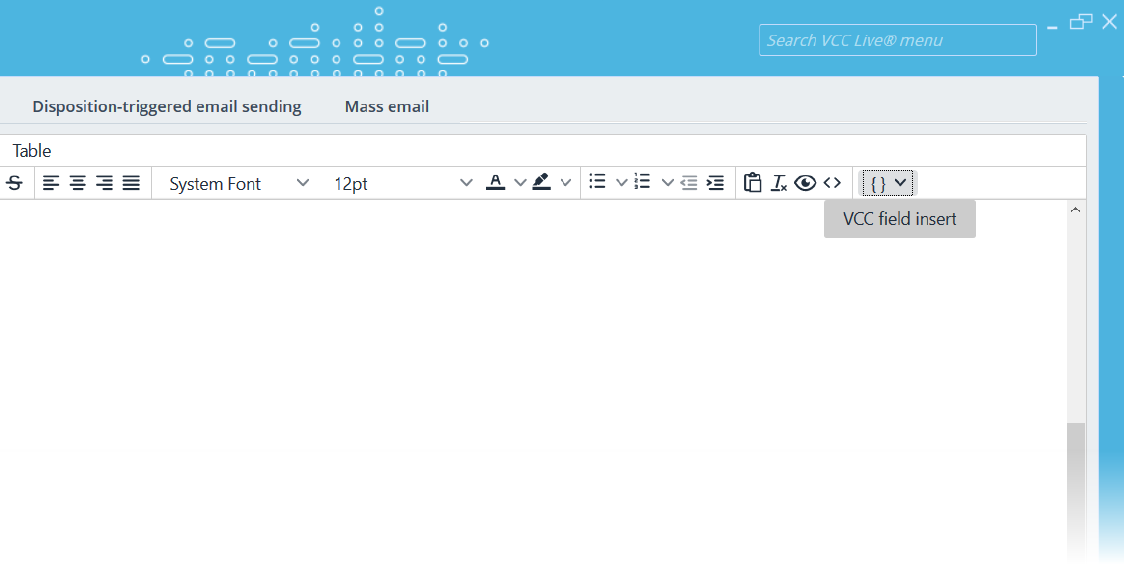
As described above, System Default Dynamic Email Fields are variables that are available to all projects. Find them in the upper-right hand corner of your screen when composing an email template. By clicking on the VCC Field insert button, you can access all the available dynamic email fields, which will appear in a drop-down list.
2.1 List of available System Default Dynamic Email Fields
| Field name | Email editor name | What it shows | Setup location |
|---|---|---|---|
| Agent | {agent} | Full agent name | VCC Live > User Management > Users > Agent > Default settings pane: Name |
| Agent email address | {agent.email} | Agent email address | VCC Live > User Management > Users > Agent > Advanced settings pane: Email address |
| Disposition creation time | {createtime} | Time of disposition that triggered the email sending, in the following format: YYYY-MM-DD hh:mm:ss |
N/A |
| Callback Date | {next_calldate} | Time of the next call scheduled, in the following format: YYYY-MM-DD hh:mm:ss If no next call time is scheduled, field returns: 0000-00-00 00:00:00 |
Set manually by agent or automatically, based on Disposition settings in Project > Dispositions > Default deadline |
| Client's unique ID | {numberid} | Unique ID of the record in project’s database | n/a, assigned automatically when a record is created |
| Disposition | {disposition_name} | Name of the disposition saved for triggering Email sending | Set manually by agent |
| Description of Disposition | {disposition_desc} | Additional description for a saved disposition, typed and saved by agent in the textbox under the Disposition selection box. | For the box in the given Disposition to be available, Description type must be set to Obligatory or Approved |
| Web chat URL ID | {webchat.record} | The URL ID the client can use to get in touch with the agent via Web Chat. | N/A |
| Contact: – Title – Name – Phone number – Email address |
{contact.title} {contact.name} {contact.phone} {contact.email} |
Title typed for the contact in the Title field in the Record’s Contacts tab Name typed for the contact in the Contact’s Name field in the Record’s Contacts tab Phone number typed for the contact in the Phone number field in the Record’s Contacts tab Email address typed for the contact in the Email field |
Typed by agent manually, or imported via database import. Each record can have a maximum of 9 contacts assigned to it. |
| Voice file URL | {[[voice_url_text.label]]} | URL of the recorded conversation, available for 14 days after its generation. A recipient is able to use it to download a .wav sound file | The appearance of the URL can be specified and include various database fields. Learn more about Voice File Name Parameters |
| Last name | {agent.custom.lastName} | Specifies an agent’s last name independently from user information. Available only on request | VCC Live > User Management > Users > Agent > Custom settings pane: Last name. Available only after contacting VCC Support, and after the necessary setup is completed. |
| First name | {agent.custom.firstName} | Specifies an agent’s first name independently from user information. Available only on request | VCC Live > User Management > Users > Agent > Custom settings pane: First name. Available only after contacting VCC Support, and after the necessary setup is completed. |
| Skype | {agent.custom.skype} | Specifies an agent’s Skype name independently from other agent user information. Available only on request | VCC Live > User Management > Users > Agent > Custom settings pane: Skype. Available only after contacting VCC Support, and after the necessary setup is completed. |
| {agent.custom.facebook} | Specifies an agent’s Facebook account link independently from other agent user information. Available only on request | VCC Live > User Management > Users > Agent > Custom settings pane: Facebook. Available only after contacting VCC Support, and after the necessary setup is completed. | |
| {agent.custom.linkedIn} | Specifies an agent’s Linkedin account link independently from other agent user information. Available only on request | VCC Live > User Management > Users > Agent > Custom settings pane: Linkedin. Available only after contacting VCC Support, and after the necessary setup is completed. | |
| City | {agent.custom.city} | Specifies an agent’s city of location. Useful for big and multinational contact centers. Available only on request | VCC Live > User Management > Users > Agent > Custom settings pane: City. Available only after contacting VCC Support, and after the necessary setup is completed. |
| Country | {agent.custom.country} | Specifies an agent’s location country. Useful for large and multinational contact centers. Available only on request | VCC Live > User Management > Users > Agent > Custom settings pane: Country. Available only after contacting VCC Support, and after the necessary setup is completed. |
| Private phone | {agent.custom.privatePhone} | Specifies an agent’s private phone number independently from other agent user information. Available only on request | VCC Live > User Management > Users > Agent > Custom settings pane: Private Phone. Available only after contacting VCC Support, and after the necessary setup is completed. |
| Private email | {agent.custom.privateEmail} | Specifies an agent’s private email address independently from other agent user information. Available only on request | VCC Live > User Management > Users > Agent > Custom settings pane: Private email. Available only after contacting VCC Support, and after the necessary setup is completed. |
| Company ID | {agent.custom.companyId} | Specifies an agent’s company ID independently from other agent user information. Useful for contact centers outsourcing agent teams. Available only on request | VCC Live > User Management > Users > Agent > Custom settings pane: Company ID. Available only after contacting VCC Support, and after the necessary setup is completed. |
3. Add Dynamic Fields to your Emails
Now that you have learned what dynamic fields are and how they can help you when creating email templates, it’s time to take a look at the overall workflow. In chapter 3, we describe a step-by-step process showing you how to set up your email template using system default or project-specific dynamic fields.
3.1 Project-specific dynamic fields
If you want to use Project-specific fields, you need to either include fields with values you want to use in your database or allow your agents to add values to a field while taking a phone call with a customer.
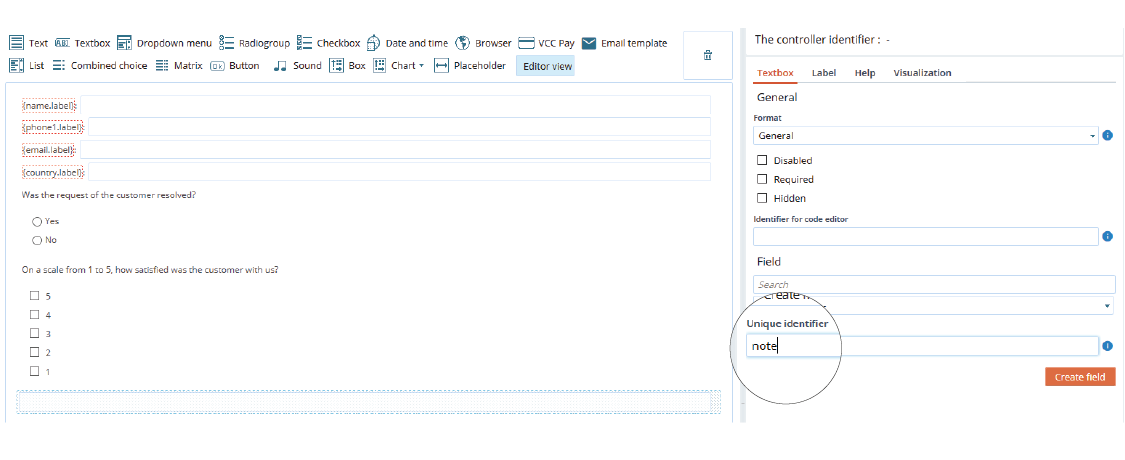
To create a new field for your email template, navigate to Project > Database > Fields. Type all the necessary fields information and press Create field.
3.2 Create a new field that can be edited and populated by agents through the agent script:
Agents can either use existing field values and choose them from the script using specific controllers, or manually type values for General type fields. If the value is needed it can be set as obligatory to fill or you can choose them by marking the Required checkbox. It is also possible to display existing variables to your agents only, or set up protection for the values so that your agents cannot modify them.
If you know your data fields will be used in a script, you can save time by creating new database fields directly from the Script editor menu, instead of doing it via the Fields menu.
- In Project > Script editor > Datasheet, Modify or create a new dataset.
- Choose a controller with which to display your data, depending on the data type. If you are unsure about which one to use, take a look at our user guide on data-dependent controls to learn about the various data types.
- Drag and drop your selected controller into your datasheet. Select your field by choosing it from a drop-down list in the settings pane on the right-hand side of the screen.
- When you have finished editing your datasheet press Only save.
Add dynamic fields to your email template
- Select one of your email templates in Project > E-mail > Template, and select the Message tab.
- Select a dynamic field using the curly brackets ( { } ) icon and insert it in your template.
- For General fields, you can use Label and Value
- For Single and Multiple fields, you can use Label, Value, Export value and Value's description.
- For more information about each of these, please refer to the Fields elements section of this tutorial above.
- Press Only save to save your changes to your template.
You can now test your template with dynamic email contents by selecting a number of records from the Records list and sending them the template with the Mass email sending action.
Useful tips:
- When testing your email template, it is recommended to set your own email address in the template Recipient field. Once you have finished your tests, do not forget to reset it.
- When using Export value or Export value, make sure the fields you set up in your email template have values assigned to them.
- Verify whether your records in your database contain the necessary data by navigating to Database > Fields, and mark the fields you want to use in your email template as Indexed. Then, navigate to the Records list section and make sure corresponding data is entered in the records you want to use (send an email to). This can be done by searching for one or more records and checking in the relevant columns if the data is displayed properly. Columns for all indexed fields are displayed in the Records list.
3.3 System default dynamic fields
Using system default dynamic fields in your email template does not require as much preparation as project-specific dynamic fields do. In fact, you can instantly select the types of system default dynamic fields you want when composing your email template. As such, for a step-by-step tutorial, you can follow the same steps described for project-specific dynamic fields in the section above titled Add dynamic fields to your email template.
Make sure the fields you want to use have their values saved in the corresponding menu sections, as described in the List of Available System Default Dynamic Email Fields section’s Setup location column.
>Note: Dynamic fields can be formatted in the same way as regular text.
>Note: Dynamic fields can be embedded in other elements, such as tables or lists.
4. Monitoring sent emails
Keeping track of your emails is important for future reference or when tracking a communication thread with one of your customers. Our Email log section (Project > Database > Email log) features an extensive filter section, so you can find the emails you are looking for based on several specific criteria.
The results section lists all the found emails in your project, and the system can look for both inbound or outbound emails. You can further process your results by exporting them as a database in txt or csv format or by copying them directly to your clipboard.
>Note: By double-clicking on an email in the Results section, you can see the final, sent version of the email, including the dynamic fields with their respective values displayed.
A list of available columns in the Email log is available on this user guide website.
5. Use examples of dynamic email contents
Using dynamic email content in your email campaign takes your business operations to the next level: the possibility of creating templates with these variables and conditions can really customize messages sent by your company and tailor your content to suit your customers. Its effect is similar to that of a personalized letter sent specifically to one addressee.
Let’s take a look at a few possible examples of how your company can use dynamic email content.
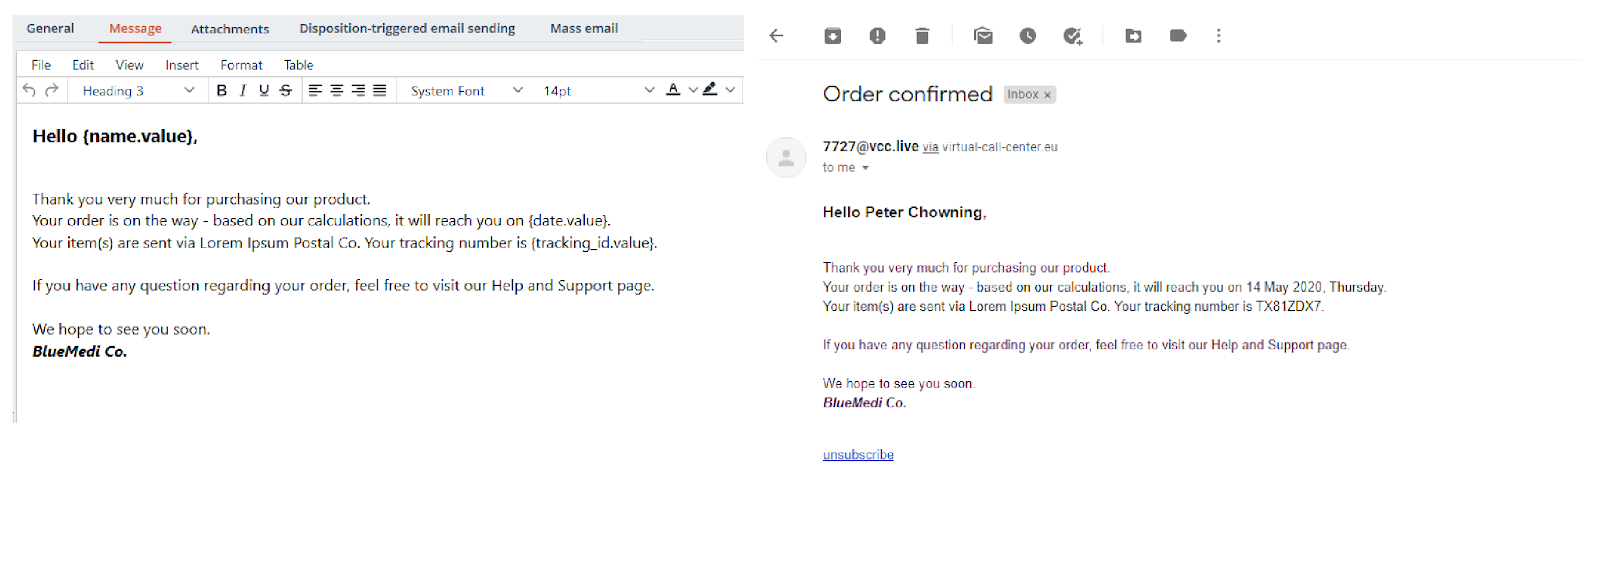
- Sales: An email can be sent to a customer once an agent finishes talking to them, and the customer decides to purchase a product or service. Sending the email can be triggered by a Success disposition, and the email can include eg. a confirmation of the purchase, along with the purchased product/service information and estimated delivery date. This information can be either manually entered on the datasheet by the agent while the conversation is taking place, or if a calculation is needed, using a javascript solution.
-
Debt Collection: As an extension of a debt collection project, an email can be sent to a customer once an agent has failed to reach them. Sending the email can be triggered by an Unreached disposition, and the email can include eg. client debt information such as the amount to be paid, the deadline of the overdue payment or the next debt collection steps that will be taken.
-
Customer Care: Emailing, as part of the Customer Care process, is something that can be done to follow up a phone call between a customer and an agent. Such an email can include the further necessary steps to be taken by the customer in order to solve a problem, with variables including the name of the customer’s project or their company details. Dynamic email contents can also be used for agent signatures: these signatures would then change based on which agent has sent the email to the customer.
Related articles
There's always more to learn. Discover similar features by visiting related articles:
Comments
Can’t find what you need? Use the comment section below to connect with others, get answers from our experts, or share your ideas with us.
There are no comments yet.