


Email Handling
Estimated reading time: 7 minutes | Target users: Supervisors
Table of Contents
- 1. Setting up an email account at VCC Live
- 1.1 Setup for inbound emails
- 1.2 Set up an email account using the VCC mail server
- 1.3 Optional – Set up your email account using an SMTP server
- 1.4 Optional – Set up your email account using OAuth 2.0 authentication – Google
- 1.5 Optional – Set up your email account using OAuth 2.0 authentication – Microsoft Azure
- 2. Creating an Email template
- 3. Assign agents to your project + further settings
- 4. Handling emails from the agent’s perspective
- Open
- Contact
- Ticket
- Reply
In this tutorial, you will learn how to set up an inbound email account in VCC Live that is capable of handling inbound emails.
Imagine this scenario! You would like to use VCC Live to receive incoming emails from your customers, so your agents can process their requests and reply to them
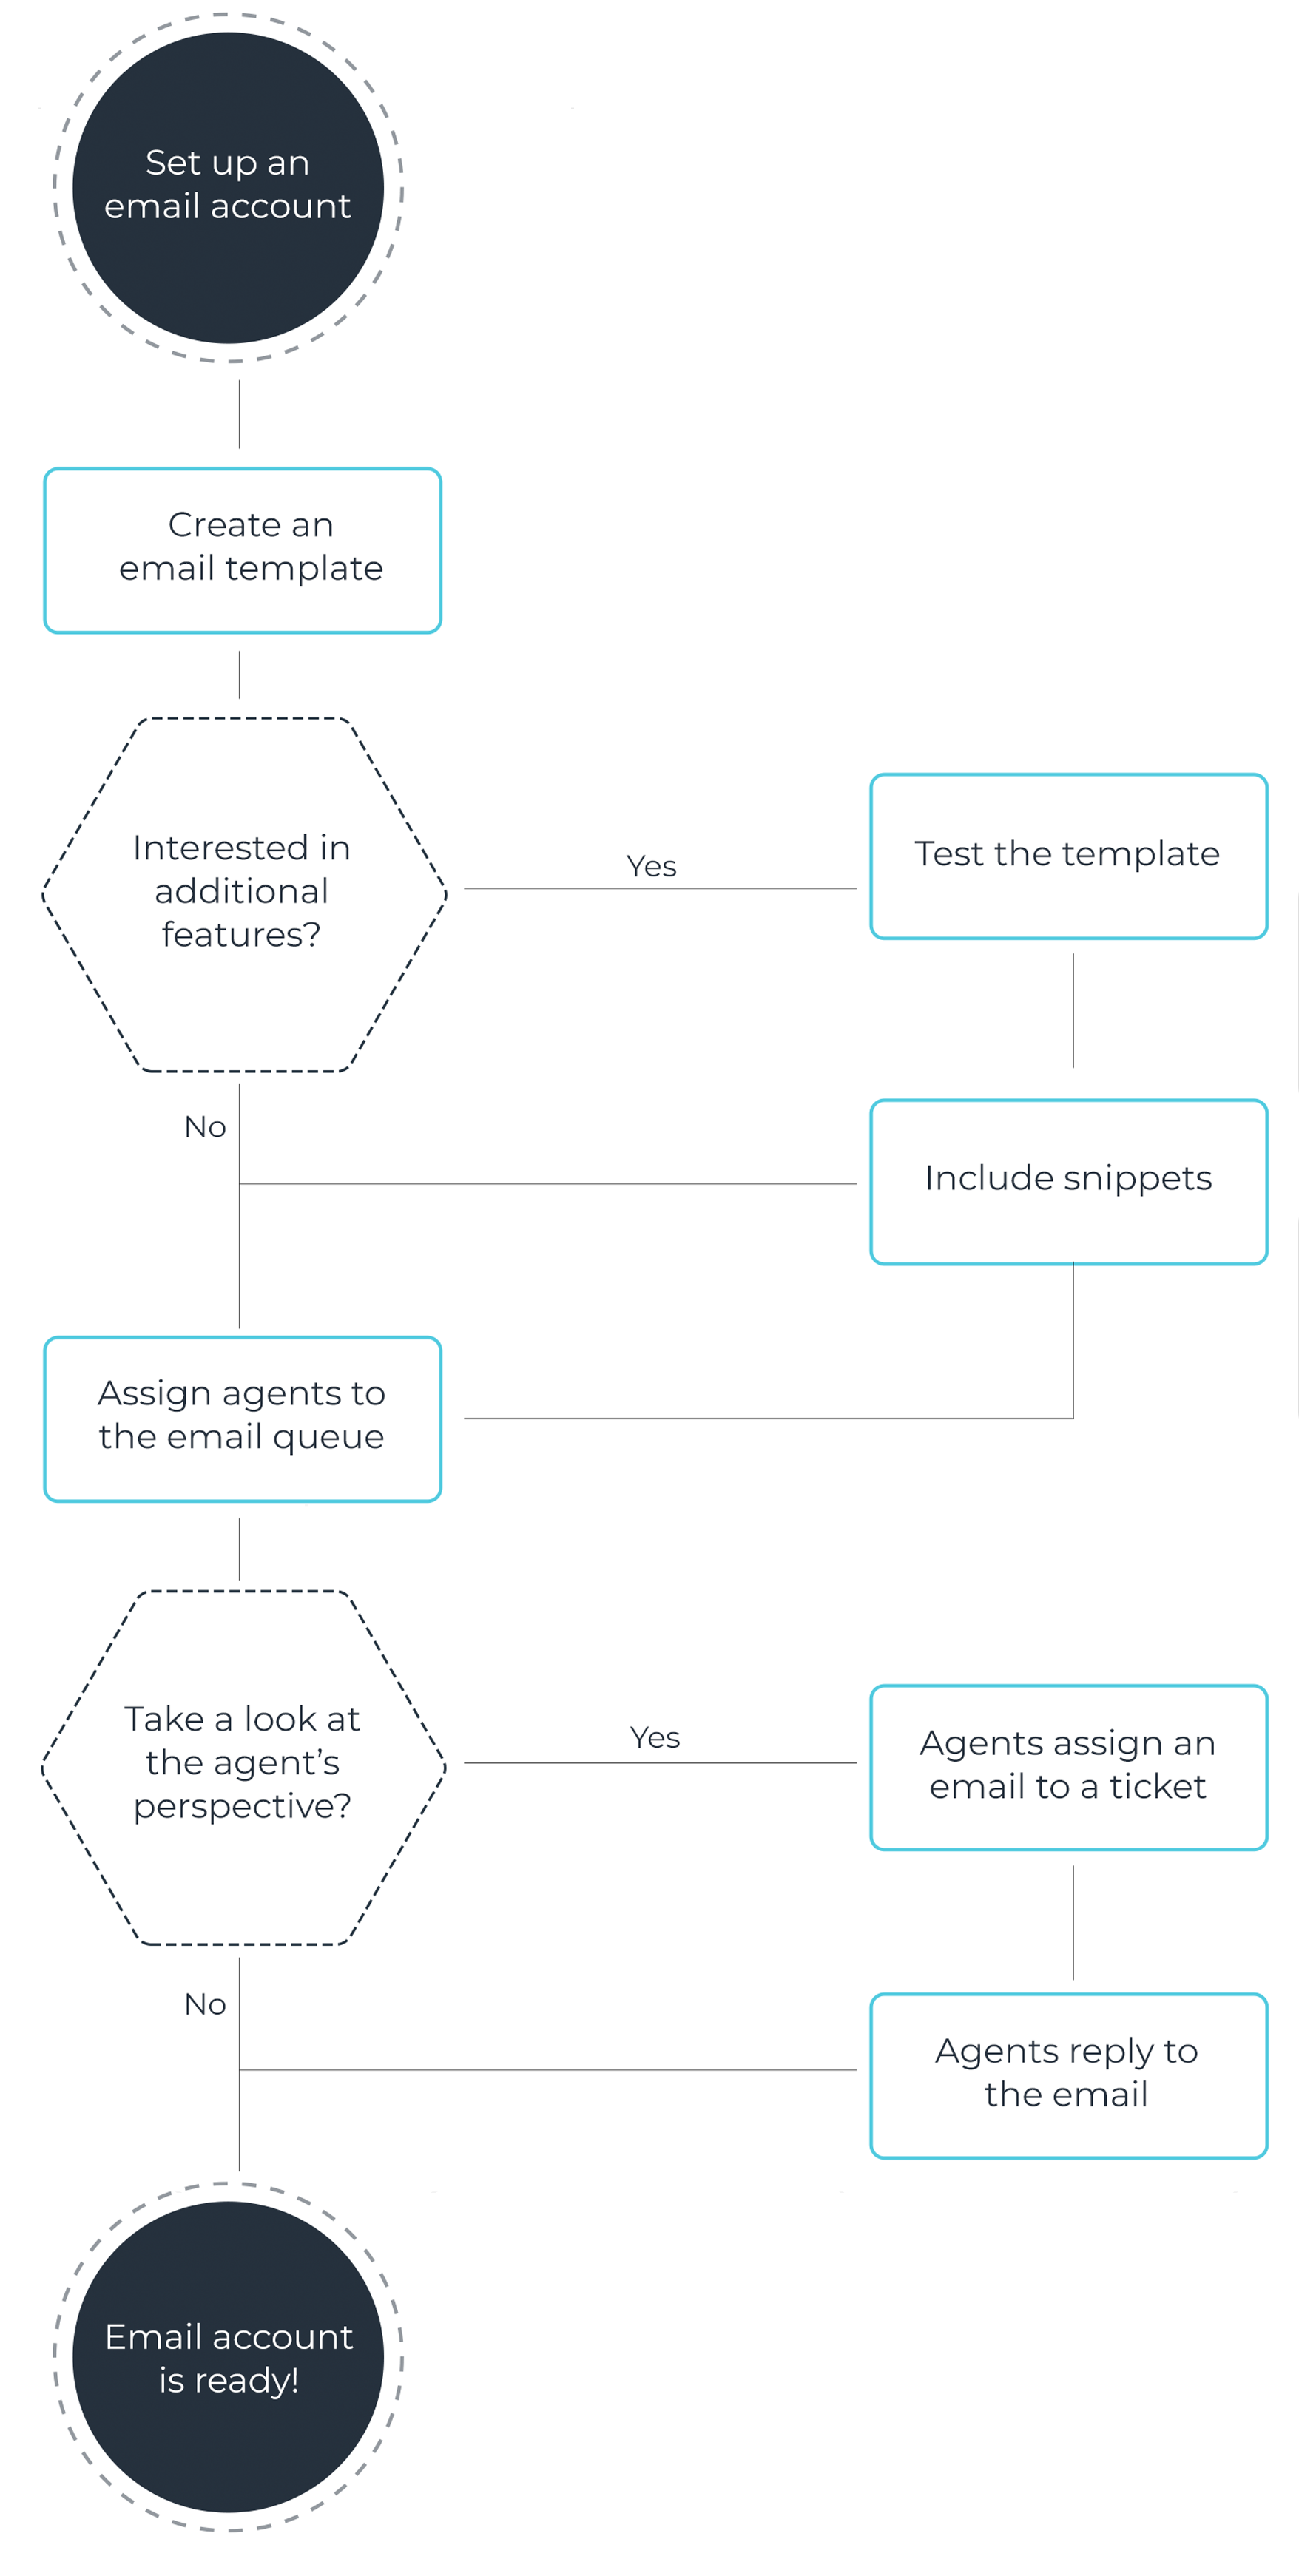
This use case covers the following:
- Set up an email account at VCC Live
- Create an email template, including testing the template and including snippets
- Assign agents to your email queue
- See how agents can handle emails on the agent interface, including agents assigning it to a ticket and replying to it
1. Setting up an email account at VCC Live
1.1 Setup for inbound emails
- From the VCC Live menu, select Contact Center > Global Settings.
- Select the Email accounts tab.
- Press New account. Enter a name for the account.
- From the Protocol drop-down list, select Email forwarding
- In the Project drop-down list, you can choose which project your inbound emails should be routed to.
- Press Save
Once you save your account, you will see an auto-generated email account in grey in the Forward emails to field. This means that your customers should send their emails to this email address in order to contact your company.
Since this is a rather complex email address, we suggest setting up an email address that is easy to remember (eg. [email protected]), and then in the settings of your email provider, set up a forwarding address to the auto-generated email address you see in grey in the Forward emails to field.
1.2 Set up an email account using the VCC mail server
This is necessary to let your agents reply to incoming emails.
- From the VCC Live menu, select Contact Center > Global Settings.
- Select the Email accounts tab.
- Press New account. Enter a name for the account.
- From the Protocol drop-down list, select VCC Live mail server
- Enter the email address you want to show as the sender’s email address
- Press Save
1.3 Optional – Set up your email account using an SMTP server
Instead of using VCC Live’s mailing server, you can choose another SMTP server to handle your email-sending duties. In this example, we will show how to sync your account with your email client.
- From the VCC Live menu, select Contact Center > Global Settings.
- Select the Email accounts tab.
- Click on the “…” icon, and then select the New account option.
- From the Protocol drop-down list, select Use SMTP server
- Enter the details in the following fields:
- Authentication method: LOGIN
- Security protocol: STARTTLS
- Mail server: Your mail server address, for example: smtp.office365.com or smtp.gmail.com
- Default port: 465 or 587 (which one is authorized)
- Username: Your email address
- Password: your email password or, in Google’s case, the 16-character password generated for VCC Live by Google’s App passwords
- Email address: Your email address
- Display name: the name that appears to your customers when they receive an email from your agents
- Default: By marking this checkbox, you set this account as your default sender account.
- Press Save
1.4 Optional – Set up your email account using OAuth 2.0 authentication – Google
You can use OAuth 2.0 authentication for email communication. In this example, we will show how to sync your account with Google.
- From the VCC Live menu, select Contact Center > Global Settings.
- Select the Email accounts tab.
- Press New account. Enter a name for the account.
- From the Protocol drop-down list, select SMTP XOAUTH2
- Enter the details in the appearing fields
- Authentication method: LOGIN
- Mail server: smtp.gmail.com
- Default port: 465
- Username: your Google username and password
- Email address: the email you wish to assign
- Display name: the name that appears to your customers when they receive an email from your agents
- In OAuth Settings, enter your:
- Client ID
- Client Secret
- Authorize URL
- Access Token URL
- Scopes: In case of Google, enter “openid profile email https://mail.google.com/“
- Press Save
Note: You need to make sure that you also set up a Redirect URL in the format of: "https://{customer}.asp.virtual-call-center.eu/oauth", where ‘customer’ refers to your VCC account name, which you are using when logging in manually to VCC Live. Read more about redirect URLs here.
1.5 Optional – Set up your email account using OAuth 2.0 authentication – Microsoft Azure
1. Sign In to the Azure Portal
Navigate to https://portal.azure.com and sign in with your organizational credentials.
2. Register a New Application
- In the left-hand navigation menu, select Azure Active Directory.
- Click on Add, then choose App registration.
3. Fill in Application Details
When creating the application:
- Name: Choose a descriptive name for your app.
- Supported account types: Choose who can access the app (e.g., single tenant or multi-tenant).
- Redirect URI:
Select Web from the dropdown and provide a redirect URI. You need to make sure that you also set up a Redirect URL in the format of:"https://{customer}.asp.virtual-call-center.eu/oauth", where ‘customer’ refers to your VCC account name, which you are using when logging in manually to VCC Live. Read more about redirect URLs here.
Click Register once complete.
4. Save Application IDs
After registration, you’ll be redirected to the app overview page. Make a note of:
- Application (client) ID
- Directory (tenant) ID
These values will be needed for your integration later.
5. Create a Client Secret
- Click on Certificates & secrets from the left-hand menu.
- Under the Client secrets tab, click New client secret.
- Provide a description and select an expiration timeframe (Microsoft enforces a max of 24 months).
- Click Add.
After the secret is created:
- Click Copy to clipboard next to the Value.
- Save this value securely. It won’t be shown again and will be required later.
6. Configure API Permissions
- In the left sidebar, click API permissions.
- Choose Add a permission.
- Select Microsoft Graph.
- Choose Delegated permissions.
-
Enable the following permissions:
offline_accessSMTP.Send(Search for “SMTP”, then expand and select this)
-
Click Add permissions to finalize.
7. Set up an Email account in VCC Live
- From the VCC Live menu, select Contact Center > Global Settings
- Select the Email accounts tab.
- Press New account. Enter a name for the account.
- From the Protocol drop-down list, select SMTP XOAUTH2
- Enter the details in the appearing fields
- Authentication method: LOGIN
- Security protocol: STARTTLS
- Mail server: smtp.office365.com
- Default port: 587
- Username: your Azure username
- Email address: the email you wish to assign
- Display name: the name that appears to your customers when they receive an email from your agents
- In OAuth Settings, enter your:
- Client ID
- Client Secret
- Authorize URL: https://login.microsoftonline.com/tenantId/oauth2/v2.0/authorize
- Access Token URL: https://login.microsoftonline.com/tenantId/oauth2/v2.0/token
- Scopes: offline_access https://outlook.office365.com/SMTP.Send
- Press Save and Connect
Learn more about offline_access scope in Azure here.
8. Enable SMTP sending in Exchange Admin Center
Use the new Exchange Admin Center to enable SMTP AUTH globally
- Login to or navigate to the new Exchange Admin Center.
- Go to the Mail Flow settings page under Settings
- Uncheck the setting labeled “Turn off SMTP AUTH protocol for your organization
To enable SMTP AUTH on specific mailboxes
- Open the Microsoft 365 admin center and go to Users -> Active users.
- Select the user, and in the flyout that appears, click Mail.
- In the Email apps section, click Manage email apps.
- Verify the Authenticated SMTP setting: unchecked = disabled, checked = enabled.
- When you’re finished, click Save changes.”
2. Creating an Email template
- Select a project from the project list, then select Channels > E-mail.
- Press New email template.
- Enter the name of the template in the Template name text field.
- Enter a subject.
- Enter an email address or select a database field in the Recipient drop-down list to set the recipient.
- Enter one or more email addresses in the CC and BCC text fields if required.
- Enter or select an email address from the Sender drop-down list. This address is displayed as the sender to the recipient.
- If it is not marked, mark the Active checkbox.
- Select the Message tab, then enter and format the desired message, or enrich it with an image and video.
- Select the Attachments tab to insert an attachment.
- Press Save.
Tip: At this point, you can test your template by sending it to any email address with the Save and send test email button.
Email snippet tab
Snippets are similar to templates, but they are smaller and shorter in form. Think of them as small building blocks or objects of text you can create beforehand, and then your agents can use them by selecting them when composing a message. This is useful if you want to offer effective phrases and expressions that accurately represent your company’s profile and align with the voice and tone of your business.
3. Assign agents to your project + further settings
- Go to the project > Agents
- Assign your agents to the project by dragging and dropping them from left to right.
- Go to project > Emails
- On Email sender accounts, select the sender email account you created in step 2.1, and click Use as default
- On Email templates at the bottom of the page, mark the templates you want to make available to your agents.
4. Handling emails from the agent’s perspective
Now that you have set up your email account and template, let’s take a look at how an agent can receive and reply to an incoming email. These are the steps they should follow:
Open
When an agent logs in to the project and receives a new incoming email, this icon appears in the upper left-hand corner: ![]()
Contact
Opening a ticket, they can either
- Create a new contact for the email by pressing +New contact, or
- Assign the email to a preexisting contact
Ticket
Then the email can be assigned to:
- A new ticket by pressing +New ticket, or
- A preexisting ticket by selecting one of the appearing tickets. Select it and then press Assign to ticket in the upper right-hand corner.
Reply
The agent can now compose a reply message and then send it to your customer.
- Templates and snippets can be inserted here: for templates, use the Template drop-down, and for snippets, use the
 icon.
icon.
Learn more about:
Comments
Can’t find what you need? Use the comment section below to connect with others, get answers from our experts, or share your ideas with us.
There are no comments yet.