Get to Know the Agent Workspace
Estimated reading time: 27 minutes | Target users: Supervisors, Agents
In this tutorial, you will learn how to use the basic functions and features of VCC Live’s Agent Workspace.
The VCC Live Agent Workspace is the main interface where agents work, and where they can handle calls, manage emails, gather information from websites or talk to fellow agents. To access the Agent Workspace, an agent user account with agent rights needs to be set up.
The agent workspace is designed to be suitable to perform daily agent tasks, providing all the necessary options and functions for a seamless workflow. It does not, however, feature most logs, statistics or settings regarding specific projects or the global operation VCC Live: these can be accessed via the Supervisor Workspace, which can be accessed with a Supervisor account and authorization.
In this tutorial you will learn about:
- First Steps and the Agent Workspace
- Handling Calls
- Tips and Tricks
- Managing Emails and Tickets
- Handling Chat Messages
1. First Steps and the Agent Workspace
1.1 Logging in to VCC Live
Once you receive your VCC Live credentials, you can log in to the VCC Live Desk application, and start exploring the screen environment.. After opening VCC Live on your computer, you will see the Login Screen.
- Submit your username, password and account name (Account name can be accessed by clicking on Show more >>).
- Press Log in. Then, the Login screen appears.
Tip: A number of customization options are available on the Login Screen. See Login Screen.
1.2 Logging in to a Project
After logging in to VCC Live, the project selection screen appears. Here you can only see projects that were created and assigned to you by your supervisor, and that are currently active. You can adjust your main project settings, marking which project you want to set as your primary project (you may choose only one primary project), and which other ones are your secondary projects. In primary projects you are able to participate in both inbound and outbound calling activities. Once logged in, the system loads in the screen of the selected primary projects. At the same time, if you have selected projects as your secondary projects, you would be able to receive calls from those projects too. Depending on the settings created by your supervisor, you may also be able to receive your own callbacks from different projects while logged into your primary project.
Note: If you are automatically logged in to a project or you cannot see the project selector screen, your supervisor may have enabled the Automatic project login feature. See Auto Project Login.
To Select and Log in to a project:
- Mark the radio button next to the project you want to log in to. This will be your primary project.
- Mark one or more checkboxes next to the projects you want to be your secondary projects.
- Press Log in.
Tip: Some logs and statistics options are available on the project login screen. Read more about them in the Logs and Statistics section.
Note: To see an updated status of your project screen, it is possible to refresh your Login Screen. To do that, simply Press Refresh at the bottom of the screen.
The General Settings Section of VCC Live from the Login Screen
If you click on the VCC Live logo in the upper left-hand corner of the screen you can access some of the VCC Live settings before you start working on your project. These are:
Local settings: audio- and sound-related settings, such as selecting your input device (microphone) or Media player parameters. You can also select your preferred language for spell-checking.
Certificate Manager: Access, view or edit certificates that are related to VCC Live.
Keyboard shortcuts: You can find information on Keyboard shortcuts in a later part of this tutorial.
About: Version number and official VCC Live website information of, along with License agreement details and additional licenses.
Profile: Information and privacy settings regarding your agent profile at VCC Live.
1.3 The Agent Workspace
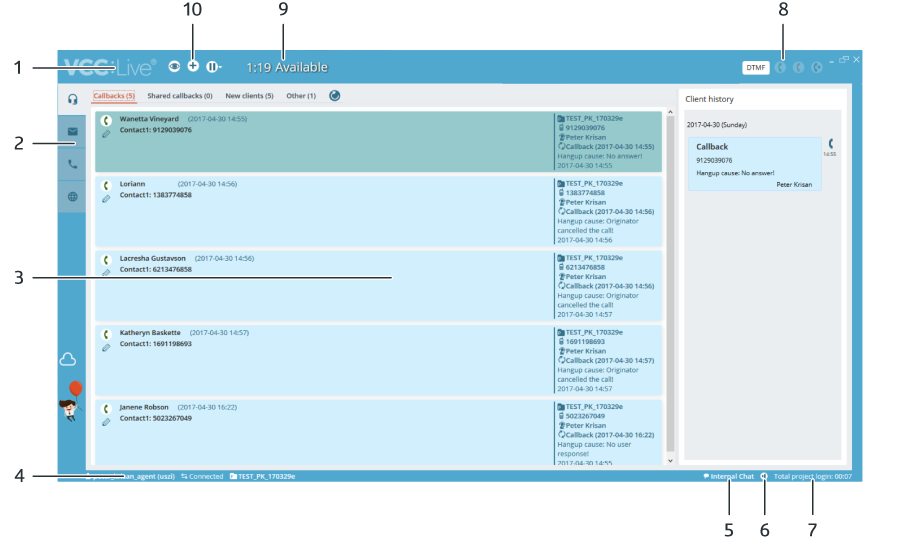
After setting up your primary and secondary projects, the main VCC Live hub, the Agent Workspace opens up. Here you can access all your active records, clients, emails, chats and more. But first, let’s see how the Agent Workspace is built up.
| name | description |
|---|---|
| 1. VCC Live menu | Access generic settings. Works only from the Project Login Screen. |
| 2. Taskbar | Use tabs to switch between the call, email and ticket, manual dialer, agent browser, and chat worksheets. |
| 3. Worksheet | The interface where you do most of your work. |
| 4. Status bar | A bar displaying various kinds of status information. |
| 5. Internal chat | Internal chat function providing a text-based, real-time communication interface with your team within VCC Live. |
| 6. Volume settings | Adjust the volume of system tones, and your or the other party’s speech volume. |
| 7. Project login time | Total time spent logged into the current project, as well as your time in various agent states: unavailable, available, on a break. |
| 8. Call and DTMF buttons | Carry out DTMF, accept, end, reject and transfer call activities. These are only available in certain circumstances (eg. DTMF is only available when in call status). |
| 9. Status info | Used to indicate your status, as well as the time spent in that status. |
| 10. Function keys | Open test mode, add a new contact, look up records, log out, or use break codes. |
Note: The layout of the worksheet may differ depending on the dialing mode the project is using, the agent script and the datasheet settings applied by a supervisor.
2. Handling Calls
One of VCC Live’s greatest features is its versatile way in handling calls. It manages calls as records, which receive dispositions provided by once a call is finished. Dispositions indicate the result of each call and show what the next possible steps should be, regarding that call.
During a call, a datasheet or script is displayed to the agent, with helpful information such as pre-written scripts, talking points or information sheets. If you are working with more than one project at the same time (in other words, you’ve selected at least one secondary project) the datasheet and script displayed will be based on the settings related to the project from which the call you are handling originated from.
2.1 Accessing Records Based on their Current Status (in Manual mode only)
- In order to access records that need to be called back by the logged-in agent, click on the Callbacks tab.
- In order to access records that need to be called back by any of the available agents, click on the Shared callbacks tab.
- To access records that weren’t called yet, click on New clients.
- On the Other tab, you will find records with Busy or Unavailable dispositions that are unavailable at the moment.
- Next to the Other tab you can find the optional Answering machine tab: it is displayed based on the supervisor setup of the agent’s User Rights. Here you can find calls where a client has left a Voicemail message.
You can refresh the screen to see the latest status of the different tabs by pressing .
Note: The number in brackets displays the number of records in that list.
Note: In automatic modes, agents see the dialing button in the middle of the screen until a call is established.
2.2 Using the Phone Buttons
Use the phone buttons for directly handling calls – the colors of these buttons suggest a conventional use
- Press
to answer an incoming call.
- Press
to end or reject a call.
- Press
to forward a call. This option is only available during a call that has a record already assigned to it.
You can assign a record to your call by either choosing one from the middle of your screen, or by creating a new record (for the latter, permission is necessary from your supervisor).
- Press
to activate the DTMF pad. This option is only available during a call.
Note: In projects using a predictive dialing mode, the system automatically initiates calls.
Note: Transferring is only available during a call that has a record already assigned to it.
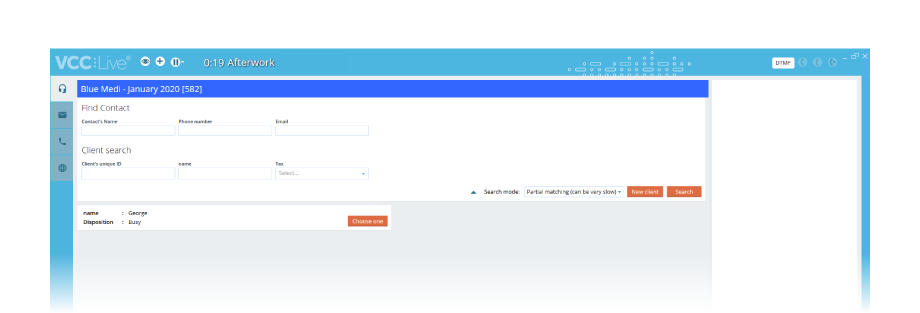
2.3 Manually Dialing a Contact from the Project’s Contact list
As an agent you may be allowed to call contacts manually. Access and call the phone numbers you want by following the steps below.. (Please note that on projects using a predictive dialing mode, the system automatically initiates the calls.)
- Select the contact you wish to call.
- Press
to place the call.
2.4 Carrying Out a Call Using the Agent Workspace in Manual Dialing Mode
In the steps below, you will see a detailed step-by-step process on how to initiate, carry out and finish a call in VCC Live.
- Choose one of the tabs mentioned in 2.1 above, and select the contact you wish to call.
- Press
to place the call.
- You will see on your screen what status you are in after placing the call: Waiting for call, Ringing, then In call. While In call, you can follow your sheet or script for your project, if provided.
- Once you have finished the call, press
to end the call.
- You will see your status change to Afterwork status: here you can evaluate the call and select a disposition for the record. Please note that it is also possible to choose a status while still in Call status.
- In the Dispositions pane, select the Unreached, Reached, or Success tab, then select a disposition depending on the result of the call.
- If you select a shared callback or callback type disposition, then you should set a callback date and time as well.
- If needed and allowed, add a remark in the text box.
- Press Save.
- After you have selected a disposition, the main page appears again, and you will be in Available status again.
Tip: In Afterwork status, it is also possible to choose the Save and Recall option to immediately try to recall the same phone number.
2.5 Accessing the Keypad and Extensions
There is a more direct way of initiating calls, which is used mostly for calling contacts that are not included in the contact list. You can access the keypad and extensions section by carrying out the following steps.
- Press
on the taskbar.
- Then you can either:
- Select the Call tab to activate the keypad and type or paste a number – please note that it must contain the prefix and not include the initial ’00’ numbers or special characters,
- Select the Call extension tab to access the extensions list or
- Select the Call agent tab to access the agent list.
Note: You can set the Outbound Caller ID by selecting a phone number from the Outbound phone number drop-down list. However, this feature must be enabled on the admin workspace. See To Enable Agents to Select the Outbound Caller ID.
3. Tips and Tricks
Once you get accustomed to VCC Live’s layout and functions, there are a number of ways of improving your workflow and thus performance. Here are some essential tips and tricks you may find useful when managing and handling calls in the Agent Workspace.
3.1 Keyboard shortcuts
Keyboard shortcuts are combinations of two or more keys on your keyboard. They provide quick access to commands (for example answering and ending calls, or starting a break) that you would otherwise have to access via the menus.
Using these shortcuts improves your performance and quicken up your workflow, therefore we recommend learning as many of them as you can, and include them in your daily work.
| Shortcut | Description |
|---|---|
| Ctrl + 1-9 | Call phone number (1-9) in Prework status |
| Ctrl + H | Hang up |
| Ctrl + D | Open DTMF keypad |
| Ctrl + T | Open call transfer menu |
| Ctrl + S | Save disposition during ‘In Call’ and ‘Afterwork’ status* |
| Ctrl + Shift + S | Save disposition and recall in ‘Afterwork’ status** |
| Ctrl + P | Resume work (return from break) |
| Ctrl + E | Open first record |
| Ctrl + O | Open break codes menu |
| Ctrl + F | Search contacts |
| Ctrl + N | New contact |
| Ctrl + R | Preview |
| Enter | Accept call |
- A disposition needs to first be selected.
** This works with Callback and Shared Callback dispositions.
3.2 Using Break Codes
When you are taking breaks, you need to use break codes to indicate your status as well as prevent the system from distributing calls to you.
Taking a break and resuming to work using a break code:
- While logged in to a project, press
.
- Select a break code. The pause/resume screen appears.
- After your break, while VCC Live shows your pause / resume screen, press
.

Tip #1: You can use the shortcut key Ctrl + O to open the break codes menu, then select a break code by choosing with the up+down arrow keys + confirming it by pressing Enter.
Tip #2: With the shortcut key Ctrl + P, you can return from a break to work.
Note: Admins can set up soft and hard limits. When you reach a limit, the color of the pause screen changes to indicate that you have exceeded the limit.
3.3 Using the Internal Chat Function
The internal chat of VCC Live provides an immediate, instant messaging interface to communicate with fellow agents in real-time. It can be used by all agents within the project
To Use the Internal Chat Function
- Press the
at the bottom of the screen to open Internal Chat.
- Enter your message in the textbox, then press Send.
3.4 Using the Agent Browser
The Agent Browser is a useful tool for agents that allows you to access crucial data or helpful information during your work, whether it be an in-call investigation or pre-work lookup. The Agent Browser can be accessed by agents after logging in, and is then available at all times when they are logged in. Admins can add up to 10 websites to the agent browser.
- Press
on the taskbar to access the browser.
- Use the navigation buttons to navigate your way around.
- Press
to return to the original web page.
- Press
to navigate to the previous page.
- Press
to navigate one page forward.
- Press
Tip: We recommend admins add websites that provide useful information for you, such as a company home page, browser-based CRM system or web-mapping service.
Note: A browser can also be made available in your project script or datasheet, if set up by a supervisor. In that case it is only available while a call is taking place. It can then immediately provide you with information related to a particular client, for example by opening a customer card in your CRM system.
4. Handling Emails and Tickets
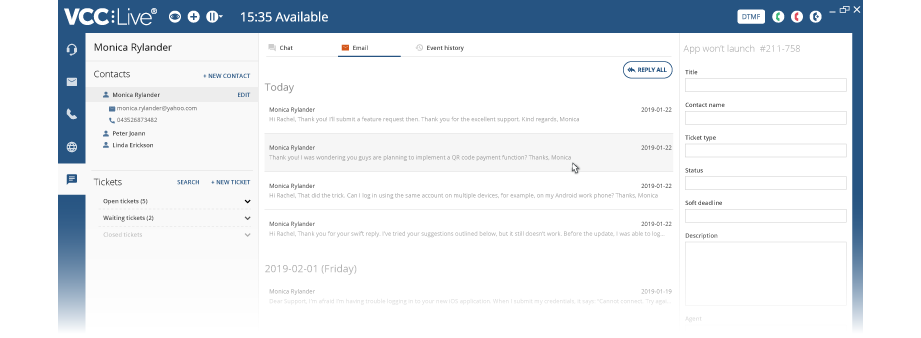
VCC Live features an efficient ticketing system: it converts customer emails into support tickets, which enables agents to follow up on emails, track the statuses of tickets as well as monitor SLA performance and statistics.
4.1 Accessing Emails and Tickets
The emails and tickets interface lists all new inbound emails, ongoing tickets, and tickets awaiting your response. The Emails and Tickets interface can be used by agents only if your supervisor sets up an email account related to the project you are working on.
You can assign a new email to a new or already existing client and open a ticket for the query, assign an email to an existing ticket or create a new ticket from scratch.
The Notification badges attached to the Message icon can help you get a quick overview on the current situation of emails and tickets:
- The number in the red circle in the upper right-hand corner shows the number of new emails
- The number in the blue circle in the bottom right-hand corner shows the number of open tickets that need your attention
Accessing your Emails and Tickets
- Press
on the taskbar to open the email and ticket lists. Here you can find 3 types of ongoing tickets or emails
- Inbound emails, which are new, unread emails.
- Open tickets, i.e. ongoing tickets that have been replied to by a customer but have not yet been handled by an agent.
- Waiting tickets, which are ongoing tickets awaiting a reply from the customer.
- Press
to view the spam folder, or press
to refresh emails and tickets.
If there is no email you can start your ticket with, it is also possible to create a New ticket from scratch.
- Press Create Ticket button to create a new ticket, or select a new email.
- If you want to assign the email to an existing client, use the Search for records pane to search for a record, and then select the customer. If you want to assign the email to a new client, use the Create new record pane, and fill in the required information, then press Create.
4.2 Handling Tickets
When you open a ticket, the system takes you to a separate window, where you can manage your tickets in a dedicated screen. This screen appears under a new tab, which you can find on the left-hand side of the window.
Here you can find all the relevant information regarding your ticket and client, for example, contact details, other tickets assigned to the client, chat and email threads and event history.
Sending Emails from the Ticket List
- Once the email and ticket interface is open, select an email or create a new one by pressing New ticket.
- Select a contact email address or add a new one from Contacts.
- Press Save ticket.
- Select on Email tab a New email button
- Select a template from list (if you have)
- Enter the subject, compose your message, then press Send.
Changing the status of a ticket
In order to keep track of your ongoing tickets, you can assign a different status for each ticket, so you can see what work needs to be done on each of them. The available statuses you can assign to your tickets are as follows:
- Waiting for agent (park) – appears in the Waiting tickets part of the interface
- Waiting for contact’s response (park) – appears in the Waiting tickets part of the interface
- Waiting for third party (park) – appears in the Waiting tickets part of the interface
- Successful (closed) – doesn’t appear on the agent’s interface, unless a customer answers again within the same email thread
- Unsuccessful (closed) – doesn’t appear on the agent’s interface anymore, unless a customer answers again within the same email thread
To change the status of a ticket, carry out the following steps:
- Select an existing ticket
- On the right-hand side, change the status of the ticket as desired, add comments if necessary and press Save ticket.
Note: Status is the same for a ticket as disposition is for a call, and is obligatory, while Ticket type is an internally set tag that you can use with your team. All emails and tickets are searchable, although, to be searchable, tickets must be assigned to agents. For more information on Ticket types, see below description.
Changing the Ticket type
- Select an existing ticket
- On the right-hand side, change the Ticket type and press Save ticket. Available Ticket types are set specifically for a project by the project Supervisor.
Note: Using the Ticket type field is not obligatory and you may not be able to select anything here if your supervisor did not specify possible Ticket types in the project settings.
5. Handling Chat Messages
VCC Live’s Chat feature can be integrated with a website or a Facebook page, allowing visitors to get in touch and communicate with agents in real time. When a visitor sends you a message via your website, you can instantly respond to it from within the VCC Live application.
5.1 Access Chat Messages
When a visitor sends you a message, it appears automatically in VCC Live’s Agent Workspace. The chat interface has a chat-bubble icon, which can be found on the left-hand side of the screen, along with the other icons including Calls and Tickets.
In order to access incoming chat messages:
- Click on
on the left-hand side
- Type your reply and click on Send (alternatively you can press Enter too).
Note: Chat messages are assigned to agents independently, and once assigned, no other agent can see that message on their interface.
5.2 Other actions you can perform with chat messages
Besides communicating with customers, you can manage your messages to keep track of them in your ongoing project.
- To Assign the Chat conversation to a record: open the conversation, then find, select or create a new record, and assign it to your message using the panes on the left-hand side
- To View Conversation History with the visitor: open the conversation, then expand the Previous conversation drop-down pane below the conversation.
- To Transfer Chat Conversations to Other Queues or Agents: open the conversation, press Transfer, then select a queue or user from the list.
5.3 Overview of the two Chat Windows
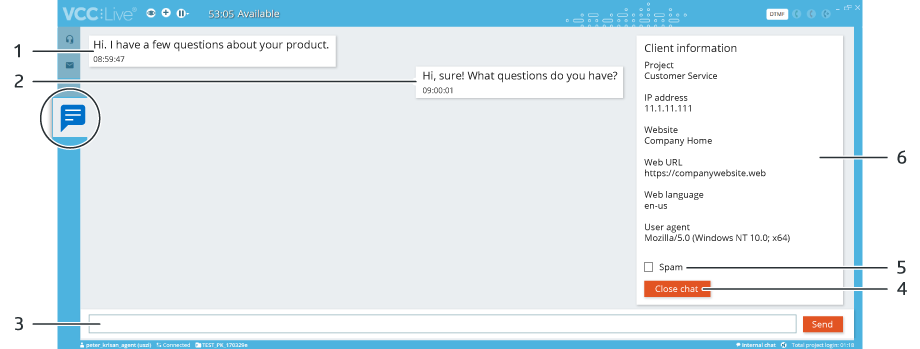
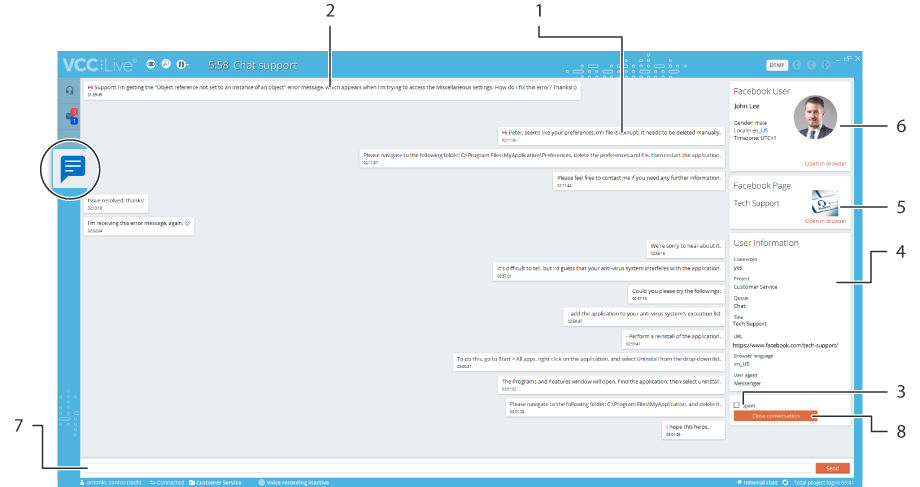
Below you can see a comprehensive overview of the two Chat screens you can use in VCC Live:
- the Website Chat which appears when a visitor to the company’s website messages you), and
- the Facebook Chat screen (which appears when a visitor to the company’s Facebook page messages you via Facebook).
Website Chat overivew
| name | description |
|---|---|
| 1. Received message | Message from the client. |
| 2. Sent message | Message you’ve sent. |
| 3. Reply text field | Enter your message, then press Send to send the message. |
| 4. Close button | Exit the chat conversation. |
| 5. Spam radio button | Blocks the sender by IP address. |
| 6. Client information | Information about the sender, including source website, website language, IP address, and browser used. |
Note: Note: Once the auto-response function is set up for a project by a supervisor, auto-generated responses are also seen on this screen.
Facebook Chat overview
| name | description |
|---|---|
| 1. Sent message | Message you’ve sent. |
| 2. Received message | Message from the client. |
| 3. Spam radio button | Blocks the sender by IP address. |
| 4. Agent information | Generic information about the agent. |
| 5. Facebook page | Information about the business page the client reaches out from. |
| 6. Client Facebook profile | Information about the sender. |
| 7. Reply text field | Enter your message, then press Send to send the message. |
| 8. Close button | Exit the chat conversation. |








Comments
Can’t find what you need? Use the comment section below to connect with others, get answers from our experts, or share your ideas with us.
There are no comments yet.