Custom States
Estimated reading time: 10 minutes | Target users: Supervisors, Administrators
With custom states in VCC Live, you can manage periods för agents, when they can focus on a certain type of work, e.g, managing only emails, chats, or calls.
In this tutorial, you will find out how custom states work in VCC Live’s environment and how you can set them up to work efficiently.
This tutorial includes:
- How custom states work in VCC Live
- How to create a custom state
- How to manage your custom states
- Custom state alerts
- How agents can choose a custom state
- What an agent can see while in a custom state
- Logs and statistics for custom states
1. How custom states work in VCC Live
A custom state represents an agent status that signals limited availability. During a workday, agents can decide to move to a custom state by switching their status to a custom state. In such cases, instead of a work-related status, such as Prework or Call, their time is tracked in terms of the selected custom state.
As an example, typical custom states can be:
- “Do not disturb”
- “Ticket time”
- “Email answering”
- “Chat focus”
- “Inbound call only”
- “Transfers only”
2. Create a new custom state
2.1 Setting up step by step
Creating a custom state is done in the Admin user interface; therefore, only users with supervisor or admin rights can perform this action. In addition, the break codes right needs to be allocated to the supervisors and admins, so they can see the break codes and custom states menu in the VCC Live > Contact Center menu.
To create a customized break code for your project, follow these steps:
- Navigate to VCC Live > Contact Center > Break codes menu
- Click the triple dot icon (…) and select New break code.
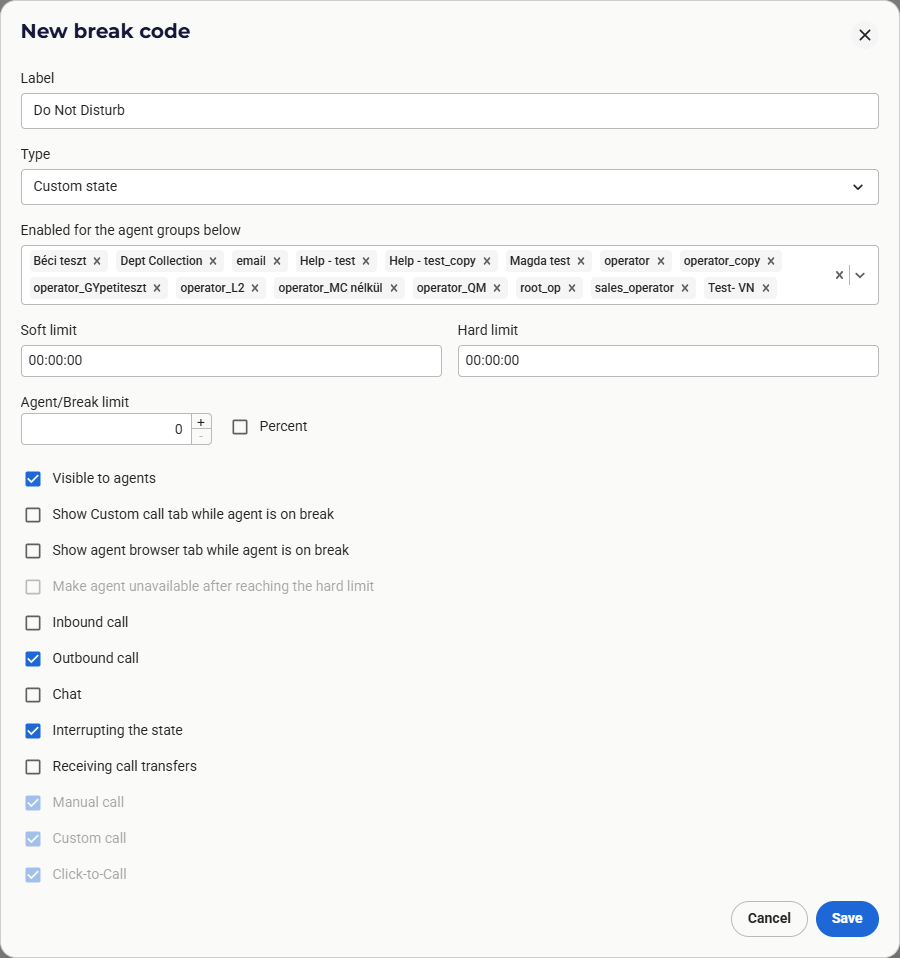
- In the pop-up modal, type a name for your custom state. This name appears to agents and supervisors, and this is what you see in logs and statistics.
- In Type, select Custom state.
- Select the agent groups you want to be connected to this custom state. These agent groups can then use your custom state*. By default, all agent groups are selected.
- Set the soft and hard limits.*
- Mark the Show Custom call tab while agent is on break and Show agent browser tab while agent is on break checkboxes if necessary.
- Select what type of interactions can agents manage in this status: Inbound call, Outbound call, Chat, Call transfers
- Select whether interrupting this state should result in the agent returning to this state or not
- Once you are done, press Save.

2.2 Definitions
Soft limit
Refers to a duration of time. When this time expires, agents and supervisors are notified that the time in the custom state is about to end. Real-time monitoring and the User state log can display an agent’s soft limit status by displaying an agent’s name in bold. When the soft limit is reached, the agent interface window turns orange, indicating that the agent should return to the Available state as soon as possible. Soft limits are also used when Alerts are set up.
Hard limit
Refers to a duration of time. When this time expires, agents and supervisors are notified that the time in the custom state has ended. Real-time monitoring and the User state log can display an agent’s soft limit status by displaying an agent’s name in red. When the soft limit is reached, the agent interface window turns red as well, indicating that the agent should return to the Available state as soon as possible. Hard limits are also used when Alerts are set up.
Show on Custom Call tab
Marking this checkbox makes it possible for your agents to choose a break while they are working on a Custom Call tab.
Show on Agent browser tab
Marking this checkbox makes it possible for your agents to choose a break while they are working on an Agent browser tab.
Inbound call
Marking this checkbox means that agents on this custom state can receive inbound calls from the call queues to which they are added.
Outbound call
Marking this checkbox means that agents on this custom state can receive outbound calls from the dialer if a dialer is set up in the project that they have logged into.
Chat
Marking this checkbox means that agents on this custom state can receive chats from the chat queues to which they are added.
Interrupting the state
Unmarking this checkbox makes it possible for your agents to return to the given custom state if they have made a call or interrupted the custom state..
Receiving call transfers
Marking this checkbox means that agents in this custom state can receive call transfers from other agents.
3. Managing your custom states
3.1 Edit custom states
By selecting one of the custom states in the Break Code menu, you can see its parameters and available settings. To modify any of the parameters, edit them as required on this interface, then press Save at the bottom of the screen.
3.2 Remove custom state
To remove a custom state, follow these steps:
- Select the custom state you want to remove.
- Click the triple dot icon (…) and select Delete break code.
- In the Attention pop-up message, press Proceed to confirm the removal of the custom state.
4. Custom state alerts
Once you have set up your soft and hard limits, you can assign an alert to them – that is, a notification sound or a pop-up window. Please note that if you want to send alerts to supervisors, then you must meet these two criteria:
- Supervisors and agents have to be on the same team
- The Supervisor’s Real-time monitoring interface has to be open
For agents, the pop-up window shows that their time in their custom state has reached the soft or hard limit.
For supervisors, it shows this same information, plus the name of the agent who exceeded the limit.
To set up a custom state alert, follow these steps.
- Navigate to VCC Live > Contact Center > Break codes menu
- Select a custom state and at the bottom of its parameters, click on Manage alerts...
- In the pop-up modal, mark the checkboxes assigned to soft and hard limits as needed.
- Press Save
Note: You can also enable an option for each custom state that will put the agent into an unavailable state once the agent reaches the hard limit.
5. Choosing a custom state
To choose a custom state from the agent interface, follow these steps:
- Click the state selector at the top of the window
- Select a custom state from the drop-down menu (custom states that reached a set agent limit already are grayed out and cannot be chosen).
- You can see now the screen showing your chosen custom state and the time spent in that status.
- Return to the Available state by selecting Available in the status selector
6. Logs and statistics for looking up agents’ custom statuses
From a supervisor’s point of view, here are the most important logs and statistics interfaces where you can check custom statuses – number of occurrences, time tracked, etc.
- User State Log: A report that shows all states that users were in (including custom statuses). It includes projects and records information. You can reach it via VCC Live menu > Logs and Statistics > User State Log.
- From the status filter section, you can use AUX to search for custom statuses.
- User-Based Statistics: This includes user-based statistics for every project for a specified period of time. It breaks down data into three layers (dimensions): Project, User, and Date (the order can be modified).
- Key columns: In this table, you can insert or remove all of your custom (and default) custom state columns (‘count’ and ‘duration’ columns alike). Read more about it here.
- Real-time monitoring: This interface enables you to get an insight into your daily operations, such as the status of your agents, or your inbound and outbound activities. You can also listen to ongoing conversations, talk to an agent without the customer hearing, transfer agents between projects, send messages to agents, or change the agents’ status. Read more about it here.
- Key columns: On the Users pane:
- Status, which shows the custom state if an agent is on one at the moment
- Time spent in status, which shows the length of time the agent has been in the said status.
- Break, which shows the number of agents on a break or custom state at a given moment.
- On the Outbound pane
- Break, which shows the number of agents on a break or custom state at a given moment.
- Key columns: On the Users pane:


Comments
Can’t find what you need? Use the comment section below to connect with others, get answers from our experts, or share your ideas with us.
There are no comments yet.