


Users, Rights and Teams
Estimated reading time: 22 minutes | Target users: Supervisors, Administrators
Table of Contents
- 1. Users
- 1.1 Introduction
- 1.2 Create a new user
- 1.3 Reset a User’s Password
- 1.4 Inactivate a user
- 1.5 Redistribute Agent Callbacks when an Agent is Sick or on Holiday
- 2. Rights
- 2.1 Introduction
- 2.2 Create a New Rights Group
- 2.3 Copy a Right Group
- 2.4 Remove a Right Group
- 2.5 Give or Restrict Access to Specific System Features
- 2.6 Agent Rights
- 2.7 Supervisor Rights
- 2.8 Grant Access to the System for Users Based on IP Address
- 3. Teams
- 3.1 Introduction
- 3.2 Create a team
- 3.3 Add or remove a team from a project
- 4. User management example case
VCC Live’s user management system uses an advanced user management system that allows you to manage your users, allocate your team members to system interfaces, and let your users communicate with each other. This advanced system is based on three interfaces:
Users – Here, you can add new users and store their basic information, such as email addresses or phone numbers. Here you can also inactivate users, reset user passwords, see an agent’s project assignments, and more.
Rights – Here you can specify the interfaces and features that various user rights groups are allowed to see and use.
Teams – Here you can create various teams and assign them to specific projects for easier reporting, or limit team members’ access to certain projects.
For a summary on this topic, please check our User Rights Groups Guide.
In this tutorial, you will learn about:
- Creating users and inactivating users
- Creating and managing user rights groups
- Creating and handling teams
1. Users
1.1 Introduction
Creating a user in VCC Live means allowing a user personal access to the application’s various features, logs, and statistics. In VCC Live, there are two user rights group types, which means that once a new user is created, it must belong to one of these group types.
A user in VCC Live belongs to a user group, which then has to belong to either the Supervisor, or Agent group type.
These group types above are also the default user rights groups. Based on them, additional Agent- and Supervisor-type right groups can be created. More details on this in section 2.2.
It is worth noting that these two categories are:
- Exclusive to one another, so one user can belong to only one of these group types, and
- Fixed, in the sense that once a user has been created and assigned to a Supervisor-type group, then that user cannot be converted to be an Agent-type user and vice versa.
Tip: Users can switch from one group to another, as long as they remain in their respective group type.
1.2 Create a new user
Expand your group and create a new user by following these steps:
- Go to VCC Live menu > User Management > Users
- Click Create new user
- Type in the user’s Name, Username, and Password
- You can use alphanumeric and underscore (“_”) characters for your username
- Password minimum requirements: 5 characters, including 2 uppercase characters, 1 number and 1 special character.
- Select a group for your user, then click Next.
- Assign your user to a team from the list, then click Next.
Note: You can customize password minimum requirements based on your own needs in VCC Live menu > Contact Center > Global settings > Password Policy.
Now you will be able to see your new user in the user list. By selecting them, you can access, view, and edit your user’s settings in the right-hand side pane:
- Default settings lists the parameters that have been entered in the creation process
- PIN number authentication is available to anyone with a Premium subscription. A calling supervisor has to enter a PIN number provided in the IVR menu. Once the system confirms the code, the call is placed in the queue. This function is used when you call a dedicated support phone number while not using the application.
- Custom settings lists fields that can provide additional information regarding the user, such as First name, Last name, Facebook page, LinkedIn page etc.
- Advanced settings lets you set the status of your user to Active or Inactive, enter a contact phone number and email address, and sign the user up for different types of Newsletters and notifications from VCC Live.
- Project / Skill level (available only to agent groups) displays a list of available projects and agent assignments to them. Drilling down features within a project is possible if a project has multiple queues defined. Assigning your agents to specific queues can be verified here.
- Automatic project login (available only to agent groups) allows you to enable Automatic project login features for the selected agent. When enabled, a list of the agent’s projects is displayed, and their order can be modified. The system can then automatically log agents out from the highest priority project (the first one on the list) if there are no more callable records and log them into the next priority project.
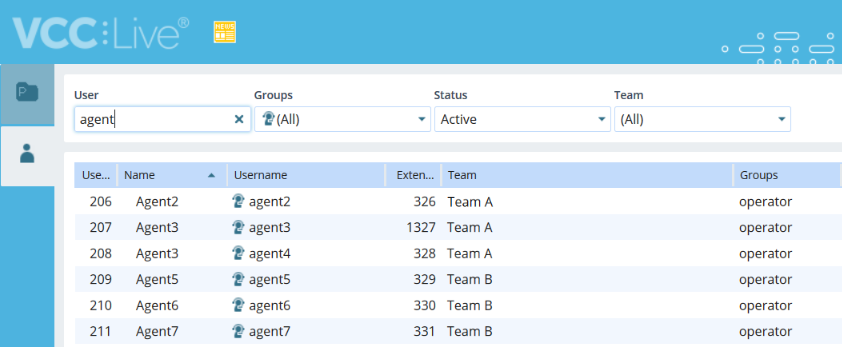
Note: You can filter and copy/export your list of users by using the drop-down filtering options at the top of the screen (Groups, Status, Team) and then clicking on either Export or Copy to Clipboard.
1.3 Reset a User’s Password
If you ever find yourself in a situation where you or your colleagues may not remember their passwords, here is what to do:
- Go to VCC Live menu > User Management > Users
- Select the user whose password you want to reset
- Enter a new password in the Default settings section in the right-hand side pane.
- Re-enter the new password in Confirm new password.
- If necessary, mark the Confirm new password (recommended).
- Press Save
Passwords can be reset by users who:
- Belong to a Supervisor-type group
- Belong to the same team as the user whose password is being reset
The person performing the password reset must have the same or higher-level rights than the user who is requesting the password reset.
1.4 Inactivate a user
If one of your agents or supervisors leaves your team, you can inactivate their account by following these steps:
- Go to VCC Live menu > User Management > Users
- Select the user you want to inactivate
- Scroll down on the right-hand side section, and navigate to the Advanced settings pane.
- Set the status from Active to Inactive.
- Press Save
When an agent user’s account is inactivated, all callbacks belonging to them in each of their projects are automatically redistributed to other agents. Once done, this action cannot be undone.
1.5 Redistribute Agent Callbacks when an Agent is Sick or on Holiday
If one of your agents or supervisors from your team is sick or goes on a holiday, we recommend redistributing the agent’s callbacks. Here’s how you can do it:
- Go to VCC Live menu > User Management > Users
- Select the agent whose callbacks you want to redistribute
- In the Advanced settings pane on the right-hand side, mark the Callback redistribution checkbox.
- Press Save
By enabling this redistribution function, the agent’s callbacks are shared with all agents in each project, respectively.
The advantage of this solution is that this operation can be easily undone once the agent is back and Callback redistribution is disabled (checkbox unmarked). This means any agent callbacks that are due from that moment on are again owned by the original agent.
2. Rights
2.1 Introduction
Suited to your needs, in VCC Live, you can create as many user rights groups as you wish.
As described above, there are two main types of user group types: Supervisor and Agent group types. To put it simply:
- If you log in to VCC Live with a supervisor-type user account, you will see the supervisor interface where you can set up projects, export logs, statistics, etc.
- If you log in to VCC Live with an agent-type user account, you will see the agent interface, where you can initiate calls, handle messages, finalize records,, etc.
When creating user rights groups, you need to decide whether you want to assign or restrict rights to your supervisor or operator groups. Groups cannot be combined, and once a user is created as a supervisor, their rights can only be modified within supervisor rights groups by assigning the user to another supervisor Right group or by modifying his group’s rights.
A user can belong to only one Right group at a time – this means that if you want a person to be able to use both the agent- and the supervisor interface, then two separate user accounts need to be created for that person: one belonging to an agent group (an agent user account) and one belonging to a supervisor group (a supervisor user account).
If a user rights group has fewer rights than another group, members in the former won’t be able to modify the group rights of the latter in the Rights menu. A group with fewer rights can also not access groups with more rights, either. By default, any supervisor right group has a higher number of rights than any agent user rights group, so users in a supervisor-type group can always access agent-type groups.
Note: Administrator groups belong to the supervisor rights group type.
It is possible to create groups with different sets of enabled rights, but with the same overall totals. This means that, for example, Group A can have one set of rights, and Group B a different set of rights, with both groups having the same total number of rights.
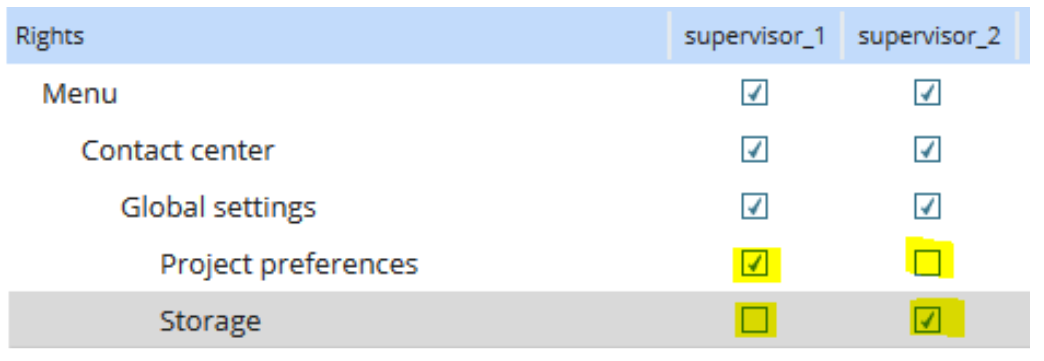
This system of user rights groups with different levels of rights and permissions affects the capabilities of users belonging to a group. Users in a lower-level right group cannot:
- see members of higher-level groups in logs, statistics or in the Users menu
- see higher-level right groups in the Rights menu
Regarding the two groups in the above example, this means that the supervisor_2 group cannot see or modify the Project preferences settings of the supervisor_1 group, and at the same time, the supervisor_1 group cannot see or modify the Storage settings of the supervisor_2 group.
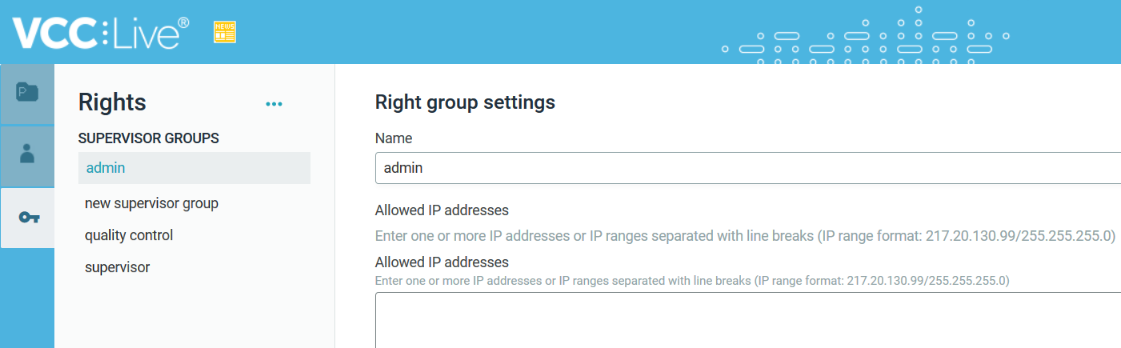
2.2 Create a New Rights Group
Expand your system of rights groups and create a new rights group by following these steps:
- Go to VCC Live menu > User Management > Rights.
- Click on the Settings icon (
 ) and select New group.
 - Type a Name for your group and mark whether it is an Agent- or Supervisor-type group.
- Check the boxes next to your preferred screens and interfaces in VCC Live. The ones you select here will be available to members of your newly created user rights group.
- When you are satisfied with everything, click Save.

2.3 Copy a Right Group
Save time by duplicating an already-existing user rights group, which then can be modified as necessary.
- Go to VCC Live menu > User Management > Rights.
- Select the right group you want to copy.
- Click on the Settings icon () and select Copy group.
- Type a Name for your duplicated group and then press Clone.
- Your new group will appear in the group-list on the left-hand side pane. If you wish to apply different settings to this new group, don’t forget to press Save once you’re done.

2.4 Remove a Right Group
To remove a saved user rights group, follow these steps:
- Make sure there are no users assigned to the group you are about to delete, as the system won’t allow you to remove a group while it has users assigned to it.
- You can remove a user from right group A in VCC Live menu > User Management > Users, by clicking on a user assigned to right group A and selecting another right group in Default settings > Groups.
- Go to VCC Live menu > User Management > Rights
- Select the right group you want to remove.
- In the Attention pop-up modal, click Delete.

2.5 Give or Restrict Access to Specific System Features
Once you have created a user rights group, you can edit and customize it to your needs. This means either:
- Granting a group access to a right by putting a checkmark next to it, so they can access specific screens and interfaces, or
- Restricting a group’s access to a right by not putting a checkmark next to it.
All available system permissions are grouped under various interface categories, so it is easier to see what the listed rights refer to.
To grant or deny access to a user rights group, follow these steps:
- Go to VCC Live menu > User Management > Rights
- Select the right group you want to edit.
- Mark the rights you want to be accessed by the group you are editing, and unmark the ones you want to be restricted from that group.
- Use the Search feature in the upper right-hand corner to find the rights you are looking for.
- Click Save to save your settings.

Note: You can edit multiple agent or supervisor right groups at the same time by pressing CTRL while selecting them.
2.6 Agent Rights
You can find below the list of agent rights that can be allocated to the right groups
| Name | Description | Enabled by default |
|---|---|---|
| Login button | “Login” button appears on the login screen. | Yes |
| Agent can select which assigned project to log into | The agent can select which projects to log into as primary (only 1 project) and secondary projects (1 or more projects). If this is not enabled, but the agent is assigned to more than 1 project, then the agent can only select which project to log into as the Primary project (the other projects will be automatically selected as secondary, and selection cannot be disabled). | Yes |
| Show chat and email tabs | Displays chats and emails to an agent as part of the Omnichannel communication. | Yes |
| Transferring emails to queue | The agent can transfer an inbound email to a different email queue before assigning it to a ticket. | — |
| Parent/child ticket creation | When enabled, agents can create new parent or child ticket relations from existing tickets. | — |
| Add new client button | The Plus icon is displayed in the upper left corner after logging into a project. On click, the agent can add a new record. | Yes |
| Search button | Search icon is displayed in the upper left corner after logging into a project. On click, the agent can search records. | Yes |
| Search in secondary projects | If Search is enabled, then on the search screen, on the lower right side there is a “Search in secondary projects” checkbox. The checkbox doesn’t appear in the case of an incoming call (if the agent has to select the record manually). | — |
| Callback list in aux | “Callbacks” button appears on AUX screen. | — |
| Editing callbacks in aux | If “Callback list in AUX” is enabled, then after opening the list, the callback time can be edited by clicking on the time of the callback. Callback cannot be edited on the login screen, regardless of this setting. Callback cannot be initiated during AUX | — |
| Preview button | The Eye icon is displayed in the upper left corner. On click, the agent can preview records (enter test mode). Call cannot be initiated from the Preview function. | — |
| Ticket list | 1. After logging in, the email icon is displayed on the left panel, and the agent can handle emails. 2. In AUX a “Ticket list” button is displayed, and the agent can check tickets during AUX. | — |
| List other agents tickets | In the “Ticket list” window (if enabled), list other agents, and they can be selected as filter criteria. | — |
| Call statistics (deprecated) button | Global call statistics and user-based statistics appear on the AUX screen and login screen. | Yes |
| Show Custom columns in Call statistics | Within Global call statistics, if you click on the cogwheel icon to control which columns are visible, the custom columns are listed for making them visible. | Yes |
| CDR log | “CDR log” button appears on AUX screen. | — |
| Play voice file | Play button column in the “CDR log”. | — |
| Show scores to agents in CDR log | Displays an extra column in the “CDR log” window (if enabled). Column title: “Scores”. | — |
| Check quota button | “Check quota” button appears on AUX screen. | Yes |
| Number of waiting clients in a particular queue | If enabled, a notification is displayed in the lower right corner if there is a waiting call in the queue. | Yes |
| Internal chat | In the lower right corner, “Internal chat” is displayed. On click, it opens the internal chat tab, where agents can chat together. | Yes |
| Show DTMF | If enabled, the agent can see what DTMF buttons the customer enters in their phone (the numbers are displayed on the bottom of the window, to the left of “News”) | — |
| Transfer | During a call, in the upper right corner, a blue transfer button is displayed and can be clicked to transfer the call. | Yes |
| Transfer – number | Enables transferring the call to a phone number. | Yes |
| Transfer – agent | Enables transferring call to another agent. | Yes |
| Transfer – extension | Enables transferring the call to an external extension. | Yes |
| Attended transfer (VCC Live 360) | An agent can make attended transfers. If disabled, only blind transfers are available and transfer to other agents is unavailable. | Yes |
| Quality management statistics | “Quality management statistics” button appears on the login screen and AUX screen. | Yes |
| Rater | Displays an extra column in the “Quality management statistics” window (if enabled). Column title: “Rated by”. | Yes |
| Description added by rater | Displays an extra column in the “Quality management statistics” window (if enabled). Column title: “Description”. | Yes |
| Values set by rater | Displays 3 columns in the “Quality management statistics” window (if enabled). Content: “Rating number”, “Maximum value”, “Rating percent”. | Yes |
| Play voice file | Displays the play button column in the “Quality management statistics”window (if enabled). | Yes |
| Rate details | In the “Quality management statistics” window (if enabled), double-click on the row of the call or the QM categories to open the details of the assessment. | Yes |
| Agent voice recording management | If enabled, the agent can turn off voice recording by clicking the “Voice recording active/inactive” label on the bottom of the window (next to the project name) | — |
| Custom call | After logging in, the phone icon is displayed on the left panel, and the agent can start custom calls. | — |
| Custom call – call | On the Custom call tab (if enabled), there is an extra tab displayed within, for making custom calls. | — |
| Custom call – agent | On the Custom call tab (if enabled), there is an extra tab displayed, for calling another agent. | — |
| Custom call – extension | On the Custom call tab (if enabled), there is an extra tab displayed within, for calling an external extension. | — |
| Access to answering machine | After logging in, the “Answering machine” tab is also available for selection. If the agent clicks on it, they can see the list of calls with “Answering machine” disposition. | — |
| Tools | Before logging into a project, the agent can click on the VCC Live menu (upper left corner), and “Tools” will be listed in the menu. | Yes |
| Test mode button | “Test mode” button appears on the login screen. | Yes |
| Statistic buttons in ‘Unavailable’ state | “Global call statistics” and “User-based statistics” buttons appear on the login screen. | — |
| Finance data at the agent | No extra function (parent right for the next 3 rights) | Yes |
| Agent’s commission at calls statistic | Allows “Agent commission” (Operátori jutalék) column to be selectable for display in “Global call statistics” window (if enabled) (=the column title appears in the list after clicking on the cogwheel icon). Not visible by default, it has to be set as visible by clicking on the cogwheel and selecting it. | Yes |
| CC commission at calls statistic | Allows “CC commission” column to be selectable for display in “Global call statistics” window (if enabled) (=the column title appears in the list after clicking on the cogwheel icon). Not visible by default, it has to be set as visible by clicking on the cogwheel and selecting it. | Yes |
| Call cost | Allows “Call cost” column to be selectable for display in “Global call statistics” window (if enabled) (=the column title appears in the list after clicking on the cogwheel icon). Not visible by default, it has to be set as visible by clicking on the cogwheel and selecting it. | — |
| 2FA can be turned off | Allows agents to turn off 2FA once it is set up. If disabled, agents cannot turn off 2FA. | Yes |
| Log in without a microphone | When enabled, agents can log in to VCC 360 without a microphone. Outbound call buttons will be disabled. | — |
2.7 Supervisor Rights
The following list captures the possible rights for supervisors and users
| Name | Description | Enabled for Admin by default | Enabled for Supervisor by default |
|---|---|---|---|
| Menu | Enables access to Main menu | Yes | Yes |
| Contact center | Enables access to Contact Center settings in the Main menu | Yes | Yes |
| Global settings | Enables access to Global settings in Contact Center settings | Yes | Yes |
| Project preferences | Enables access to set Project preferences, including timezone, default call recording filename and after-call work limits. | Yes | Yes |
| Storage | Enables access to general settings as certificates, codes, and click-to-call port. | Yes | — |
| General | Enables access to set global storage settings, including when call recordings are moved to the trash. | Yes | Yes |
| OAuth settings | Enables access to set OAuth settings for the account | — | — |
| Security settings | Enables access to Password policy settings and to sign up for Security notifications. | Yes | — |
| Robinson list | Enables access to global Robinson list settings, including creating, editing, and deleting Robinson lists. | Yes | — |
| Email account settings | Enables access to email account settings, including creating and deleting accounts. | — | — |
| Master tables | Enables access to creating master tables. | Yes | Yes |
| Database API | Enables access to Database API settings, including IP filters and API tokens. | Yes | Yes |
| IVR Sound Library | Enables access to IVR sound library, including adding, editing, and deleting custom IVR sound folders for languages. | Yes | — |
| Webhook | Enables access to global Webhook settings, including creating and managing global webhooks for all projects. | Yes | Yes |
| Break codes | Enables access to managing break codes, including soft and hard limits. | Yes | Yes |
| Phone book | Enables access to set up phone books, import records manually or in bulk mode, and attach phone numbers to projects. | — | — |
| Buy phone numbers | Enables access to buy phone numbers in the Tools menu. | Yes | — |
| Quality management categories | Enables access to Quality management category setting, which can be used globally in any project. | Yes | Yes |
| Projects | Enables access to the Projects menu from where the list of active, inactive, and deleted projects can be easily retrieved. | Yes | Yes |
| Action menu | Enables access to the Actions menu on the Projects page from which new projects, new folders, and other actions can be easily triggered. | Yes | Yes |
| New project wizard | Enables access to creating new projects with the project wizard. | Yes | Yes |
| Delete project | Enables access to deleting a project. | — | — |
| Clone project | Enables access to cloning a project, which can be initiated from the Project Action menu. | Yes | Yes |
| Project folder actions | Enables the user to create, access, modify, move, or delete project folders. | Yes | Yes |
| General tab | Enables access to the General tab of a project, where the user can set the state, period, and other settings of a project. | Yes | Yes |
| Limits tab | Enables access to the Limits tab of a project, where global afterwork soft and hard limits can be overridden, notification on empty database can be set up, and coloring for agent statuses can be defined. | Yes | Yes |
| Teams tab | Enables access to the Teams tab of a project, where Teams can be added to a project. | Yes | Yes |
| Webhook tab | Enables access to the Webhook tab of a project, where project-level webhooks can be defined. | Yes | Yes |
| Quality management tab | Enables access to the Quality Management tab of a project, where quality management scorecards can be set up for individual projects. | Yes | Yes |
| Agent browser tab | Enables access to the Agent browser tab of a project, where you can define individual websites available for agents when they log in to this specific project. | Yes | Yes |
| Channels | Enables access to manage channels for a project, including Voice, SMS, Email, Chat, and Social media. | Yes | Yes |
| Voice | Enables access to Voice channel settings. | Yes | Yes |
| Modifying call settings in the Call menu | Enables the possibility to change call settings. | Yes | Yes |
| Inbound | Enables access to the Inbound settings page, including processes, templates, inbound settings, test calls, and text-to-speech. | Yes | Yes |
| Apply inbound changes | Enables access to apply changes to inbound settings, including to the setup of the IVR. | Yes | Yes |
| Phone numbers in transfer process | Enables access to use phone numbers in the transfer process. | — | — |
| Outbound | Enables you to access the outbound setup page. | Yes | Yes |
| Routing & Calling Line Identification tab | Enables access to the Routing & CLI tab within the Outbound settings, where phone numbers can be assigned to outbound voice calling. | Yes | Yes |
| Dial settings | Enables access to change dialer settings for a given project. | Yes | Yes |
| Set dialing time | Enables access to set and change dialing time for the dialer, which is particularly relevant for projects with power and predictive dialer and outbound IVR. | Yes | Yes |
| Custom predictive templates | Enables access to create, save, and use custom predictive templates during predictive dialing. | Yes | — |
| Agent timezone | Enables access to use the Agent timezone option in dialer settings. | Yes | — |
| SMS | Enables access to the SMS menu within a project and to manage SMS-related settings. | Yes | Yes |
| Enables access to the Email menu within a project and to manage Email-related settings. | Yes | Yes | |
| Automatic deletion of e-mails, chats, and related tickets | Enables the user to set up the automatic deletion of emails, chats, and related tickets within a project. | — | — |
| Social media | Enables access to the Social media menu within a project and to manage Facebook page-related settings. | — | — |
| Database | Enables access to the Database menu within a project. | Yes | Yes |
| Fields | Enables access to the Fields menu within the Database section in a project. Users can create new fields and manage existing fields. | Yes | Yes |
| Import | Enables access to the Import menu within the Database section in a project. Users can start to import data into the project or update the database. | Yes | Yes |
| Export | Enables access to the Export menu within the Database section in a project. Users can start to export data from the project using filters, templates, and selected dispositions. | Yes | Yes |
| Mass export | Enables access to the Mass Export menu, in which users are able to export data from multiple projects at the same time to emails or a file storage solution. | Yes | Yes |
| Records | Enables access to the Records menu within the Database section in a project. The user can display the records present in the Project database. | Yes | Yes |
| Export and copy to clipboard | Enables access to export and to copy to clipboard from the Records page. | Yes | Yes |
| Records list | Enables access to the Records list menu within the Database section in a project. The user can search and filter for records in the Project database. | Yes | Yes |
| Export and copy to clipboard | Enables access to export and to copy to clipboard from the Records list page. | Yes | Yes |
| Actions | Enables access to the Actions menu on the Records list page, which includes various possible actions for the user. | Yes | Yes |
| Recycle As New | Enables access to modify selected records on the Records list page in a way that they would appear as new in the database. | Yes | Yes |
| Select agent | Enables access to modify the agent for selected records on the Records list page, excluding the ones that are new in the database. | Yes | Yes |
| Set disposition | Enables access to set a disposition for selected records on the Records list page. | Yes | Yes |
| Release dropped records | Enables access to release dropped records on the Records list page. | — | — |
| Mass email | Enables access to send a mass email to selected records on the Records list page using a predefined email template. | Yes | Yes |
| Assign address list | Enables access to assign an address list to selected records on the Records list page. | Yes | Yes |
| Mass value update | Enables access to mass update a field’s value for selected records on the Records list page. | Yes | Yes |
| Deactivate/Activate records | Enables users to deactivate or activate records within the project. | — | — |
| Ticket list | Enables access to the Ticket list page within a project, where the user can search, filter, and create tickets. | — | — |
| Quota | Enables access to the Quota page within a project. | Yes | Yes |
| Merge tickets | Enables access to the Merge tickets button on the Ticket list page, with which users can merge different tickets into a single one. | Yes | Yes |
| Split merged tickets | Enables access to split merged tickets on the Ticket list page, with which users are able to split tickets that had been previously merged. | Yes | — |
| Agents | Enables access to the Agents page of a project, where Agents can be assigned to the project and their queues, with the possibility to also set their skills. | Yes | Yes |
| Dispositions | Enables access to the Dispositions page of a project, where all the dispositions of the project can be managed. | Yes | Yes |
| Script editor | Enables access to the Script page of a project, where all the agent scripts of the project can be managed. | Yes | Yes |
| Tickets | Enables access to the Tickets page of a project, where fields and automations for tickets can be set up. | Yes | — |
| VCC Pay | Enables access to the VCC Pay page of a project, where payment-related settings can be edited for the project. | — | — |
| Recurring payment list | Enables access to the Recurring payment list of the project. | — | — |
| Cancel recurring payment | Enables the user to cancel a recurring payment from the recurring payment list. | — | — |
| VCC Pay transactions statistics/list | Enables access to the VCC Pay transactions list in a project. | — | — |
| Project-specific logs and statistics | Enables access to the Project-specific logs and statistics within a project. | Yes | Yes |
| Email log | Enables access to the Email log of a project, which contains all emails within the project. | Yes | Yes |
| CDR log | Enables access to the CDR log of a project, which contains all CDRs for calls within the project. | Yes | Yes |
| Allow data export | Enables users to export CDR log data from the interface. | Yes | Yes |
| Destination number added to the export | When enabled, destination phone numbers are added to the data export. | Yes | Yes |
| Chat log | Enables access to the Chat log of a project, which contains all Chat messages within the project. | Yes | Yes |
| SMS log | Enables access to the SMS log of a project, which contains all SMS messages within the project. | Yes | Yes |
| Call statistics (deprecated) | Enables access to the Call statistics of a project, which contains call-related statistics within a project. | Yes | Yes |
| User based statistics | Enables access to the User-based statistics of a project, which contains call and user-related data, including system and custom KPIs for the given project. | — | — |
| Inbound statistics | Enables access to the Inbound statistics of a project, which contains data and KPIs about inbound calls. | — | — |
| Notification if there’s no callable number | Enables access to set up a notification within the project if there are no callable numbers left. | Yes | Yes |
| Allocate dispositions to records | Enables access to allocate dispositions to records. | Yes | Yes |
| Delete dispositions allocated to records | Enables access to delete selected dispositions from records on the event page of a record. | Yes | Yes |
| Export editor | Enables access to the Export editor page in the Contact center part of the main menu, where users are able to set up export templates. | Yes | Yes |
| External extensions | Enables access to the External extensions page in the Contact center part of the main menu, where users are able to set up external extensions, which can be used for calling or transferring by agents. | Yes | Yes |
| Inbound processes | Enables access to the Inbound processes list page in the Contact center part of the main menu, where the user can oversee inbound processes and export them. | — | — |
| Mass project actions | Enables access to the Mass project actions page in the Contact center part of the main menu, where the user can bulk inactive projects or export their data. | Yes | — |
| Custom KPIs | Enables access to the Mass project actions page in the Contact Center part of the main menu, where the user can bulk inactive projects or export their data. | Yes | — |
| User Management | Enables access to the User Management section of the main menu. | Yes | Yes |
| Users | Enables access to the Users page, where the list of users having access to VCC Live can be managed. | Yes | Yes |
| Add user | Enables access to add a user on the Users page. | Yes | Yes |
| Edit user | Enables access to edit a user on the Users page. | Yes | Yes |
| Anonymize user | Enables access to anonymize all personal data of a user on the Users page. | Yes | Yes |
| VCC Live user management | Enables access to manage the data of VCC Live users. | Yes | Yes |
| Rights | Enables access to the Rights page, where all user rights can be managed. | Yes | — |
| Manage agent rights | Enables access to manage the rights of agent groups. | Yes | — |
| Manage supervisor rights | Enables access to manage the rights of supervisor groups. | Yes | — |
| Teams | Enables access to the Teams page within the Users section, where teams for VCC Live can be managed. | Yes | Yes |
| Manage agents in teams | Enables access to manage agents in teams by adding or removing them. | — | — |
| Manage supervisor in teams | Enables access to manage supervisors in teams by adding or removing them. | Yes | Yes |
| Internal chat | Enables access to use internal chat with which supervisors and admins can communicate directly with agents. | Yes | Yes |
| News for agents | Enables access to the News for Agents page, where agent news can be created and edited. | Yes | Yes |
| Tools | Enables access to the Tools section of the main menu. | Yes | Yes |
| Finance | Enables access to the Finance page within Tools, where transactions and invoices can be managed. | Yes | — |
| Phone number list | Enables access to the Phone number list page, where phone numbers can be managed and assigned to projects. | Yes | — |
| Monitoring | Enables access to the Monitoring section within the main menu. | Yes | Yes |
| Real-time monitoring | Enables access to the Real-time monitoring page within the Monitoring section. | Yes | Yes |
| Inbound wallboard | Enables access to the Inbound wallboard page within the Monitoring section. | Yes | Yes |
| Call wallboard | Enables access to the Call wallboard page within the Monitoring section. | Yes | Yes |
| Global logs and statistics | Enables access to the Logs and statistics section within the main menu, where global logs and statistics can be accessed. | Yes | Yes |
| View custom columns in logs and statistics | Enables the user to view custom columns within logs and statistics. | Yes | — |
| Add and edit custom columns in logs and statistics | Enables the user to add or modify custom columns in logs and statistics. | Yes | — |
| Global call statistics (deprecated) | Enables access to the Global call statistics page within the Logs and statistics section. | Yes | Yes |
| Disposition statistics | Enables access to the Disposition statistics page within the Logs and statistics section. | Yes | Yes |
| Global inbound statistics | Enables access to the Global inbound statistics page within the Logs and statistics section. | Yes | Yes |
| Weekly inbound statistics | Enables access to the Weekly inbound statistics page within the Logs and statistics section. | Yes | Yes |
| Quality management statistics | Enables access to the Quality management statistics page within the Logs and statistics section. | Yes | Yes |
| User state log | Enables access to the User state log page within the Logs and statistics section, where the user’s state history can be reviewed. | Yes | Yes |
| Project independent CDR search | Enables access to the Project independent CDR search page within the Logs and statistics section, where CDRs can be searched for independently of projects. | Yes | Yes |
| User activity log | Enables access to the User activity log page within the Logs and statistics section, where the user’s activities can be checked and traced. | Yes | Yes |
| User activity log parameters | Enables the display of detailed parameters about each user activity that was logged. | — | — |
| Webhook statistics | Enables access to the Webhook statistics page within the Logs and statistics section. | Yes | Yes |
| Finance | Enables supervisors and admins access to finance-related data and also to sign up for the Balance newsletter. | Yes | — |
| Commission related to agent | Enables access to view commission data that relates to agents in statistics. | Yes | — |
| Other financial data | Enables access to view other financial data in statistics. | Yes | — |
| Call cost | Enables access to view call cost data in statistics. | Yes | — |
| Quality Management: Delete rate | Enables the user to delete a quality management rating that was previously assigned. | Yes | — |
| Quality Management: Modify rate | Enables the user to modify a quality management rating that was previously assigned. | Yes | Yes |
| Quality Management: Modify rate | Enables the user to access quality management. | Yes | Yes |
| View saved changes | Enables access to view saved changes on various interfaces. | Yes | — |
| Call support | Enables access to the functionality (at the bottom right of the screen) with which supervisors and admins can directly call support from VCC Live. | Yes | Yes |
| Dashboard | Enables access to Dashboards, where users can display system and custom KPIs on widgets and share them with other users. | Yes | — |
| Sensitive data | Enables access to sensitive personal data. | Yes | Yes |
| Play voicefile | Enables access to play a voicefile where available. | Yes | Yes |
| Download voicefile | Enables access to play a voicefile where available. | Yes | Yes |
| Moving voicefile to trash | Enables access to move a voicefile to trash where available. | Yes | Yes |
| Delete voicefile | Enables access to delete a voicefile where available. | Yes | — |
| Disposition based voicefile delete | Enables access to set up disposition-based voicefile delete on the dispositions page within a project.. | Yes | — |
| View Dashboard | Enables access to view dashboards that were shared with the users by URL. | Yes | — |
| Technical notifications | Enables access to sign up for technical notifications. | Yes | Yes |
| Legal notifications | Enables access to sign up for legal notifications | Yes | — |
Tip: It is possible to select more than one user rights group and then bulk edit them. This makes it easier to compare various user rights groups at the same time.
- To select more than one group, click on them while holding down the Ctrl button on your keyboard.
- To select a range of groups, click on one group, then click on any further groups while holding down the Shift button on your keyboard.
2.8 Grant Access to the System for Users Based on IP Address
Access to VCC Live can also be granted based on IP address, so only users logging in from a specific IP address are able to use your project’s interfaces. To set this up, follow these steps:
- Go to VCC Live menu > User Management > Rights
- Select the right group you want to edit.
- Enter the IP address(es) you want to grant access to your project, based on the user rights group set up.
- If you want to grant access to the IP address you are using at the moment, click on Insert my IP address. This copies and pastes your IP address into the field.
- You can also enter one or more IP addresses or IP ranges separated by line breaks (eg, IP range format: 217.20.130.99/255.255.255.0)
- Click Save to save your settings.
3. Teams
3.1 Introduction
The team system used in VCC Live’s user management structure allows you to handle more than one user at once. As a team usually consists of two or more users, this is useful for assigning several users to a project and handling them together. One team can be assigned to several projects, and several teams can be assigned to one project.
Only members of the assigned team can be assigned to the project, log in, and see its contents.
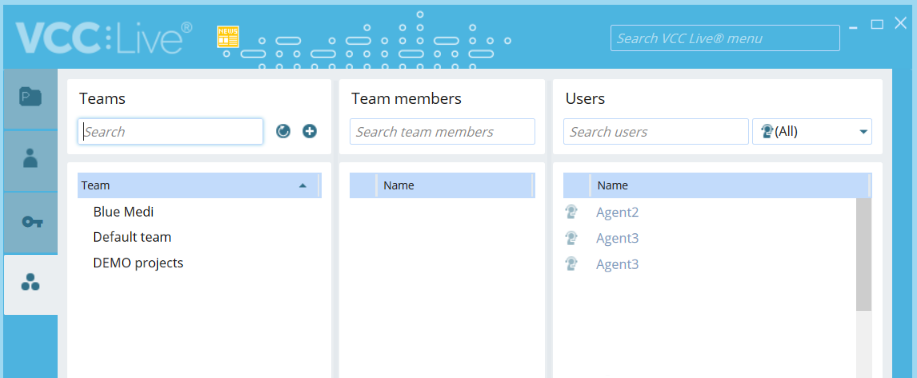
3.2 Create a team
Here’s how you can create a team, and add users to it.
- Go to VCC Live menu > User Management > Teams
- Click on the
 icon to create a new team
 - Type in a name for the team and press OK.
- Select your newly created team in the left-hand side column, and add users to it by drag-and-dropping users from the right-hand side column into the middle one, which shows a list of the selected team’s team members.
- You can search and filter the User list by using either the search field or the dropdown menu above the user’s list.
3.3 Add or remove a team from a project
To assign one or more teams to your project, follow these steps:
- Select your project, then go to the Teams tab.
- From the Teams column, drag-and-drop the teams you want to use in your project to the right-hand side column (Added).
- By drag-and-dropping teams from the Added column to Teams, you can remove teams from your project.
4. User management example case
Let’s say you manage an external team hired for a specific project. You have a team of supervisors for this project (named External Supervisors), who supervise a selected group of agents (named External Agents). Both these external supervisors and agents need to have lower-level rights than your respective normal supervisors and agents.
To set up the above, you need to perform the following steps:
- Create a user right group for your External Supervisors and External Agents by
- Copying the regular supervisor and agent user right groups, and
- Editing them in VCC Live > User management > Rights, to revoke some of the access rights.
- Create new users and assign them to the newly-created Supervisor and Agent right groups, or modify user groups of already created users at VCC Live > User management > Users.
- Create a separate team for all external users (both supervisors and agents) in VCC Live menu > User Management > Teams
- Add both the newly-created separate team and your regular Admin team to the project they need to work on, so your Admin team can supervise the work of the External Team.
By doing this the External Supervisors will only be able to see the External Agents in the various statistics and monitoring interfaces, including the User menu, and will only be able to manage projects that their team is added to.
Comments
Can’t find what you need? Use the comment section below to connect with others, get answers from our experts, or share your ideas with us.
There are no comments yet.