Mass Email
Estimated reading time: 8 minutes | Target users: Everyone
Using VCC Live’s mass email feature is a powerful marketing tool for reaching a big number of users at once via email. Since every user at these days has an email address, running an email campaign is considered to be one of the most popular means of reaching your customers: it allows to display more content than an SMS does, and unlike a phone call, it reaches your target when it is most suitable for them (when they check their emails). By emphasizing your message with different formatting options and/or pictures, you can create attractive content and high response rates with the help of mass emailing.
In this lesson, you will learn:
- How to set up and modify a mass email account
- How to send mass emails
- How to check the results of your email campaign
1. Send Mass Emails
Sending an email template to a selected number of your contacts has never been easier. All you need to do is to create an email template, then choose your contacts from the list you have imported to VCC Live (you can select all or you can filter your results with specified criteria), then send the email template.
1.1 Set Up an Email Template
To send mass emails, first you have to create an email template. In order to do that, simply follow the below steps:
- Select a project from the project list, then select Channels > E-mail.
- Press New email template.
- Enter the name of the template in the Template name text field.
- Enter a subject.
- Select a database field in the Recipient drop-down list to set the recipient.
- Enter one or more email addresses in the CC and BCC text fields if required.
- Enter or select an email address from the Sender drop-down list. This address is displayed as the sender to the recipient.
- If it is not marked, mark the Active checkbox.
- Select the Message tab, then enter and format the desired message, or enrich it with image and video.
- Select the Attachments tab to insert an attachment. It is possible to add attachments based on conditions, where an attachment is inserted based on single or multiple field values).
- Press Save.
Tip: You can use HTML to customize your email with various style and formatting options.
1.2 Select your Recipients
After setting up your email template, you can select a number of contacts you wish to send your email to from your database. In order to do that, just do the following:
- Select your project from the project list, then select Database > Records list.
- In the General filter parameters tab, specify the filter settings in order to find the desired range of your contacts. If you want all of your records listed, simply press Search without setting up the filter sections.
- In the Results pane (on the right), you will see your records listed. If you approve that these are records you want to send your email, then click on Actions > Mass email.
- Select your email template, and click on Send.
2. Set up a Mass Email Account
A mass email account is used to store disposition settings, which react to various incoming events. For example, if you would like to explore which customers may be interested in your product, then you can set up the disposition “Interested and to be called back” for customers, who clicked on the link you included in your email. This way, you will have a list of users who might be interested in further information about your business or product.
2.1 To create a mass email account:
- From the VCC Live menu, select Contact Center > Global Settings.
- Select the Email accounts tab.
- Press New account.
- Enter a name for the setting.
- Select Mass email from the Protocol drop-down list.
- Enter your email address and domain, then press Save.
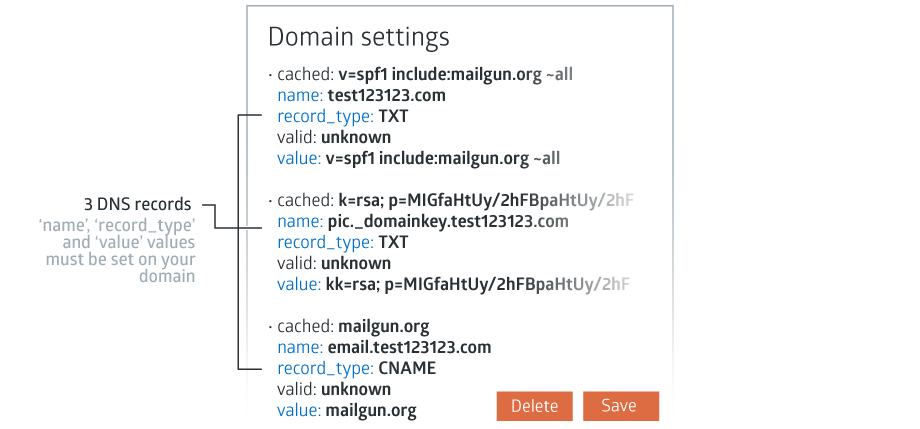
- The Domain settings pane appears, displaying 3 DNS records (2 TXT record type, 1 CNAME record type). The following field values must be set on your domain: name, record_type, and value.
- Once you have finished, please let your contact person at VCC Live know. Your credentials must be validated at our end.
3. Specify the Mass Email Settings for Your Template
After your credentials have been validated by VCC and your mass email account is created, you can then assign this account to your email templates and set up various rules for trigger events. In order to adjust these settings, just do the following steps:
- Select a project from the project list, then select Channels > E-mail.
- Press
to see your email templates list, then select a template.
- Select the Mass email tab.
- Under Sender email account, select your previously created mass email account.
- Set the desired settings. The system adds the selected dispositions to each record based on response. Eg. If a user opens your email, it presumably means that they are interested in the product / content of the email. Therefore they indeed belong to your target group: setting up the Opened field as Callback means that every opened email would receive a Call back disposition, so in the end there will be a list of potential customers who can be called back by agents.
- Press Save.
4. Acquire Information on Your Email Performance
Once you have sent your emails, it is possible to search and filter your emails based on their performance, similarly to the Records list pane. In this field, you can see how your customers responded to your emails and what status did the emails receive. Furthermore, in case of ‘Sending failed’, you can learn what error description was attached to the email.
To access Email log, follow the below steps:
- Select your project from the project list, then select Logs and Statistics > Email log.
- In the General tab, specify the filter settings in order to find the desired range of your emails. If you want all of your emails listed, simply press Search without setting up the filter sections.
- In the Results pane (below), you will see your emails listed. By using your scroll bar at the bottom, you can see further information on your email events such as Disposition or Status.
- You can export your results in txt or csv by clicking on Export.


Comments
Can’t find what you need? Use the comment section below to connect with others, get answers from our experts, or share your ideas with us.
There are no comments yet.