IVR Settings – Use Cases
Estimated reading time: 8 minutes | Target users: Supervisors
IVR (Interactive Voice Response) is an automated telephony system that can interact with your callers, gather information from them, or route calls to the appropriate recipients.
In this lesson, you will find out the following:
- The Basics of IVR
- Where to set up an IVR menu
- Saturday as a working day (inbound)
- Weekdays as Holidays (inbound)
- Planned maintenance (inbound)
- Weekdays as holidays (outbound)
- Setting up a redirecting phone number for one or more phone numbers (outbound)

1. The Basics of IVR
The IVR can play pre-recorded messages with a list of options to choose from. The callers can use their phone keypad to navigate their way around the IVR menu or choose the option they need.
Things You Can Do With the IVR
It’s no coincidence that IVR is often called the heart of inbound operations. IVR defines how your clients can interact with your contact center. IVR is essentially the first layer of interaction between the clients and your organization.
2. Where to set up an IVR menu
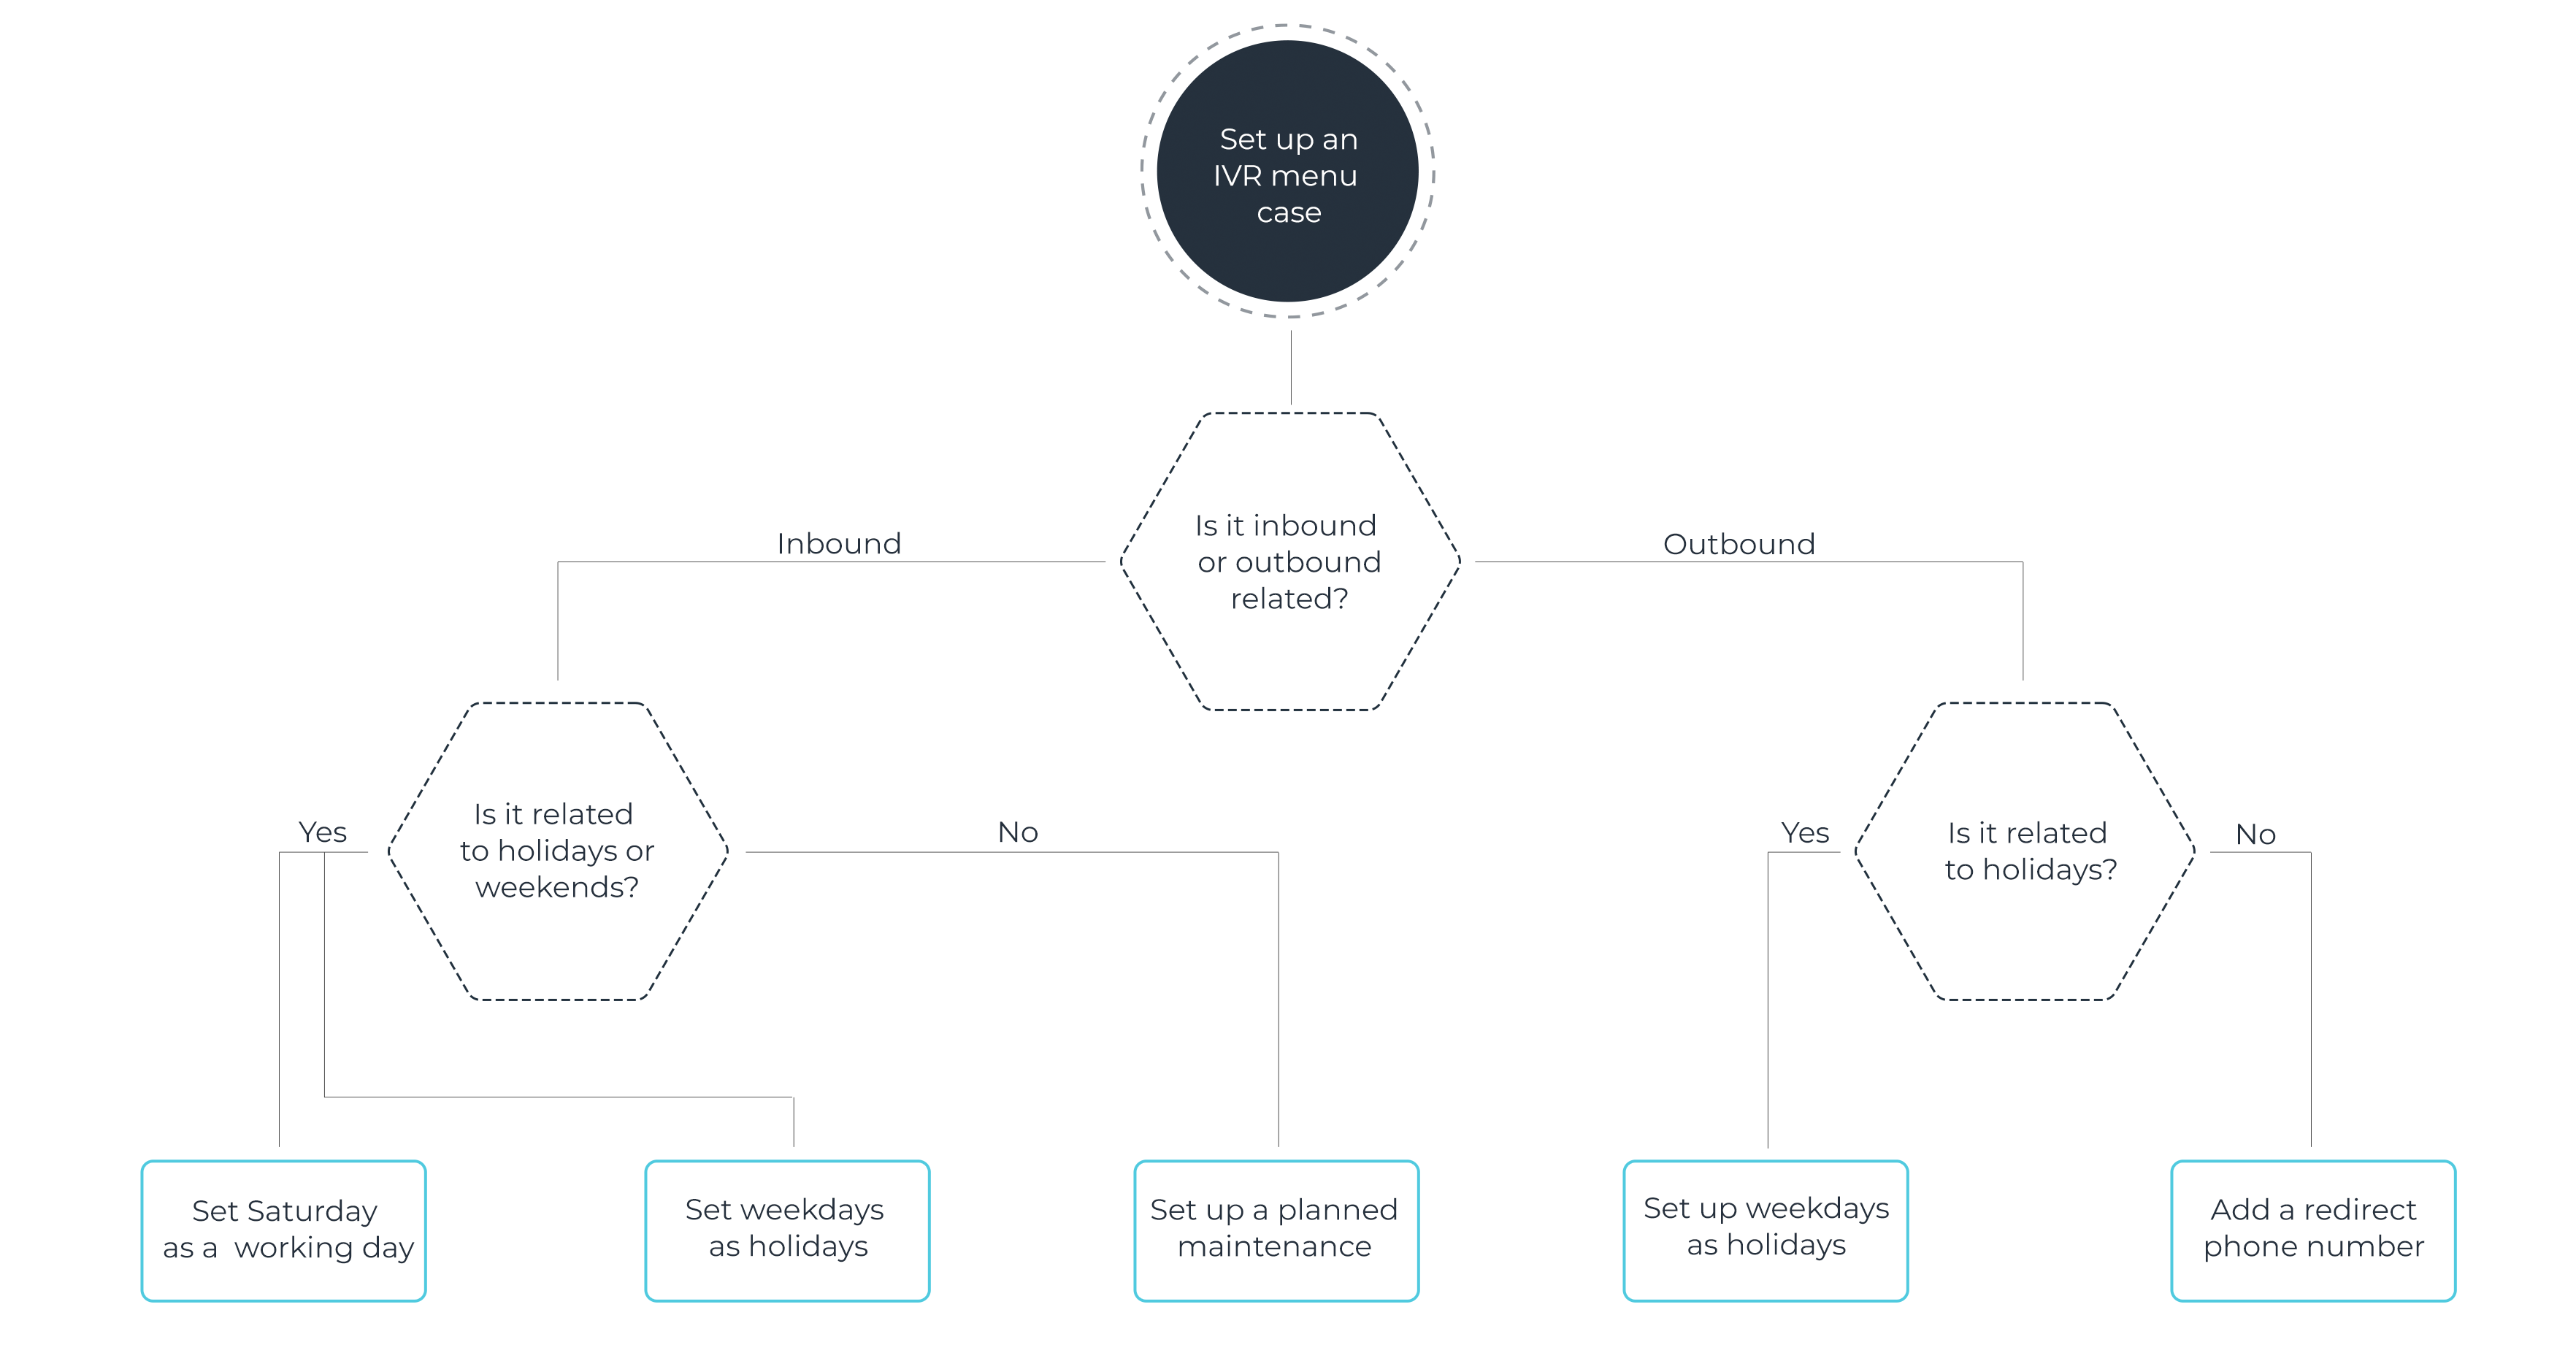
Navigate to your project, then Channels > Voice > Inbound. The Processes tab on the Inbound worksheet is where you can create your IVR menu. An inbound call consists of processes, which is a set of actions, functions, automations, or conditions. It allows you to define what happens when a caller reaches out to you. There is a list of inbound processes you can use for creating your IVR menu, but let us show you some examples that would explain creating IVRs in a much more straightforward manner.
In the below subchapters, we introduce you to how to set up the most common IVR menus for VCC Live.
2.1 Inbound – Saturday as a working day
- Navigate to your project > Channels > Voice > Inbound
- Click on Actions > Timesheet
- Enter a name for your Timesheet, eg. ‘Working hours’
- Add Parameters to your timesheet where you specify the timeframe for the opening hours of your business.
Example: set the timeframe from 09:00 to 17:00, from Monday to Friday, then Add a new parameter and set the time frame 09:00 to 17:00 on Saturday. With this setting, you would be able to receive calls on Saturday, just like on any other weekday. - Then you can add the IVR process to your Timesheet, and add IVR buttons and further processes.
- Click Save, and then Apply inbound changes.
Once that working Saturday is over, you can simply head back to this setup and delete the Saturday row by clicking on the trash icon next to it. Then again, press Save and Apply Inbound Changes.
Tip: You can specify the year and month for your selected days of the week.
2.2 Inbound – Weekdays as Holidays
- Navigate to your project > Channels > Voice > Inbound
- Click on Actions > Timesheet to add a new timesheet
- Enter a name for your timesheet, eg. “January 1”
- Add the parameter that marks the day and timeframe for your planned maintenance – in this case, January 1, 08.00 – 17.30
- Then you can add further processes to your timesheet, such as a Playback process, that plays a sound file informing your customers that at that given moment there is no customer support available. The script for this message can be included in the Note section of the process.
- Click Save, and then Apply inbound changes.
Tip: Setting a time for the end of a period means that calls in that particular minute don’t qualify for that process anymore. As an example, if you have used 08.00 – 17.30, then a call at 17.30:21 won’t move to this process (but a call at 17.29:59 will)
Note: If you have a timeframe defined for a specific workday in a timesheet that is shorter than the timeframe defined for that workday in general in the same timesheet, then the longer timesheet will be applied. For this setup, we recommend creating a new, separate timesheet process.
2.3 Inbound – Planned Maintenance
- Navigate to your project > Channels > Voice > Inbound
- Click on Actions > Timesheet to add a new timesheet
- Enter a name for your timesheet, eg. ‘Planned maintenance’
- Add the parameter that marks the day and timeframe for your planned maintenance. For example, 2021 January 6 / 00:00-23:59.
NB: Our system uses a date-focused filtering option in each case, meaning that filter criteria provided with dates override the “weekday-checkbox” filter criteria
NB: The entered filter criteria should not overlap with each other, as this would result in unsatisfactory results. - Add further processes to your timesheet, such as a Playback process (that plays a sound file informing your customers that at the moment you are facing technical issues), or a Redirect process where you can provide a phone number the customer is directed to.
- Click Save, and then Apply inbound changes.
Tip: Setting a time for the end of a period means that calls in that particular minute don’t qualify for that process anymore. As an example, if you have used 00.00 – 23.59, then a call at 23.59:21 won’t move to this process (but a call at 23.58:59 will)
2.4 Outbound – Weekdays as Holidays
The Outbound IVR is an automatic dialing mode that is used to establish connections between customers and VCC Live’s system without involving an agent. If a call is answered, the system then automatically transfers it to a specific inbound process.
You can find a practical overview and detailed set of instructions about Outbound IVR on our tutorial site. In this article, we focus on how to edit your active Outbound IVR project and set the active timeframe, so the Outbound IVR would run on Holidays too.
- Navigate to project > Channels > Voice > Outbound
- Under the “Call Answered – Disposition”, add a new timeframe parameter by clicking on the Add button
- Set your parameters, eg. Dec. 24, 8:00 – 17:00
- Click Save
2.5 Outbound – Set a Redirect Phone number for your Outbound IVR
Let’s say your project’s Outbound IVR has reached a customer, who wants to talk to one of your agents. In the below example, let’s make number 5 on the dialpad to work as a redirecting action to your agent.
- Navigate to project > Channels > Voice > Inbound
- Select the IVR menu process, and navigate to number 5.
- Select Actions, and then add the Redirect process.
- Enter a name for the process, then type the phone number you want your customer to be directed to. The phone number’s format is country code + area code + phone number, without spaces or special characters. Example: 3611234567
- Click Save and Apply inbound changes
Tip: In case you want to add more numbers, just add some more Redirect processes to your IVR button. If different opening hours are assigned to these phone numbers, then first create a separate project with the specific opening hours, then apply the Jump and Label processes to this Redirect process.
A full list and description of our Inbound processes can be found here.


Comments
Can’t find what you need? Use the comment section below to connect with others, get answers from our experts, or share your ideas with us.
There are no comments yet.