IVR (Sync)
IVR Webhook (formerly known as IVR API) helps you create an agent-free, highly-customized, interactive environment between your customer and company, based on your CRM or ERP system. Callers can leverage IVR menus using their phone keypads as DTMF codes. They are then transferred as HTTP(S) requests to your ERP or CRM system, which needs to be replied to based on your business logic.
Table of Contents
- Typical Uses
- Variables
- System Variables
- User Variables
- Requests
- HTTP method is GET/DELETE
- HTTP method is POST/PUT
- Content type is form
- Content type is JSON
- Response
- Response Requirements and Limits
- Content type is application/JSON or text/JSON
- Content type is text/x-ini
- Content type is text/plain (or anything else)
- Setting Up
- To Add a IVR Webhook Process
- IVR Webhook Process Parameters
Typical Uses
- Caller authentication using caller number and/or PIN
- Personalised interactive voice menu
- Balance confirmation read-back (TTS)
- Utilities consumption measurements
Variables
You can use system and user variables in the URL and request body.
System Variables
| variable name | description |
|---|---|
| customer | Customer identifier |
| projectid | Project identifier |
| source | Caller phone number |
| destination | Called phone number |
| uuid | Call’s unique identifier |
| vccsys_shortid | Call’s short identifier |
User Variables
| icon | IVR action’s name | description |
|---|---|---|
| Get digits and playback | Any number typed in during a phone call. Customers can provide you with data, for example a customer identification number, using a keypad. You can also add a recorded voice file before the data is inputted. The data is assigned a variable that you can use in other processes. | |
| Transfering data via HTTP | You can refer to variables and forward the data to a specific system via APIs. | |
| Set variable | You can set variables. | |
| Query data | You can assign field values to variables. |
Requests
A variable can be used in a HTTP(S) URL and body. You can refer to a variable as ${variable_name}.
Note: HTTP Body content can only be used if HTTP method is set to POST or PUT.
HTTP method is GET/DELETE
URL: https://example.com?key1=${variable1}&key2=${variable2}&key3=string
Body content: <empty>
HTTP method is POST/PUT
Required format of the URL and Body content depends on the Content type you select.
Content type is form
URL: https://example.com
Body content: key1=${variable1}&key2=${variable2}&key3=string
Content type is JSON
URL: https://example.com
Body content:
{
   "key1": "${variable1}",
   "key2": "${variable2}",
   "key3": "string"
}
Response
An appropriate response should be sent by your system to set one or more variables, which may affect the IVR process, making the process dynamic, for example, a value can be read back to the customer. The response can define new variables and also override existing ones, except system variables. If successful, the HTTP response code should be 200 OK.
Response Requirements and Limits
- Connection timeout: 5 sec
- Response timeout: 5 sec
- Response key/value limit: max. 100
- Body content content size limit: 65536 byte
- Value length limit: 256 characters
- Key name: lowercase alphanumerics (a-z, 0-9 and low_dash, first character must be a letter or low_dash)
Content type is application/JSON or text/JSON
Note: A JSON response can contain up to three-level depth objects (key/value pair). Values can be BOOLEAN, FLOAT, INT and STRING data.
Body content:
{
   "key1": "value",
   "key2": 123,
   ...
   "key100":"value"
}
Content type is text/x-ini
Body content:
key1=value1
key2=123
key3=true
...
key100=value100
Content type is text/plain (or anything else)
Body content: format should be a single number or string, that will be stored in the variable previously set in the Set variable text field.
Setting Up
VCC Live IVR Webhook can be set up by adding the IVR Webhook process to your inbound processes in VCC Live Desk .
Note: If you need assistance regarding the procedure, please contact our Support Team.
To Add a IVR Webhook Process
- Select a project from the project list, then select Channels > Voice > Inbound.
- On the Actions tab, select a timesheet or macro, then press Actions, and select IVR Webhook.
- Select the item you just added. The properties are located on the right.
- Set the desired parameters. See IVR Webhook Process Parameters section.
- Press Apply inbound changes.
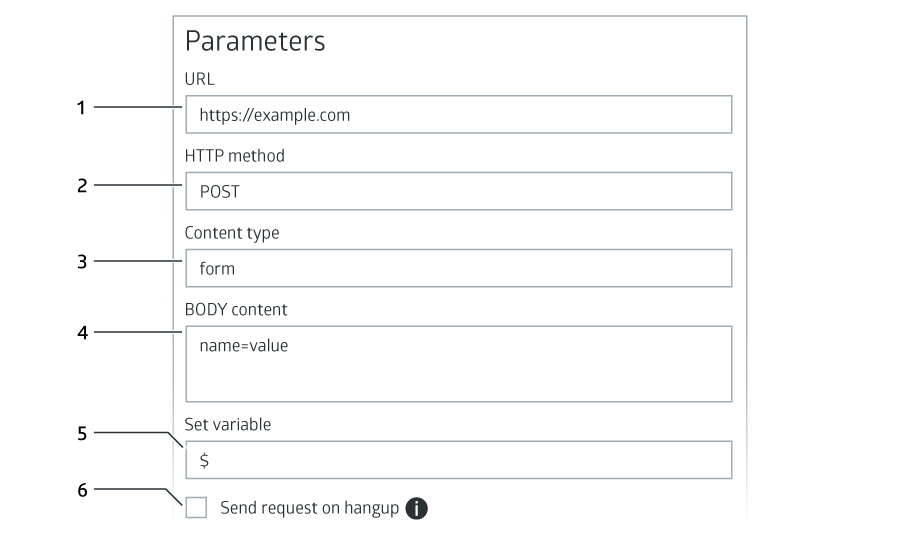
IVR Webhook Process Parameters
| name | description |
|---|---|
| 1. URL | Target URL you want to transfer data to. |
| 2. HTTP method | Method of sending: POST, GET, PUT or DELETE. |
| 3. Content type | Content type: form, json. |
| 4. Body content | Body content, available for POST and PUT methods only. |
| 5. Set variable | The variable that will store the received reply from the URL. |
| 6. Send request when call ends | If enabled, data is sent on hang up, and the system disregards the response. |

Note: the received response (stored as a variable, e.g.: vcc_variable) can be used to transfer the call for specific processes or can for a Read-back process. (e.g. balance read-back, customerid read-back).
Warning: We strongly recommend using HTTPS instead of HTTP.


Comments
Can’t find what you need? Use the comment section below to connect with others, get answers from our experts, or share your ideas with us.
There are no comments yet.